Deploy with a Gold Master Image
This topic applies only to the following SolarWinds Platform products:
SolarWinds Observability Self-Hosted
DPAIM — LA — NAM — NPM — SAM — SCM — SRM — VMAN*
Use a Gold Master image when you want to maintain a master image of agent software that is copied when a new Windows server is provisioned. This saves time for virtual machines and physical servers. Whenever a new server is brought online using this image, the agent will already be installed.
Disable the SolarWinds Orion agent service before you create your gold master, and then start it on the remote computer when the gold master is cloned.
Install an agent offline
-
Click Settings > All Settings in the menu bar.
-
Under Product Specific Settings, click Agent & Remote Collector. Then, on the Agent Management view, click Download Agent Software.
In Orion Platform 2020.2 and earlier, click Agent Settings to get to the Agent Management view with the Download Agent Software link.
- Click Windows, and click Next.
- Click Distribute via a Golden Master Image, and click Next.
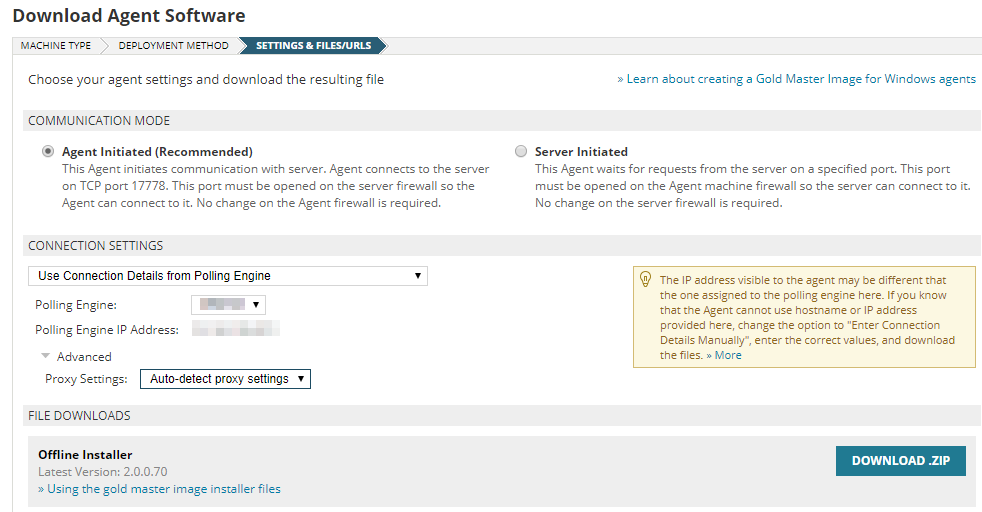
- Select the agent communication mode.
For agent-initiated communication, enter the polling engine you want the agent to use. You may need to manually enter the polling engine information if the IP address is different from what the SolarWinds Platform server reports. This happens when the monitored host is behind a NAT or proxy device. In these cases, enter the IP address of the SolarWinds Platform server or the additional polling engine as it is accessible from the host where the agent will be installed.
To use an existing polling engine, select Use Connection Details from Polling Engine, and then select a polling engine from the list.
To manually enter the polling engine IP address, select Enter Connection Details Manually, and then enter the host name and IP address. The IP address is required. Use the host name and IP address of the polling engine that you can access from the client.
If a proxy is required, expand Advanced, and specify the proxy settings.

For server-initiated communications, enter your agent communication port number. The default port is 17790.
- Click Download .ZIP, and save the file.
- Extract the contents of the ZIP file and copy the extracted files to the master image computer.
- On the image computer, run the Command prompt as administrator. Without the administrator mode, you may not be able to copy files or create the scheduled task when you run the batch file.
- In the command prompt, go to the directory where you copied the files and run
setup.bat.This process creates a SolarWinds directory in AllUsersProfile, copies three files into the directory, and creates a scheduled task to install the client when the computer reboots.
- Reboot the computer. During the reboot, the agent is installed and the scheduled task is removed.
When the installation is successful and communication between the agent and the SolarWinds Platform server is successful, the agent is listed on the Manage Agents page.
Enable server-initiated communication on deployed agents
If you are deploying a server-initiated agent, you need to enable agent communication with your SolarWinds Platform server.
- Click Settings > All Settings in the menu bar.
- Under Node & Group Management, click Manage Agents.
- Click Add Agent > Connect to a previously installed agent > Next.
- Enter a name for the agent, and click Server-initiated communication.
- Enter the IP address of the node where the agent is deployed.
If you have set up a shared secret, provide the password. - Click Advanced and verify that you have specified the correct port for the agent. The default port is 17790.
- Click Submit.
When the installation is successful and communication between the agent and the SolarWinds Platform server is successful, the agent is listed on the Manage Agents page.
