- Release Notes
- SolarWinds Observability Self-Hosted 2025.1 release notes
- SolarWinds Observability Self-Hosted 2024.4.1 release notes
- SolarWinds Observability Self-Hosted 2024.4 release notes
- SolarWinds Observability Self-Hosted 2024.2.1 release notes
- SolarWinds Observability Self-Hosted 2024.2 release notes
- SolarWinds Observability Self-Hosted 2024.1.1 release notes
- SolarWinds Observability Self-Hosted 2024.1 release notes
- SolarWinds Observability Self-Hosted 2023.4.2 release notes
- SolarWinds Observability Self-Hosted 2023.4.1 release notes
- SolarWinds Observability Self-Hosted 2023.4 release notes
- SolarWinds Observability Self-Hosted 2023.3.1 release notes
- SolarWinds Observability Self-Hosted 2023.3 release notes
- SolarWinds Observability Self-Hosted 2023.2.2 release notes
- SolarWinds Observability Self-Hosted 2023.2.1 release notes
- SolarWinds Observability Self-Hosted 2023.2 release notes
- SolarWinds Observability Self-Hosted 2023.1.1 release notes
- SolarWinds Observability Self-Hosted 2023.1 release notes
- SolarWinds Observability Self-Hosted 2022.4.1 release notes
- SolarWinds Observability Self-Hosted 2022.4 release notes
- SolarWinds Observability Self-Hosted 2022.3 release notes
- SolarWinds Observability Self-Hosted release history
- SolarWinds Platform release history
- SolarWinds Platform release notes aggregator
- Install or Upgrade
- SolarWinds Platform Products Installation and Upgrade Guide
- About installing or upgrading SolarWinds Platform products and scalability engines
- Prepare to install or upgrade SolarWinds Platform products
- Install SolarWinds Platform products in a new environment
- Install an additional polling engine, additional web server, or HA server in a SolarWinds Platform deployment
- Options for upgrading scalability engines
- Upgrade an existing deployment
- Add a new SolarWinds Platform product to an existing deployment
- Troubleshoot a SolarWinds Platform product installation
- Scalability engine guidelines for SolarWinds products
- Deploy SolarWinds Platform products to Amazon Web Services
- Deploy SolarWinds Platform products to Microsoft Azure
- Install SolarWinds Platform products using Azure Marketplace in Microsoft Azure or Microsoft Azure Government
- Install SolarWinds Platform products using Amazon AWS Marketplace (CloudFormation)
- Deploy the SolarWinds Platform in a multi-tenant way
- Run the SolarWinds Installer in silent mode
- Reasons to Upgrade SolarWinds Platform Products from a 2012 Infrastructure
- SolarWinds Platform Migration Guide
- Migrate the SolarWinds Platform server with minimal downtime
- Migrate SolarWinds Platform products to a new server using the same IP and hostname
- Migrate SolarWinds Platform products to a new server with a new IP or hostname
- Migrate the SolarWinds Platform database to a new server
- Migrate the SolarWinds Platform database to or from a Microsoft Azure database solution
- Migrate the SolarWinds Platform database to Amazon RDS for SQL Server
- Upgrade the Orion SQL Server without migration
- Get Started
- Administer
- SolarWinds Observability Self-Hosted and SolarWinds Platform Administrator Guide
- SolarWinds Platform features
- What is SolarWinds Observability and how does it work
- Licensing model for SolarWinds Observability Self-Hosted
- SolarWinds Observability Self-Hosted licensing model
- License SolarWinds Platform products in the SolarWinds Platform Web Console
- Evaluate SolarWinds Platform products
- Activate your SolarWinds Observability Self-Hosted license
- Activate licenses for SolarWinds Platform products
- Upgrade licenses in the SolarWinds Platform
- Assign licenses for SolarWinds Platform products to a server
- Migrate SolarWinds Platform licenses from one server to another
- Synchronize licenses in the SolarWinds Platform
- Connect SolarWinds Observability Self-Hosted to SolarWinds Observability SaaS
- Anomaly-Based Alerting in SolarWinds Observability Self-Hosted
- View and manage security data
- Discover and add network devices to SolarWinds Platform
- Discover your network for the SolarWinds Platform with the Discovery Wizard
- Add nodes to SolarWinds Platform using Active Directory
- Credentials for Active Directory discovery in SolarWinds Platform
- Automatically add discovered nodes to SolarWinds Platform
- Advanced discovery in the SolarWinds Platform
- Add discovered devices to the SolarWinds Platform
- Add a single node for monitoring to the SolarWinds Platform
- Choose the polling method to use in the SolarWinds Platform
- Use a list of IP addresses to discover your network
- Manage scheduled discovery results in the SolarWinds Platform
- Set the default SNMP version for wizards
- Minimize SNMP processing load during discoveries in the SolarWinds Platform using the Discovery Ignore List
- Manage devices in the SolarWinds Platform Web Console
- Delete devices from monitoring
- View node data in tooltips
- Edit node properties
- Change the polling method for a node
- Promote a node from ICMP to SNMP monitoring
- Change polling engine node assignments in the SolarWinds Platform
- View the resources and statistics monitored on a node
- Monitor volumes in the SolarWinds Platform
- Suspend data collection or alerts for nodes in Maintenance Mode
- Poll and rediscover devices immediately
- Calculate node status in the SolarWinds Platform
- Node status contributors
- Status Rollup Mode in the SolarWinds Platform
- Group objects and mirror network dependencies in the SolarWinds Platform Web Console
- View events, alerts, traps, and syslogs in the SolarWinds Platform Web Console Message Center
- Monitor hardware health
- Monitor Hardware Health for Nutanix clusters
- Nutanix Hardware Health monitoring requirements
- Set up Hardware Health monitoring for Nutanix clusters
- Display Hardware Health data for Nutanix clusters
- Understand Nutanix sensor status mapping
- Manage alerts and reports for Nutanix clusters
- Troubleshoot Nutanix Hardware Health monitoring
- Monitor Hardware Health for Nutanix clusters
- Monitor Cisco UCS devices in the SolarWinds Platform
- Monitor cloud instances and VMs
- Recommendations and requirements for monitoring cloud accounts
- Configure cloud accounts for the SolarWinds Platform
- Find cloud account credentials
- Add the first cloud account to the SolarWinds Platform
- Explore cloud instances and VMs
- Cloud service polling overview
- Throttling overview: control resources used by your cloud instance/VM
- Manage your cloud infrastructure
- Access the Cloud Infrastructure Monitoring Settings page
- Add another cloud account
- Manage existing cloud accounts
- Edit cloud account properties
- Choose cloud instances/VMs to monitor
- Perform actions against cloud instances and VMs: stop, reboot, delete, unmanage, poll now, or turn polling on/off
- Manage a cloud instance or VM as a SolarWinds Platform node
- Remove a cloud account
- Edit retention settings for cloud-related statistics
- Edit global thresholds for cloud monitoring
- Create cloud application monitors and templates
- Manage cloud monitoring alerts
- Troubleshoot cloud monitoring
- Troubleshoot cloud monitoring with PerfStack
- Monitor containers in the SolarWinds Platform
- Monitor virtual infrastructure
- Quality of Experience
- Monitor Quality of Experience metrics
- Poll devices with SolarWinds Platform Agents
- Modify global agent deployment and update settings
- Agent communication modes
- Deploy agents to nodes
- Deploy an agent with the Add Node wizard
- Deploy agents to monitored nodes
- Deploy the agent manually to a Windows computer
- Deploy SolarWinds Platform Agents manually to a Linux/Unix-based computer
- Credentials and privileges used on Linux/Unix-based computers
- Mass deploy an agent on Windows
- Deploy agents on Linux/Unix-based computers through a repository
- Deploy with a Gold Master Image
- Deploy an agent with Patch Manager
- Prerequisites for deploying agents on Windows Core Servers
- Deploy Windows agents in the cloud
- Manually deploy an agent on Amazon Web Services
- Automatically deploy a Windows agent to established instances on Amazon Web Services
- Automatically deploy SolarWinds Platform Agent on Azure VMs
- View agent connections and status, update agents, or manage agents
- Edit agent settings
- Track your polling method
- View the status of agent plug-ins
- Edit agent connection settings or reprovision the agent once deployed
- Connect to or register a previously installed agent to modify connection or update settings
- Migrate agents from one Orion instance to another
- Use a group policy to migrate agents on Windows
- Redeploy agents from the SolarWinds Platform Web Console to a monitored node
- Change the agent communication mode on the remote node
- Change the agent port to match the open port on the SolarWinds Platform server
- Agent polling method
- View logs and events with the Log Viewer
- Log Viewer installation scenarios
- Log Viewer feature comparison
- Evaluate Log Analyzer
- Log Viewer licensing model
- Explore the Log Viewer
- Create custom log-processing rules in Log Viewer
- Duplicate rules
- Reorder custom rules in Log Viewer
- Import and export rules
- Legacy rule migration and LA/LV feature comparison
- Run external program variables in Log Viewer
- Integrate SolarWinds Platform alerts with Log Viewer
- Log forwarding in Log Viewer
- Search and filter historical event logs in Log Viewer
- Filter entry details in Log Viewer
- Drop unwanted event logs in Log Viewer
- Log Analyzer alert variables for syslogs and traps
- Set Log Viewer storage and search retention period
- Monitor Syslog messages
- Monitor SNMP traps
- Alert Integrations in the SolarWinds Platform
- Troubleshooting environmental issues with Performance Analysis dashboards
- Use alerts to monitor your environment with the SolarWinds Platform
- Alert preconfiguration tasks in the SolarWinds Platform
- Configure the default information in the email action for SolarWinds Platform alerts
- Best practices and tips for alerting in the SolarWinds Platform
- Navigate to the Alert Manager in the SolarWinds Platform
- Add an SMTP server in the SolarWinds Platform
- Create new alerts to monitor your environment with the SolarWinds Platform
- Set alert properties in the SolarWinds Platform
- Define the conditions that must exist to trigger an alert in the SolarWinds Platform
- Define the conditions that must exist to reset an alert in the SolarWinds Platform
- Schedule when an alert monitors your environment
- Define what happens when an alert is triggered in the SolarWinds Platform
- Define what happens when the alert is reset in the SolarWinds Platform
- Review the alert's configuration in the SolarWinds Platform
- Reduce alerting noise in the SolarWinds Platform
- Complex trigger conditions in the SolarWinds Platform
- Alerts with multi-element triggers in the SolarWinds Platform
- Use duration in the trigger for SolarWinds Platform alerts
- The 'Do Not Alert' alert in the SolarWinds Platform
- Send SolarWinds Platform alerts to specific contacts
- Single alert when multiple devices go down in the SolarWinds Platform
- Event correlation alerts (Y after X) in the SolarWinds Platform
- Commonly created alerts in the SolarWinds Platform
- View triggered SolarWinds Platform alerts in the SolarWinds Platform Web Console
- Remove alerts from the Active Alerts list in the SolarWinds Platform
- Test alert triggers and actions in the SolarWinds Platform
- Modify multiple alerts or share alerts in the SolarWinds Platform
- Build complex conditions in the SolarWinds Platform
- Manage alert actions in the SolarWinds Platform
- Approve alert actions executing a script
- Alert actions available in the SolarWinds Platform
- Change a custom property alert action in the SolarWinds Platform
- Create a ServiceNow incident in the SolarWinds Platform
- Create a SolarWinds Service Desk incident in the SolarWinds Platform
- Dial a paging or SMS service in the SolarWinds Platform
- Email a web page to users in the SolarWinds Platform
- Execute an external program in the SolarWinds Platform
- Execute an external Visual Basic script in the SolarWinds Platform
- Failover to a standby server in the SolarWinds Platform
- Log the alert message to a file in the SolarWinds Platform
- Log the alert to the NPM event log
- Change the resource allocation of a virtual machine in the SolarWinds Platform
- Delete a snapshot of a virtual machine in the SolarWinds Platform
- Move a virtual machine to a different host in the SolarWinds Platform
- Move a virtual machine to a different storage in the SolarWinds Platform
- Pause a virtual machine in the SolarWinds Platform
- Power off a virtual machine in the SolarWinds Platform
- Power on a virtual machine in the SolarWinds Platform
- Restart a virtual machine in the SolarWinds Platform
- Suspend a virtual machine in the SolarWinds Platform
- Take a snapshot of a virtual machine in the SolarWinds Platform
- Play a sound when an alert is triggered in the SolarWinds Platform
- Restart IIS sites or application pools in the SolarWinds Platform
- Send an SNMP trap in the SolarWinds Platform
- Send a GET or POST request through HTTP or HTTPS in the SolarWinds Platform
- Send a syslog message in the SolarWinds Platform
- Send an email or page in the SolarWinds Platform
- Manually set a custom status in the SolarWinds Platform
- Use the speech synthesizer to read alerts in the SolarWinds Platform
- Log an alert to the Windows Event Log in the SolarWinds Platform
- Variables in the SolarWinds Platform
- Changes in the alerting engine introduced in Orion Platform 2015.1
- Alert migration to the web
- Share SolarWinds Platform alerts with other SolarWinds products
- AlertStack
- Manage SolarWinds Platform Web Console user accounts in the SolarWinds Platform
- Create users in the SolarWinds Platform
- Change passwords for SolarWinds Platform users
- Unlock user accounts
- Set and manage user account expiration
- Configure user password expiration
- Enable SolarWinds Platform users to authenticate through LDAP
- Authenticate SolarWinds Platform users with SAML v2
- Configure Okta for single sign-on login to the SolarWinds Platform Web Console
- Configure Active Directory Federation Services for single sign-on login to the SolarWinds Platform Web Console
- Configure Azure AD for single sign-on login to the SolarWinds Platform Web Console
- Create a SAML user in the SolarWinds Platform
- Troubleshoot SAML Login
- Define what users can access and do in the SolarWinds Platform
- Restrict user access to network areas by applying limitations in the SolarWinds Platform
- Set default menu bars and views for users in the SolarWinds Platform
- Limit users to specific network areas in the SolarWinds Platform
- Configure automatic login in the SolarWinds Platform
- Manage polling engines in the SolarWinds Platform
- Additional Polling Engines in the SolarWinds Platform
- Use an Additional Web Server
- Calculate node availability in the SolarWinds Platform
- Assign credentials to virtual servers in the SolarWinds Platform
- Set the node warning level in the SolarWinds Platform
- Delete polling engines in the SolarWinds Platform
- Administrative functions of the SolarWinds Platform Web Console in the SolarWinds Platform
- SolarWinds Platform Web Console administration in the SolarWinds Platform
- View secure data in the SolarWinds Platform
- Handle counter rollovers in the SolarWinds Platform
- Configure web proxy settings in the SolarWinds Platform
- Maintain the SolarWinds Platform database in the SolarWinds Platform
- Security enhancements and exceptions for SolarWinds Platform products
- Update polling settings in the SolarWinds Platform
- Manage the SolarWinds Platform Web Console for your SolarWinds Platform
- Customize the SolarWinds Platform Web Console look, views, settings, charts, and maps in the SolarWinds Platform
- Customize the SolarWinds Platform Web Console look for the SolarWinds Platform
- Add custom properties to node popovers in the SolarWinds Platform
- Dashboards or views
- How custom views/classic dashboards work in the SolarWinds Platform
- SolarWinds Platform Web Console and chart settings for the SolarWinds Platform
- Customize charts in the SolarWinds Platform Web Console for the SolarWinds Platform
- Customize modern dashboards
- Customize the SolarWinds Platform Web Console look for the SolarWinds Platform
- Intelligent Maps for SolarWinds Platform products
- Define what users can access and do in Intelligent Maps
- View details for SolarWinds Platform entities on Intelligent Maps
- Work with entities in auto-generated Intelligent Maps in the Map subview
- Adjust auto-generated Intelligent Maps in the SolarWinds Platform
- Understand connections on Intelligent Maps in the SolarWinds Platform
- Create and edit Intelligent Maps
- Clone Intelligent Maps
- Create nested maps in Intelligent Maps
- Create wireless heat maps with Intelligent Maps
- Import maps
- Add Intelligent Maps to views as a widget
- Use Intelligent Maps in alerts and reports
- Use Intelligent Maps to view historical events
- View monitored objects on Worldwide map or on Network Atlas maps in the SolarWinds Platform
- Manage and view reports in the SolarWinds Platform
- Predefined reports in the SolarWinds Platform
- Modify an existing web-based report for the SolarWinds Platform
- Create a web-based report in the SolarWinds Platform
- Add content to a web-based report in the SolarWinds Platform
- Customize a chart for SolarWinds Platform reports
- Customize a table for web-based reports
- Customize a web-based report layout in the SolarWinds Platform
- Restrict who can access reports in the SolarWinds Platform
- Generate reports in the SolarWinds Platform on a schedule
- Export and import reports in the SolarWinds Platform
- Troubleshoot reports
- Create custom monitors in the SolarWinds Platform
- Access nodes using HTTP, SSH, and Telnet in the SolarWinds Platform
- Optimize and scale SolarWinds Platform products
- Troubleshoot Orion Deployment issues with Active Diagnostics
- Know the environment monitored with the SolarWinds Platform
- What devices to monitor with SolarWinds Platform and what do you need to know about them?
- Optimize polling engines in your SolarWinds Platform deployment
- Optimize the database used by SolarWinds Platform products
- Optimize the performance of the SolarWinds Platform Web Console
- Don't forget about maintaining your SolarWinds Platform deployment
- Collect diagnostics from the SolarWinds Platform Web Console
- Secure Configuration for the SolarWinds Platform
- URLs to allow-list in firewalls to enable in SolarWinds Platform
- SolarWinds Platform features affected by Internet access
- SQL Server configuration best practices for SolarWinds Platform products
- High Availability in SolarWinds Platform products
- Disaster recovery in the SolarWinds Platform
- How failovers work
- When do I use a VIP or a virtual hostname?
- Which IP address is used as the source when using a VIP?
- SolarWinds Platform High Availability requirements
- SolarWinds Platform High Availability deployment walk-through
- Disable or delete HA pools, force a failover, or update an HA pool for SolarWinds Platform products
- Critical third-party software components in SolarWinds Platform
- SolarWinds approach to comprehensive Exchange monitoring
Send a GET or POST request through HTTP or HTTPS in the SolarWinds Platform
This topic applies only to the following products:
SolarWinds Observability Self-Hosted
DPAIM — IPAM — LA — NAM — NCM — NPM — NTA — SAM — SCM — SRM — UDT — VMAN — VNQM — WPM
SolarWinds can be configured to communicate alerts using GET or POST functions through HTTP or HTTPS. As an example, a URL may be used as an interface into a trouble ticket system, and, by correctly formatting the GET function, new trouble tickets may be created automatically.
-
When editing or adding an alert, click Add Action in the Trigger or Reset Action section of the Alert wizard.
- Select the Send a GET or POST Request to a Web Server option, then click Configure Action.
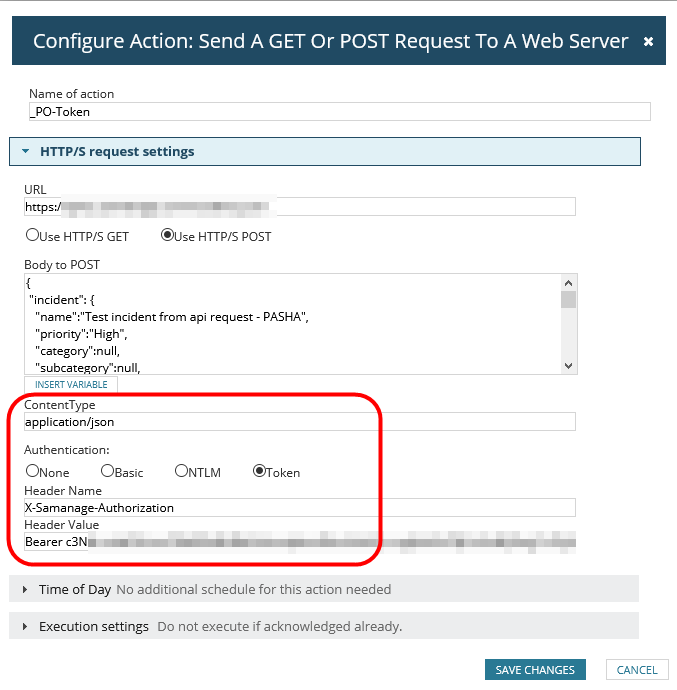
- Under HTTP request settings:
Enter a URL in the field provided.
Select either Use HTTP GET or Use HTTP POST.
Enter
HTTPS
instead ofHTTP
in the URL to send the information using HTTPS.Enter the Body to POST.
Starting with Orion Platform 2020.2, you can also specify the ContentType and Authentication:
- None
- Basic: enter or select credentials.
- NTLM: enter or select credentials.
- Token: enter a header name and value.
You can only add one header per action. If you need to configure more headers, use a script to do so.
- Schedule the action by selecting Time of Day > Use special Time of Day schedule for this action. This schedule only applies to the alert action you are editing.
This is often used to prevent an action from occurring during specific windows. -
Select how frequently this action occurs for each triggered alert in Execution Settings.
-
Click Add Action.
The action is added to the trigger or reset action list, and you can test the action using the Simulate button. When the trigger or reset conditions of the alert are met, the GET or POST request is sent to the server. You can view the server logs to confirm that the action occurred.