Service catalogs
On this page
Introduction
Like any sales catalog that identifies all the items offered in a store, your service catalog is a complete, up-to-date list of services performed within your organization. When customers want to request a product and/or service, your service catalog should be their one-stop shop.
Service Desk's Service Catalog lets you define and publish IT (VM provisioning or password reset) and non-IT services (employee onboarding) through the Employee Service Portal. The catalog forms defining those services are dynamic. You can configure them to fit specific use cases, with little to no coding required.
SolarWinds strongly recommends that anyone creating a service catalog and catalog items read the Service Desk Service catalog introduction before moving forward. It contains basic information about the service catalog feature, how it and its components within the catalog work, and things you should consider before building your service desk catalog.
Service Catalog assists your organization in maintaining order. For example:
- Define alert criteria with information sent directly to Service Desk for:
- Server failure
- Capacity level
- Define SLAs.
- Track activities and resolved incidents.
- Control the data that is sent to Service Desk.
- Use automation to assign incidents to a category.
- Re-trigger alerts to create a Incident index in an incident.
- Audit all activities.
- Identify your most popular service catalog items.
- Identify service catalog items that need to be retired.
Navigation
Service Desk > Service Catalog.
All Items index page
The Service Catalog's All Items page lists the entire collection of catalog items created.
See List view for information on how to filter, edit, and customize contents of the index page to best meet your needs. You can also learn how to search, add new records, perform actions such as import and export, and find a description of the index page using the buttons in the upper right corner.
![]()
From the Service Catalog's All Items index page, you can:
-
Search for a specific catalog item or a word or phrase in a catalog item name.
-
Create a new catalog item.
-
Update or delete a catalog item from the list view.
-
Export the list.
-
See the state of catalog items. For example, draft, internal, or approved.
-
See the category and subcategory related to the catalog item, the expected delivery time, and cost.
-
Identify whether the catalog item is highlighted in the service portal.
-
Perform actions, such as submitting a request or deleting a catalog item.
-
See the details of a record by clicking the name of the record. A panel containing the details opens. From there, you can see three tabs (Details, Process, and Audit) that provide additional information.
-
Use the Request Count column to see the number of times a catalog item has been requested. You can also click the request count number to see the Incident index page and all the incidents created from the selected catalog item.
From the Catalog Items index page, if you click on the name of a catalog item, Service Desk opens the details of that item and in the right corner you can see a message showing the number of times someone requested the item.
Both options for jumping to the Incidents index page result in displaying a filtered list related to the specific service request. From there, you can set a time-based filter to see how many service requests were created in the last 7, 14, 30, 45, 60, or 90 days.
Service catalog item creation
Service catalog items can be created using two different methods: create from scratch or generate from a solution.
Create a new service catalog item from scratch
You can create a new service catalog item (SCI) or clone an existing one and then edit the contents of the cloned item.
To create a new one from scratch:
-
Make sure you have already created any custom fields and custom forms that the new service catalog item will use. Custom fields include user roles specific to your organization.
-
Navigate to Service Desk > Service Catalog.

-
Click Add
 in the upper right.
 -
In the New Service Catalog Item dialog, provide required information (designated by a red asterisk).
-
Scroll down and add Input, such as fields to you want end users and technicians to use when they create a new request from the service catalog item.

-
If needed, scroll down and add a process workflow. (See Process workflows for guidance.)
Options include:
- Task
- Group
- Approval
- Condition Set
- Process Integration
- Update Record
- Stop Process
- Send Notification
- Paste
-
Click Create to Save.
Generate a service catalog item from a solution
You can generate service catalog items directly from solutions, ensuring that critical, validated procedures are converted into actionable, step-by-step guides for incident response and service operations, such as incident management, change processes, or onboarding workflows.
From a solution's details page, click Generate Process in the upper right corner. From there, select Generate Service Catalog Item.
See Solutions.
Process workflows
Process workflows can ensure that a process is applied consistently, including workflows for approvals.
You can manually create process workflows, and Premier customers can use GenAI to create a process workflow from a PDF, Word, or text file. Premier customers can find guidance in Setup: Labs.
You can also change a process workflow step type to another one without deleting an existing process type and creating a new one. For guidance, see Change a process workflow step type to another one
For information on creating approval process workflows, see Process workflows.
Create an approval process workflow
You can manually create an automated workflow that identifies individual approvers. See Create an approval process workflow.
Optionally, you can choose to use Service Desk's dynamic approvers feature.
Change a process workflow step type to another one
Premier customers: You can change the workflow step types in a workflow for a runbook, service request, change catalog item, or a change to another step type without having to delete an existing process type and create a new one. See Process workflows.
Modify a service request ticket after submission
Administrators can control the service request process workflows an agent can modify and when the agent can modify them. See Modify Inputs for instructions on how to enable this feature.
When a new service request is created from the service catalog, the workflow tasks begins immediately. Before modifying an existing service request, SolarWinds strongly suggests that you stop the workflow process. However, if you have Just-in-Time workflow processing turned on, it is possible to enable the activation of condition-based processes in a running process. If a field is changed before a condition set in the workflow is reached, Service Desk looks at the new value and runs from it.
-
Open the service request ticket.
-
Click the Details tab.
On the Details tab you can see a dropdown that lets you change the filter view to Inputs with value or All Request Inputs.

Directly below the filter, you can see how many input fields of the overall number display.
By default, a limited number of input fields displays. To see more, click View More Inputs.

Optionally, agents can change their default by navigating to My account > Setup > Service Request Inputs and selecting an option: Compact Display or Full Display.
-
Compact Display shows a limited number of fields based on the selected filter for incidents, with a View More option to display all fields.
-
Full Display shows all fields based on the selected filter for incidents, with a View Less option to reduce the number of visible fields.
-
-
Identify the process status before making changes.
- If the workflow process IS RUNNING:
-
You might see a pop-up message display at the top of your screen. If you see it, you must click Dismiss or the X for the message to disappear.
 Pop-up messages display only if you are trying to edit a field and your organization has the flexible behavior setting enabled. See Modify Inputs.
 -
Before making any changes:
- Go to the Process tab and stop the process to ensure that all your changes will take effect.
- Return to the Details tab and make any changes to the ticket.
-
After completing your modification, return to the Process tab and restart the process.
- If the workflow process IS NOT RUNNING:
You can make any change in the ticket, for example, change the user name, add an attachment, or update the delivery time. You can edit any field by hovering to the right of the field and clicking the pencil icon.
You can make changes in the ticket without stopping the process, but be aware, the changes might not affect the currently running process if you do.
-
- If the workflow process IS RUNNING:
Stop or restart a process workflow
For guidance on stopping and restarting a process, see Stop or restart a process workflow.
Saved catalog items
After a catalog item is saved, three tabs display at the bottom: Details, Process, and Audit.
Details tab
Provides clear visibility on items such as:
- Site and Department, to be included for reporting purposes.
- Price, for easy analysis of the budget.
- Duration, to provide visibility of process times and delivery.

Process tab
The Process tab includes the workflow; that is, all tasks and approvals required from the time of the request to its approval. The workflow can also include alternative steps if the request is not approved. For additional information, see Process workflows.

Directly from the Process tab, you can make many updates to the process, for example:
- Task. Update or add a task to the process, including the name, description, and person assigned to complete the task. You can also add fields like Requester task titles to differentiate between tasks that use the same name. For example, a task titled Issue laptop could include the name of the person to receive the laptop: Issue laptop to John Doe.
- Group. Update or add a group to act as a container for multiple steps that need to occur concurrently.
- Approval. Update or add approval steps to capture the needed authorization for a specific change.
- Condition Sets. Apply a condition to any record field (including custom fields) in a workflow. By applying a condition, you enhance customization of your workflows and increase automation of processes to ensure overall efficiency. For example:
- An onboarding workflow training process for all employees, except those in the Spain office. (The Spain office provides this training in Spanish; therefore it must follow a different workflow.)
A workflow in which a task is added to update a specific software if the laptop model contains the string
MacBook.SolarWinds recommends you review all fields below to familiarize yourself with the condition sets most relevant to your organization. Variable usage is enabled for defining the comparison value in conditional steps, for example,[Field] IS [Variable].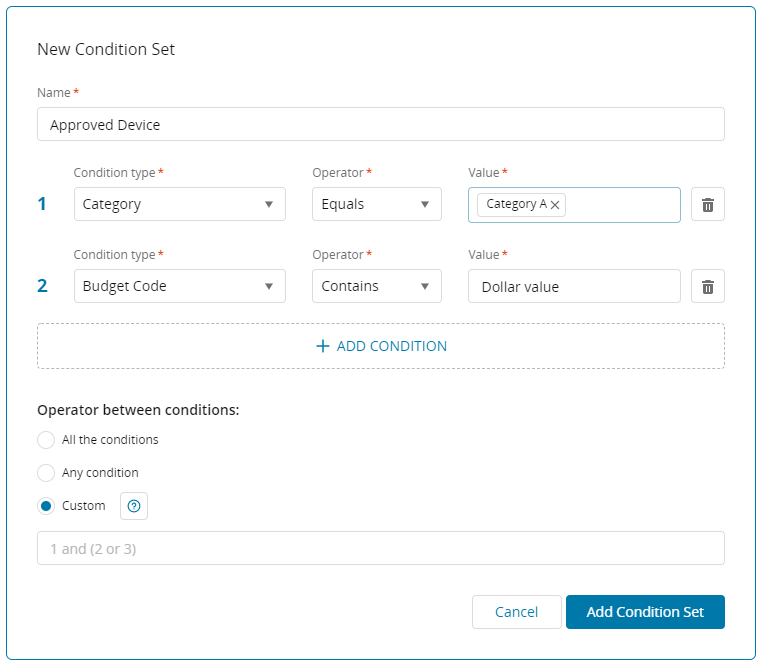 When you have multiple conditions, you can streamline processes by selecting the specific condition type needed. For example, by customizing the Operator between conditions, you can choose 1 (and 2 or 3) or any combination necessary.
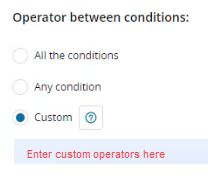
-
Process Integration. Used to integrate with external systems.
More information is available on using Process integrations within your workflow process. -
Update Record. You can alter any workflow process by customizing it. Customization and ensure smooth automation of business processes and streamlined workflows.
For example, you can update any record field in the workflow, including system fields such as name and/or CC. You can select from previously cached entries.
In addition, you can use custom fields in automated workflows to update the Description field of a service request.
 After a field is updated, it is not available for additional updates within the same action. To make further changes, exit and re-enter Update Record.
 -
Send Notifications (available for Advanced and Premier packages) is the automation tool that provides relevant stakeholders with status updates on all processes.
For example, for laptop requests, you can set up an automatic notification:
- To be sent after a new laptop request has been denied. The notification can state denial with reasons why or steps on how to follow up for more information.
- To be sent after a new laptop request has been approved. The notification can inform recipients that the laptop request is approved and the ship date is MM.DD.YYYY.
See Email notification templates for more information on how to set up email templates.
-
Paste. Lets you paste a Service Desk object previously copied to your clipboard. For example, you can copy/paste workflow nodes from the Process tab.
From the Process tab, you can drag and drop fields in the variable columns. You can also set default values.

Audit tab
The Audit tab account for all activities related to the selected catalog item.

Understand how a workflow affects a process
After you have finalized your workflow, it is essential to understand how the process unfolds. You can select between:
- Pre-processing: When a Change or Service Request is submitted, the entire workflow is processed, with each step evaluated based on the value of conditions and fields before the workflow begins.
- Just-in-Time processing: This option evaluates each workflow step based on the value of conditions and fields when these steps are reached. Just-in-time processing lets you base workflow decisions on current values rather than conditions and fields that were valued before the beginning of the workflow. As a result, you can build more dynamic and realistic workflows that replicate your IT and business processes.
The Audit tab accounts for all activities related to the selected catalog item.
Copy/paste workflow nodes
Service Desk allows you to copy individual workflow nodes from a new or existing catalog item. You can then paste them into the current catalog item or another new or existing one.
You cannot copy from workflow nodes from one account to another, for example, from a sandbox account to your primary customer account.
You can also clone a catalog item to copy all workflow nodes associated with that catalog item. Cloning is helpful when you want to create a new catalog item and reuse multiple workflows related to the previous catalog item. You can then edit, remove, and/or add workflows as needed in the new catalog item. For more information, see Clone a catalog item with its workflow nodes.
Workflow nodes are stored in catalog items under Process. Every catalog item has a Copy option.
-
Navigate to Service Desk > Service Catalog.
-
Open an existing catalog item by clicking the name, or create a new catalog item by clicking Add.
-
In an open catalog item, click the Process tab.
-
Hover over the workflow you wish to copy until icons display to the right.
-
Click the Copy to clipboard icon.

After you click Copy, the label above the icon displays with a check mark, and the text changes to Copied to clipboard.

Paste a copied workflow node
-
Determine whether the service catalog item where you want to paste the workflow node already has any workflow nodes on the Process tab.
-
If yes, hover over the workflow process where you want to add the new workflow (even the current one) until icons display to the right and click Add to create a new workflow node.

If you want to add the new workflow after all existing processes have occurred, click Add at the bottom of the list of existing workflows.
-
If not, you must first create a new one. On the Process tab, click Add to create a new workflow node.
-
-
From the dropdown menu, scroll to the bottom and select Paste.

-
Edit as needed.
Clone a catalog item with its workflow nodes
-
Navigate to Service Desk > Service Catalog.
-
From the All Items index page, click the name of a catalog item to open it.
-
In the upper right, click Actions.
-
From the dropdown menu, select Clone.
-
In the New Service Catalog Item dialog, edit any field necessary. Service Desk copied over everything associated with the previous catalog item, so review every field.
Schedule a request
-
Navigate to Service Desk > Service Catalog.
-
From the All Items index page, click the name of a catalog item to open it.
-
In the upper right, click Actions.
-
From the dropdown menu, select Schedule Request. A new service request dialog opens.
-
Update fields as needed, and click Create at the bottom.
Test a workflow
Administrators and agents with edit permission for the service catalog can test complex workflows before implementation. See Process-workflow test mode.
Edit a service catalog item
An administrator must enable users to edit a service catalog item. See Service Desk Settings: Inline Edit on Service Catalog Items for more information.
Edit a custom field from the Service Catalog
Be aware:
-
You can see where custom fields are used before you edit them from the Service Catalog.
-
Service Desk reflects any update to the values or default text in a custom field in all places where that custom field is used.
-
You cannot change a custom field's field type or scope after creation. If you need to change either the field type or scope, SolarWinds recommends creating a new field with the new type and scope.
-
If you update existing custom field values, historical data, analytics, and reporting will be affected.
See where custom fields are used before you edit
-
Navigate to Service Desk > Service Catalog.
-
Click the catalog item that contains the custom field you want to edit.
-
To the right of the custom field, click the ellipsis, and then click Edit.
-
In the Edit Custom Field dialog, read the notice and look at the list that shows where the custom field is used. In the example below, there is only one place where the custom field is used (in the Service Catalog in a catalog item named Custom field display).

-
If you still want to edit the custom field in all the locations where it is used, click Confirm.
-
Edit the custom field as needed, and then click Update.
-
When the notice displays a second time, if you are certain you want to make the changes, click Confirm again.