Change catalog
On this page
Introduction
The Service Desk Change Catalog helps ensure smooth processes during times of transition (Change Lifecycle). These processes can include pre-approval for standard and low-level risk changes with a proven history of success. The Change Catalog lets you create templates to ensure changes always adhere to the basic organization-approved processes.
Some of the most common motivators for change are:
- Security
- Maintenance
- Performance
- Software upgrades
- Hardware upgrades
Before making any changes, consider the following factors:
- Company resources
- Budget
- The effect on the organization during the change process (for example, the possibility of a simultaneous change collision).
- Ways to ensure you deliver organizational success and outcomes.
Benefits
Implementing change processes provides numerous benefits across your organization, such as:
-
Driving consistency in routine change plans. For example, changing a network router is a standard procedure. Whether you want to upgrade or replace a faulty router, over 80% of the change processes are standard across all routers.
-
Accelerating and streamlining approval and execution workflows (and more). As in the example above, the organizational process has already been approved by providing a template to request a network router change. All that's left is to follow the preset guidelines.
Best practices
SolarWinds provides these best practices to help you maximize the benefits of smooth and efficient changes throughout your organization and the lifecycle of the implemented changes.
-
Create a unique change catalog item (CCI) for every type of change.
ITIL® defines three main change types: Standard, Normal, and Emergency.
Many organizations use their unique variations of names to manage their change templates and processes more easily. Therefore, Service Desk provides the option to define custom change types. Customization helps you better organize and sort your CCIs by additional types, for example, Mandatory or Maintenance.
Here are three out-of-the-box examples of CCIs:
- Replace hard drive in server.
- Update Operating System using SolarWinds Patch Manager.
- Add an email server and Spam Experts.
- Include type and family in the naming convention (for example, Network, Application, Infrastructure).
-
Manage your unique variations of names to manage change templates and processes through Service Desk by defining custom change types. Customization helps you better organize and sort your CCIs by additional types, for example, Mandatory or Maintenance.
To create custom change types, go to Setup > Global Settings > Service Desk Settings, and then scroll down Change Type Values.
- Ensure relevant permissions are assigned per user so each role can best carry out their responsibilities in the Change Process. (Contact your administrator for proper permission assignment.)
- Attach Incidents to CCIs created. As you work, the AI capabilities in your service desk will offer relevant Incidents related to the configuration item created.
-
Whenever you have repeat requests, scheduling the request in advance via the actions column and/or the Actions icon button is important. Advance scheduling is useful for requests such as:
- Backup servers
- Check fire extinguishers.
- Constantly update your change calendar (from the Actions menu, select Change Calendar) to receive a link supported by all applications that support iCalendar.
- Be aware that Changes that are declined or On Hold status will not be pushed to the Change Calendar.
- The Change Calendar only reflects changes available to users who created the changes via their roles and permissions. Therefore, sharing only with users with equal or greater permissions is essential. Anyone with limited permissions cannot view the changes on the calendar.
- Refresh the Change Calendar. Changes are updated via the schedule of the application you select to use with the calendar, therefore, changes made are not reflected immediately.
-
Use custom titles that include inputs from the Change process to prevent multiple change records with the same title.
While using Change templates shortens processing times, drives consistency, and reduces human error, identifying specific changes directly from the index can be more challenging. You want to avoid having multiple Change records for backing up a server, all originating from the same template, with the same title.
To help identify these records quickly, you can add a custom title that includes inputs from the Change process, such as:
- Back up {{server_name}} on {{date}}
- Back up {{server_name}} to {{backup_location}}
See Change Calendar to understand the Change Calendar and how it works.
Navigation
Service Desk > Change Catalog.
Change catalog
Changes may be unique in the specific details. Numerous change processes can use the same change template to achieve successful outcomes. As the templates are editable, in the same family (for example, network, applications, infrastructure), and even across families, you can rely on the basic structure of the template and customize it to take into account the specifics relevant to the change being addressed.
All changes require consideration of factors such as team members affected and budget. By creating CCIs, defined here as templates, you can include all general processes, thereby accelerating the Change Request process and ultimately the Change Management Lifecycle.
The Change Catalog is a repository of CCIs, which are change plan templates you have predefined for each change type. The use of these CCIs by change requesters and implementers will help enforce the use of consistent ITIL® best practices across your organization, reduce manual processing times, and change failures caused by poorly planned changes.
Each CCI can be added to the Portal Guide for Portal users to initiate approved changes.
The Change Catalog is also available on your mobile device.
After creation of each CCI, notice your options:

- Show in Portal: When selected, this option lets end users request the Change directly from the Portal.
- Request: Initiate the Change request.
- Actions:
Change catalog index page
To view the Change Catalog index page navigate to Service Desk > Change Catalog.
See List view for information on how to filter, edit, and customize contents of the index page to best meet your needs. You can also learn how to search, add new records, perform actions such as import and export, and find a description of the index page using the buttons in the upper right corner.
![]()
Below is a breakdown of the default columns reflected:
Selecting the Columns  icon allows you to edit the columns in your view, add, delete, or return to the default table view.
| Title | Description |
|---|---|
| State |
|
| Type |
|
| Name | The name field is for your benefit and does not affect the process. SolarWinds recommends that you include the type and family (Network, Application, Infrastructure, etc.) in the naming convention. |
| Description | Explain the relevant topics in the change you plan to achieve |
| Created By | The individual who created the request |
| Created At | The date the request was created (when you select the CCI, the date and time are revealed in the CCI details page) |
| Scheduled | Yes or No in this column reflects whether or not a change request (CR) has been scheduled |
| Actions |
Based on the state of the CCI, the following actions will be available:
Initiating a scheduled request can be accomplished via the Actions column and/or the Actions icon button in the upper right corner of the CCI. For more information, see Schedule Request. |
To increase control of the process, you must manually update the State. Manually updating ensures the request process does not begin before all plan phases are put in place.
The tabs in a change catalog item
The lower section of the New Change Catalog Item form consists of tabs, such as Details, Process, Related, and Audit. SolarWinds recommends reviewing each tab to get the full benefit of the form. For example, the Process tab displays all tasks, assigned approvers for the Change workflow, and more.
Process Tab
Tools in the Process tab let you create seamless automated workflows. This tab incorporates all the approvers and additional process options. For further information, see Process workflows.

From the Edit  icon, you have several options as shown below:

In one step, you can update:
- Task. Update/Add a task to the lifecycle of the change, including the name, description, and person assigned to complete the task.
- Group. Update/add a group to act as a container for concurrent multiple steps.
- Approval. Update/add an approval step to capture the needed authorization for the Change.
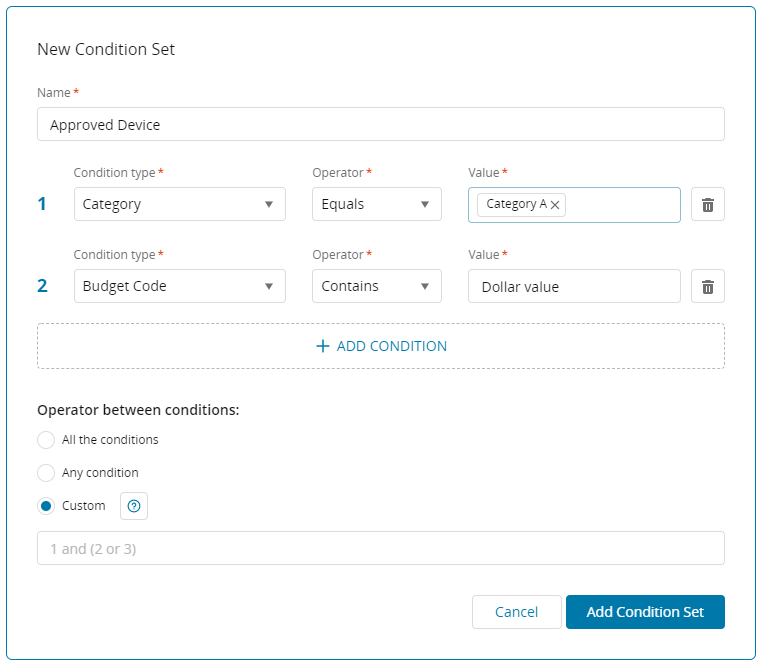
- Condition Set. Add a new Condition to any record field (including custom fields) in a process workflow and add a value to the pre-existing process. By applying a condition you enhance customization of your workflows and increase automation of processes to ensure overall efficiency.
- Record. Using Update Record, you can ensure smooth automation of business processes and alter any process workflow to customize and streamline your workflow tasks.
- You can update any record field in the workflow, which includes system fields such as:
- State
- Priority
- Assignee
- Department
- Custom fields (see Create a custom user field for use in an approval process)
You can select from previously cached entries when you update a field, such as name and/or CC. After a field is updated, it is not available for additional updates within the same action. To make further changes, exit and re-enter Update Record. Be aware that Update Record does not include inputs (also known as process fields).
- You can update any record field in the workflow, which includes system fields such as:
- Stop Process. Use Stop Process as part of the workflow if the process must be stopped in the middle.
- Send Notifications. The Send Notifications feature is available to Advanced and Premier customers.
It is your automation tool to provide status updates of all processes to relevant stakeholders. For example, for new laptop requests, you can set up an automatic notification to be sent when the new laptop request has been denied or approved. The notification can:
-
State the denial with reasons why or steps to follow up for more information.
-
State the approval of the laptop request with a ship date.
Create a new change catalog item
-
Navigate to Service Desk > Change Catalog.
-
In the upper right, click the blue Add
 icon.
icon. -
Notice the New Change Catalog Item form is divided vertically into two main sections. Text and dropdown fields appear at the top and tabs are at the bottom.

-
Enter a title, which is a mandatory field.
-
Enter information into the rich-text fields, indicated by the grey text
 icon in the lower right of each field.
 The rich-text fields in a change catalog item are Description, Change Plan, Rollback Plan, and Test Plan. Clicking the grey text
reveals a toolbar to format text, or add hyperlinks, images, or video. Video options include Vimeo, YouTube, or Microsoft Stream videos.It is a best practice to enter all common details to provide transparency and clarity for future users of a CCI.Within the form, the ellipsis
 icon that displays to the upper right of each field when you hover your mouse in that area provides you with options related to that field. The options not available for every field are Enable for editing and Show in portal.
 If Enable for editing is disabled, others can only view the details without making any changes in later phases of the Change Management Lifecycle.

SolarWinds recommends you choose whether to enable editing in the Change and Roll Back Plan fields based on your organization's needs. SolarWinds recommends you disable editing in the Test Plan field. This approach ensures the Test Plan stays constant.

-
If appropriate for your organization, make the service available in the Service Portal by selecting the checkbox next to Highlighted service.

-
Make selections from dropdown fields, and if appropriate, hover your mouse to the upper right of any field to display the ellipsis icon, which you can click to enable editing of the field.

-
Add Process fields and process workflows. See Process workflowsor see Change catalog.
Process workflows for your change catalog items
Process workflows can ensure that a process is applied consistently, including workflows for approvals.
You can manually create process workflows, and Premier customers can use GenAI to create a process workflow from a PDF, Word, or text file. Premier customers can find guidance in Setup: Labs.
You can also change a process workflow step type to another one without deleting an existing process type and creating a new one. For guidance, see Change a process workflow step type to another one
For information on creating approval process workflows, see Process workflows.
Understand one-time Ad Hoc change requests
An ad hoc change is the best way to proceed whenever a single-use change is necessary. It neither requires nor creates a change catalog item (CCI).
For example, you are replacing the phone system across your organization with VoIP (Voice over IP) technology. You don't need to repeat the process after the original change is complete. You can request an ad hoc change that will not be saved as a CCI for future use. Instead, it will display as a change created without a template.
-
From the Changes index page, click Add
 .
. -
Scroll to the bottom of the dropdown menu and click Create New Ad Hoc Change.
In the New Ad Hoc dialog, notice that the information requested is similar to that of a CCI, with the execution of the Custom Fields included in this form.

Restrict ad hoc changes
You can restrict roles from creating ad hoc changes. See Roles and Permissions for more information.

Allow Requesters and Service Task Users to submit change requests
For Requesters and Service Task Users to be able to submit change requests, they must have the following permissions:
Read > Change Catalog = Approved