Microsoft Entra ID SSO configuration
On this page
Introduction
To configure Microsoft Entra ID with your Service Desk account you will need to access both your Entra Service Portal and Service Desk. SolarWinds recommends having them both open at the same time but on separate browser tabs, as you will be going back and forth between the two.
You may connect simultaneously Microsoft Entra ID (previously Azure AD) and Google.
Learning options
You can follow the instructions that guide you through the SSO Configuration process or you can view a video.
 Watch this video:
 Navigation
Navigation is dependent upon the steps below in the section titled Configure SSO with Entra ID.
Provisioning
Some customers choose to provision users with Microsoft Entra ID. See Provisioning with Microsoft Entra Connect Cloud Sync for instructions.
Configure SSO with Entra ID
Step 1: Add Service Desk to your Entra ID
- Open your Entra ID Portal.
- Navigate to Entra ID, and then in the left pane under Manage, click Enterprise applications.
- Click the New application tab, and under Application type, search for
SolarWinds. - Click Service Desk.
- At the bottom of the new pane that displays on the right, click Create.
Entra adds Service Desk and opens it.
Step 2: Change the User Assignment Requirement
- In Service Desk from within Entra, under Manage in the left pane, click Properties.
- Scroll down to User assignment required? and switch the toggle to No. This allows anyone within your Entra account to authenticate through single sign-on with Entra.
- Scroll to the top and click Save.
Step 3: Set up Basic SAML Configuration in Entra
-
In Entra, under Manage on the left pane, click Single sign-on.
-
Click SAML.
- In the first section titled Basic SAML Configuration, click Edit and provide:
- Identifier (Entity ID): solarwinds.com
Reply URLs:
Default URL: https://[companyname].samanage.com/saml/[companyname]
Add Second URL: https://app.samanage.com/saml/[companyname]
Login URL: https://companyname.samanage.com/saml_login/companyname
(You can navigate to Setup > Account > Single Sign On > Login using Azure AD and copy the Azure Login URL.)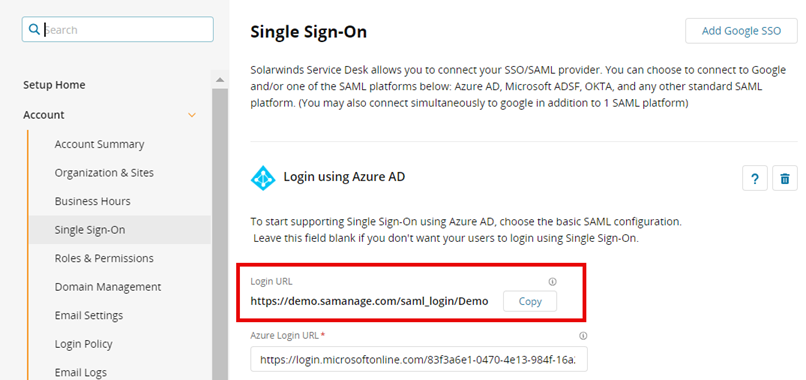
ESM customers need to edit all domain/account name references to redirect SSO to the organization level. For example:
https://org-ACCOUNTNAME.samanage.com/saml/[companyname]
orhttps://org.[DOMAINNAME]/saml/[companyname] -
Click Save.
Step 4: Verify Attributes & Claims Accuracy
-
Determine which approach you want to use:
-
If you plan to use both SSO and User Provisioning, in Entra go to the second section labeled Attributes & Claims, and then click Edit.
-
If you do not plan to use User Provisioning, skip to Step 5: Set up SAML Signing Certificate.
-
-
In Attributes & Claims, verify that the two different Entra ID fields below contain the same information.
-
Unique Principal Name - see Required claim > Claim name > Edit > Unique User Identifier (Name ID)
-
User Email Address - see Additional claims > Claim name
-
-
If the two do not match exactly, SolarWinds suggests you contact Technical Support for assistance.
Step 5: Set up SAML Signing Certificate
-
In Entra, go to the third section, labeled SAML Signing Certificate.
-
Download the certificate (Base 64) from the SAML Signing Certification section
-
Open the Certificate in a text editor.
-
Copy all the certificate contents and paste them into Service Desk.
Step 6: Set up Login URL, Logout URL, Identifier, and Certificate
In Service Desk, navigate to Setup > Account > Single Sign On > Azure integration, enter the information below, and then click Update.
-
Entra Login URL: (Copied from Entra Login URL)
-
Logout URL: https://login.microsoftonline.com/common/wsfederation?wa=wsignout1.0
-
Certificate: (Copied from Base 64 certificate via text editor)
Step 7: Test Single Sign-On
-
Open an incognito tab (or private browsing session) in an internet browser.
-
Enter your account URL, and then test logging in.
-
After a successful test, return to Service Desk, and add check marks to both boxes under the text field.
-
Create users if they do not exist.
-
Redirect to the SAML login page when logging in by default.
If the test works for one individual in your domain it will work for all. -
-
Click Update.
Your single sign-on configuration is complete.
If you receive an error after testing, contact Technical Support for assistance.