Jira connectors
On this page
Introduction
You can connect Jira Cloud to Service Desk to improve efficiency for all processes within your organization. A Jira connector allows you to escalate an incident directly into a Jira project via an incident's details page. In addition, after an issue is closed in Jira, the incident in Service Desk will simultaneously update with the details from Jira.
Navigation
Setup > Integrations > Jira.
Setup
SolarWinds recommends setting up service accounts in both Jira and Service Desk for smooth integration of the two platforms. If the incident requester doesn’t have a user with the same email in Jira, the Jira issue reporter defaults to the Jira administrator.
If your organization had a Jira integration configured prior to March 4, 2026, Service Desk renamed it to Legacy Jira Connector. On the Connector Details tab, you can rename it to meet your needs.
In addition, any escalation process defined for your previous integration changed. By going to the Projects & Issues tab, you can select the default project and the default issue. By default, when a project is selected, only issues configured for that project are available in the Issues dropdown.
- In Service Desk, navigate to Setup > Integrations > Jira.
-
Set up Connector Details:
-
Authenticate Service Desk and Jira to establish a connection.
-
Provide a mandatory name for the connector and optional description.
-
Make sure you have an active Jira account and enter the URL in the Service Desk space provided. Then click Generate Key.

-
Log into your Jira account and navigate to Settings.
-
Click Jira Apps.
-
Under the Integration section in the left sidebar, select Application Links.
-
Click Create Link, select Direct application link, and enter the URL of your Service Desk account (for example, https://[company].solarwinds.com) into the dedicated, and then click Continue.
-
When presented with the following warning, disregard it and click Continue.

- In the Review Link section, enter the requested information:
Application Name. Type
Samanage(uppercase first letter).Application Type. Select Generic Application.
Service Provider. Type
Samanage(uppercase first letter).Consumer key and Shared secret. Type
samanage(note the use of lower case here).Request Token URL, Access token URL, and Authorize URL. Type the URL of your Samanage account (For example, https://[company].samanage.com).
Select the Create incoming link checkbox.
Click Continue.
- Create an Application link in Jira.
-
Type in the Consumer Key:
samanage -
Type in a Consumer Name:
Samanage. -
Paste the RSA public key you generated in Samanage into the Public Key field, then click Continue.
-
See the confirmation screen confirming the application link was created successfully.
- Return to Service Desk and click Active.
-
When prompted to give Service Desk access to read/write in Jira, click Allow.

-
- After you are returned to the activation page, click Next Step (projects and issues) to continue configuration.
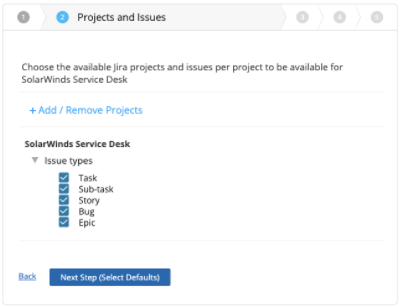
- Pull projects and issues from your Jira instance into Service Desk:
Select the associated checkbox of each Jira project you would like tied to Service Desk. Here you can also select the issue type (task, incident, change, epic, or story) as shown below. After making selections, click Next Step (Select Defaults) to continue configuration.
Select Default Project and Default Issue when incidents are escalated to Jira, then click Next Step (Field mapping).
-
-
In the Field Mapping dialog, map the fields for the path between Service Desk and Jira. Field mapping defines relationships and allows data and information to flow to the correct fields within the databases on each side of the integration. Only issues associated with the select project are available.
Service Desk currently supports mapping only for text-based field types. Mapping for other non-text field types is not supported.-
You can enhance field mapping by adding custom fields for better connection.
-
You can map the field named Ticket ID to any Jira field, establishing a unique identifier between the Service Desk and the Jira ticket. Service Desk's unique ticket ID displays in the URL of the ticket, making it easier to locate the ticket in both Service Desk and Jira. In addition, the Service Desk incident ID is provided in the Jira ticket title. (The ticket number is not clickable in Jira.)

-
-
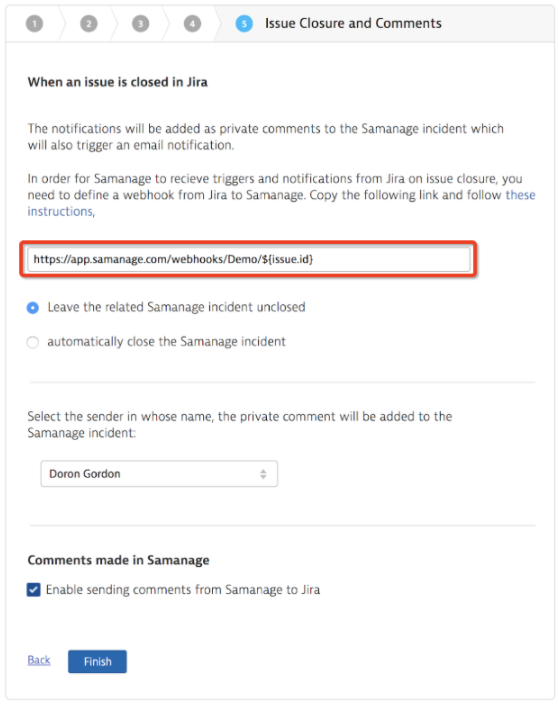
- Define what to do when an issue is closed in Jira. Options are:
- Keep the Service Desk ticket open.
- Close the Service Desk ticket with the details from Jira.
- You can also select the name of the user that is associated with private comments from Jira and link back to Service Desk. This is used when you want to communicate to the Service Desk incident agent privately from Jira to perhaps let the agent know a private status update.
- You can also select whether you want to be able to send comments from Service Desk to Jira.
When resolution codes are set to Mandatory in Service Desk, tickets closed in Jira are automatically labeled "Closed by Jira" and are also closed in Service Desk.
Using Jira connectors in incident tickets
After adding connectors, you can select a specific connector from the dropdown on the Incidents page.
The corresponding projects and issue types for the selected connector are loaded automatically.
Notifications
To receive notifications upon closure of an associated Jira issue, you need to enable a webhook. To enable this feature:
- Log in to Jira and navigate to System Webhooks > Webhooks (at /plugins/servlet/webhooks as of the writing of this article) and create a new webhook.
- Use the following information:
- Name. SolarWinds
- URL. Copy and paste from the final step in Service Desk.
-
Under Issue related events, select the Issue checkbox labeled updated.

- Click Create.
Edit an active Jira Integration
After you have successfully activated a Jira integration (connector) with Service Desk, you can see the following tabs, where you can edit your connector setup and resulting behaviors:
Disable or delete a Jira connector
To deactivate a Jira connector:
-
Navigate to Setup > Integrations > Jira.
-
Click the connector you wish to disable.
-
In the Edit Jira Integration Connector dialog, switch the green toggle in the upper right from Enabled to Disabled.
To delete a Jira connector:
-
Navigate to Setup > Integrations > Jira.
-
Hover over the connector you'd like to delete. Notice that in the Actions column a trash can displays.
-
Click the trash can to delete.
Once a connector is deleted, it cannot be restored.
Audit trail
Each incident being escalated to Jira logs the specific Jira instance, project, and issue type used, providing a clear record of the action.