Schedule an asset report
Use report schedules to automatically generate one or more reports in PDF format and email them to the specified recipients through their default outgoing email accounts. Recipients can be clients, techs, or people who do not have Web Help Desk accounts.
The following example shows how to schedule two asset reports for distribution at the beginning of every month.
-
In the toolbar, click Reports and select the Report Schedules tab.
-
Click New.
-
Enter a name to identify this report schedule. This name displays in the subject header of your report emails.

-
Select the checkbox to enable this schedule.

-
Specify how often the report is distributed and when the distribution begins.

-
(Optional) Update the email message that appears in the scheduled email. The reports will be created in PDF format and attached to the scheduled email.

You can use the following tags in your email message.
Tag Description <report_list> The list of reports included in the email.
Use one tag per line of email text.
<timestamp> The business time when Web Help Desk generated the report. -
Locate and select the clients who will receive the scheduled email. Search for a client and then click the client name.

If you defined a connection to an LDAP server, the Search LDAP check box displays. Select this option to include names from the LDAP directory in the search. The
 icon indicates that clients were found in the LDAP connection.
 -
Enter the email addresses of recipients other than Web Help Desk clients and techs who should also receive the included reports. Separate each email address with a semicolon.

- To add recipients who are not Web Help Desk clients and techs, enter their email addresses in the Other Recipients emails field.
- Select the techs who receive the scheduled reports.
- Click the Tech Recipients tab.
- Click Edit.
- Select the targeted techs, and then click Save.
- Select the scheduled reports that all techs should receive.
- Click the Included Reports tab.
- Click Edit.
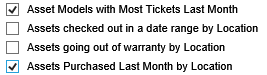
Select the targeted reports, and then click Save.
For example:
- Click the Schedule Details tab.
-
Click Save.
The new schedule is activated and available in the Report Schedules screen.