Install WHD in a stand-alone deployment
SolarWinds strongly recommends that you install Web Help Desk on a server that is protected from unauthorized access by the public. If your use of Web Help Desk does not need to be public or internet-facing, install it on a server that is neither public, nor internet-facing. To learn about best practices for configuring your Web Help Desk installation securely, see Best practices to secure SolarWinds Products.
This section describes how to perform a WHD stand-alone installation on a dedicated server.
For advanced configuration requirements and procedures for setting up Federal Information Processing Standard (FIPS) 140-2 compliant cryptography, see the WHD Administrator Guide.
Prepare for the install
Before you install WHD, do the following:
-
Locate the external database credentials.
If you plan to use SQL Server or MySQL for your primary database, locate the following:
- IP address or host name and port of the database server
- Database name
- Database user name and password
-
Check your administrator account credentials.
- Use an account with local administrative rights.
- Verify that the account is not subject to any local or group policy restrictions.
Install WHD
Install WHD on a server running one of the following operating systems:
- Microsoft Windows Server 2016
- Microsoft Windows Server 2019 and 2022
- Mac OS X or macOS
- Red Hat Enterprise Linux
Install WHD on a server running Microsoft Windows Server 2016
This procedure describes how to install a production or evaluation copy of WHD on a server running Microsoft Windows Server 2016.
- Download the installer from the Customer Portal.
- Quit all other programs.
- Log in to the WHD server as an administrator.
- Log in to the Customer Portal.
- Click Downloads > Download Product.
- Click the Products drop-down menu and select Web Help Desk (WHD).
- Click the Licenses drop-down menu and select your license tier.
- Download Server for Windows 64-bit.
-
Extract the contents of the ZIP file.
The
WebHelpDesk-[version]-x64.zipfile includes the following files:WebHelpDesk-[version].x64.exe, which installs WHD and the latest hotfix (if available) on a stand-alone 64-bit server.WHD-[version].xxxx-Hotfix, which contains the latest hotfix files (if available).
- Run the installation file.
- Right-click
webhelpdesk-[version].64.exeand select Run as Administrator. - Complete the on-screen instructions.
When the installation is complete, click Done.
The Configuration Wizard opens the default browser.
- Right-click
Install WHD on a server running Microsoft Windows Server 2019 and 2022
This procedure describes how to install a production or evaluation copy of WHD on a server running Microsoft Windows Server 2019 and 2022.
- On the Windows taskbar, right-click the Windows icon and select System.
- Under Related Settings, click Advanced system settings.
- From the Advanced tab, click Environment Variables.
- Under System Variables, click New.
- Create a new environment variable.
In the Variable name field, enter:
JAVA_TOOL_OPTIONS
In the Variable value field, enter:
"-Dos.name=Windows Server 2019"
- Click OK > OK to save your changes.
- Download the installer from the Customer Portal.
- Quit all other programs.
- Log in to the WHD server as an administrator.
- Log in to the Customer Portal.
- Click Downloads > Download Product.
- Click the Products drop-down menu and select Web Help Desk (WHD).
- Click the Licenses drop-down menu and select your license tier.
- Download Server for Windows 64-bit.
-
Open the directory where you downloaded the installer.
For example,:
C:\Downloads -
Extract the contents of the ZIP file.
The
WebHelpDesk-[version]-x64.zipfile includes the following files:WebHelpDesk-[version].x64.exe, which installs WHD and the latest hotfixes (if available) on a stand-alone 64-bit server.WHD-[version].xxxx-Hotfix, which contains the latest hotfixes (if available).
- Run the installation file.
- Right-click
webhelpdesk-[version].64.exeand select Run as Administrator. - Complete the on-screen instructions.
When the installation is complete, click Done.
The Configuration Wizard opens the default browser.
- Right-click
Install WHD on a server running Mac OS X or macOS
This procedure describes how to install a production or evaluation copy of WHD on a server running a supported macOS operating system.
- Download the installer from the Customer Portal.
- Log in to the WHD server as an administrator.
- Quit all other programs.
- Log in to the Customer Portal.
- Click Downloads > Download Product.
- Click the Products drop-down menu and select Web Help Desk (WHD).
- Click the Licenses drop-down menu and select your license tier.
- Download Server for macOS.
-
Extract the contents from the ZIP file.
The ZIP file includes the following files:
webhelpdesk-[version].64.pkg, which installs WHD and the latest hotfix (if available) for a standalone server.-
WHD-[version].xxxx-Hotfix, which contains the latest hotfix files (if available).
- Run the installation file.
- Double-click
webhelpdesk-[version].64.pkg. - Complete the on-screen instructions.
When the installation is complete, click Done.
The Configuration Wizard opens the default browser.
- Double-click
Install WHD on a server running Red Hat Enterprise Linux 64-bit
This procedure describes how to install a production or evaluation copy of WHD on a server running a supported Red Hat Enterprise Linux operating system.
- Download the installation file from the Customer Portal.
- Quit all other programs.
- Log in to the WHD server as an administrator.
- Log in to the Customer Portal.
- Click Downloads > Download Product.
- Click the Products drop-down menu and select Web Help Desk (WHD).
- Click the Licenses drop-down menu and select your license tier.
- Download Server for RedHat Linux 64-bit.
- Extract the files from the gzip file.
- Extract the contents of the
WebHelpDesk-[version].xxxx.x86_64.rpm.gzfile. Open a terminal window and execute:
gunzip webhelpdesk-[version].x86_64.rpmThe unzipped file includes the following file:
webhelpdesk-[version].xxxx.x86_64.rpmThis file installs WHD for a standalone server.
Verify that your Linux server is configured with a supported web browser.
If your Linux server is configured with a supported web browser, go to Open WHD on a server with a web browser.
If your Linux server is not configured with a supported web browser, go to Open WHD on a server without a web browser.
- Extract the contents of the
Open WHD on a server with a supported web browser
-
Open a terminal window and execute:
rpm -ivh webhelpdesk-[version].x86_64.rpm -
Open a web browser and navigate to:
https://<server_IP_address>:8443Secure port 8443 is the default port. If you log in using unsecure port 8081, a warning displays on the screen, indicating that the connection is not private.
The Configuration Wizard displays on the screen.
Open WHD on a server without a supported web browser
-
Locate and record your workstation IP address.
-
Open a Terminal window and navigate to the following directory:
/usr/local/webhelpdesk/conf -
In the
/confdirectory, open thewhd.conffile in a text editor. -
Locate the following parameter:
PRIVILEGED_NETWORKS= -
Add your Linux workstation IP address to this parameter.
For example, if your workstation IP address is 192.168.1.128, append the parameter as:
PRIVILEGED_NETWORKS=192.168.1.128 -
Save and close the file.
-
In the Terminal window, navigate to:
https://<server_IP_address>:8443Secure port 8443 is the default port. If you log in using unsecure port 8081, a warning displays on the screen, indicating that the connection is not private.
Complete the installation
When the installation is completed, the Configuration Wizard runs on secure port 8443 in the default browser. Complete the wizard, and then enable and configure the 64-bit Java Virtual Machine (JVM) memory on the WHD server (if applicable).
If you log in using unsecure port 8081, the installer displays a warning message, indicating that the connection is not private.
- Click the Start menu and navigate to Web Help Desk > Web Help Desk.
-
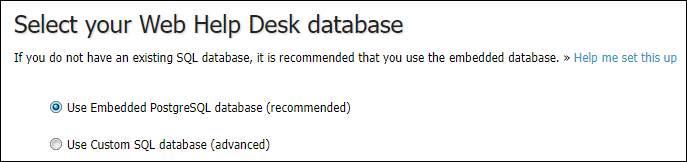
Select a database for your WHD installation.
To create a custom SQL database on a host running Microsoft SQL Server, go to step 2.
To create an embedded PostgreSQL database on your WHD server, go to step 3.
-
If WHD will be configured with an SQL Server database, set up the custom SQL database.
-
Select Use Custom SQL database (advanced).

-
(Optional) To create an account on your SQL Server database, click Create database and user account if necessary, enter the admin user name and password, and then click Create.

-
Click the Database Type drop-down menu and select Microsoft SQL Server 2008+.

-
In the Host field, enter the IP address or hostname of the SQL database server.

-
In the Port field, enter the SQL server port number. The default port is 1433.
-
In the Database Name field, enter the name of the SQL database instance.

-
In the Username field, enter the name of your local SQL account.

-
In the Password field, enter the password of your local SQL account.

-
Click Test to test the database connection.
WHD creates the SQL database for your deployment.
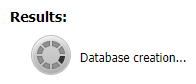
When the procedure is completed, the installer displays the following message:

If Results displays an error, follow the instructions on your screen, make the necessary changes, and then click Create.
- Click Next.
- Go to step 5.
-
- Configure the embedded PostgreSQL database for your deployment.
Select Use Embedded PostgreSQL database (recommended).
In the Database Name field, enter a name for the PostgreSQL database.

The database name must:
Contain no more than 50 characters.
Begin with an upper-case letter (A-Z) or a lower-case letter (a-z) using letters and numbers as the remaining characters
Not include postgres, template0, or template1
In the Username field, enter a username.

The username must:
Contain no more than 50 characters
Begin with an upper-case letter (A-Z) or a lower-case letter (a-z) using letters and numbers as the remaining characters
Not include whd or postgres.
In the Password field, enter a password for the PostgreSQL database.

SolarWinds recommends creating a password that includes:
At least nine characters up to 50 characters
At least two upper-case letters
At least two lower-case letters
At least two numbers
At least two of the following special characters:
‘ ~ ! @ # $ % ^ & * ( ) _ - + = { } [ ] \ / < > , . ; ? ' : | (space)
In the Admin username field, enter a username for the PostgreSQL administrator. This administrator will manage the PostgreSQL database.

The username must:
Contain no more than 50 characters
Begin with an upper-case letter (A-Z) or a lower-case letter (a-z) and include subsequent letters and numbers
Not include whd or postgres
In the Admin password field, enter a password for the administrator account.

SolarWinds recommends creating a password that includes:
At least nine characters up to 50 characters maximum
At least two upper-case letters
At least two lower-case letters
At least two numbers
At least two of the following special characters:
‘ ~ ! @ # $ % ^ & * ( ) _ - + = { } [ ] \ / < > , . ; ? ' : | (space)
Click Create.
WHD creates the PostgreSQL database for your deployment.
When the procedure is completed, the installer displays the following message:
If Results displays an error, follow the instructions on your screen, make the necessary changes, and then click Create.
Click Next.
-
-
Complete the fields as required to configure the incoming email account and outgoing server.

Each incoming mail account is associated with a specific request type, an optional tech group, and an outgoing mail account (SMTP server) used to deliver outgoing mail. For example, you could have an incoming mail account for all IT tickets, another account for HR tickets, and another for Facilities tickets.
WHD checks the Incoming mail accounts each minute for new messages, processes the messages into tickets, and deletes the processed messages from the incoming mail server.
If you are not ready to set up the email accounts, you can skip this step and set up the email accounts later from the WHD Web Console. To continue without configuring email, click Skip this step and go to step 6.
-
Expand Advanced to set up the incoming mail ports.
The installer displays the incoming mail ports menu.

-
In the Incoming Mail Port field, enter the port number for incoming mail.
By default, WHD uses your first configured incoming mail account request type as the default. After you complete the Getting Started Wizard, you can update your email account information at Setup > email.
- In the SMTP port field, enter the port number for outgoing mail.
- Complete the remaining fields and check boxes as required.
-
Click Test to test your email address.
If the email connection is good, the installer displays a confirmation message.
If the email connection is not good, verify the Test Email Addresses field value and then click Test.
- Click Next to continue.
-
-
Complete the fields to create the default admin account.

The default admin account is a local super user account used to:
- Log in to WHD for the first time and configure the application.
- Access all WHD settings and accounts.
Administrators with a default admin account can create all user accounts, including additional admin accounts. The default admin account includes tech account privileges, so you can create and process tickets with tech privileges. Techs can have either Tech or Tech Admin account privileges.
-
Click Next to continue.
-
(Optional) Create one or more custom request types.
When you install WHD, the last step of the WHD Getting Started wizard allows you to add request types or edit preconfigured request types. This step of the wizard is optional.
You may find it easier to add request types in the Tickets panel after WHD is configured.
SolarWinds recommends that you click Finish to bypass this step in the wizard and take time to plan the request types you need. See Create tech groups and request types in the WHD Getting Started Guide for information about creating request types.

-
Click Finish.
The Configuration Wizard applies your settings and configures the application.

This process may take several minutes to complete.
-
Click Login as admin to continue the setup.

The Wizard opens the WHD Administrator Console on port 8443 using HTTPS.
WHD is installed on your server.
If you log in to WHD and receive an HTTP Status 404 error, see HTTP Status 404: The requested resource () is not available to resolve this issue.
- In the Log In box, enter your administrator email and password, and then click Log In.
-
Review the End User License Agreement. If you agree with the license agreement, accept the terms and click Continue.
The WHD Administrator Console displays on your screen.
For security purposes, SolarWinds recommends that you change the password used for the WHD service. - (PostgreSQL database only) Change the default PostgreSQL database password.
Enable the 64-bit JVM memory
WHD requires additional max heap memory over the Java Virtual Machine (JVM) default setting. To improve application performance, enable the 64-bit JVM memory in the whd.conf file. When you are finished, increase the MAXIMUM_MEMORY value in the whd.conf file based on the number of techs in your deployment, and then restart the application.
-
On the WHD server, navigate to the WHD
confdirectory based on your operating system.- macOS:
/Library/WebHelpDesk/conf - Microsoft Windows:
\Program Files\WebHelpDesk\bin\wrapper\conf - Linux:
/usr/local/webhelpdesk/conf
- macOS:
-
If you are running Windows, go to step 3.
If you are running macOS or Linux, do the following:
- In the
confdirectory, open thewhd.conffile using a text editor (such as Notepad). -
Add the following argument to the
JAVA_OPTSoption:JAVA_OPTS="-d64" -
Save your changes.
-
Go to step 4.
- In the
-
If you are running Windows, do the following:
-
In the
confdirectory, open thewrapper_template.conffile using a text editor (such as Notepad). -
Scroll down to the Java Additional Parameters section.
-
At the end of the parameter list, add the following parameter:
wrapper.java.additional.xx=-d64where
xxis the next corresponding parameter number. -
Save the file.
-
Restart Web Help Desk.
-
Click Setup > General > System Information.
-
Click Restart Web Help Desk.
-
-
Log in as an administrator.
-
-
Increase the JVM memory.
-
Determine the appropriate amount of memory for your deployment using the following formula:
(Average number of concurrent techs x 150) + (Average number of concurrent users x 25) =
MAXIMUM_MEMORYvalueFor example, If the average number of concurrent techs is 10 and the average number of concurrent users is 50, the recommended
MAXIMUM_MEMORYvalue is 2750 (which is 2.75 GB):(10 x 150 = 1500) + (50 x 25 = 1250) = 2750
The
MAXIMUM_MEMORYvalue should not be greater than the total memory in the WHD server. - Update the
whd.conffile for your Microsoft Windows Server, macOS, or Linux operating system.
-
Microsoft Windows Server
-
Navigate to the
<WebHelpDesk>/confdirectory.The default directory is located at:
C:\Program Files\WebHelpDesk\ - Open the
\confdirectory. - Open the
whd.conffile in a text editor (such as Notepad). -
In the
whd.conffile, locate theMAXIMUM_MEMORYparameter.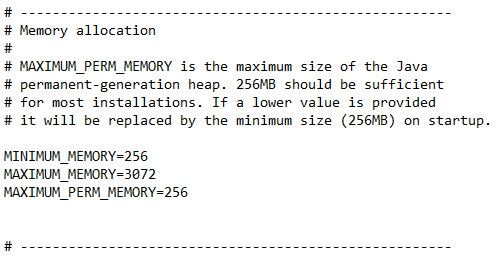
- Change the parameter value to the value you calculated in an earlier step.
- Save and close the file.
- Restart Web WHD.
- In the
WebHelpDeskdirectory, right-clickwhd_stop.batand select Run as Administrator. - After the command prompt window closes, right-click
whd_start.batand select Run as Administrator.
- In the
macOS
- Using Finder, navigate to Applications > Utilities > Terminal and open the Terminal application.
-
Change the directory to the
<WebHelpDesk>/confdirectory:cd /Library/WebHelpDesk/conf -
Open the
whd.conffile by executing:sudo vi whd.conf -
Enter the following command to change the maximum JVM to the value you calculated in a previous step:
:%s/MAXIMUM_MEMORY=512/MAXIMUM_MEMORY=[memory in MB]/ :wqFor example, if you would like to use 2750 MB, execute:
:%s/MAXIMUM_MEMORY=512/MAXIMUM_MEMORY=2750/ :wq - Save and close the file.
-
Restart WHD.
-
Open a terminal window and execute:
sudo /Library/WebHelpDesk/whd stop -
In the terminal window, execute:
sudo /Library/WebHelpDesk/whd start
-
Linux
- Open a terminal window
-
Change the directory to the
<WebHelpDesk>/confdirectory.Type:
cd /usr/local/webhelpdesk/conf -
Open the
whd.conffile.Type:
sudo vi whd.conf -
Change the maximum JVM to the appropriate value.
Execute:
:%s/MAXIMUM_MEMORY=512/MAXIMUM_MEMORY=[memory in MB]/ :wqFor example, if you want to change the value to 2750 MB, type:
:%s/MAXIMUM_MEMORY=512/MAXIMUM_MEMORY=2750/ :wq - Save and close the file.
-
Restart WHD.
-
In the terminal window, execute:
sudo service webhelpdesk stop -
In the terminal window, execute:
sudo service webhelpdesk start
-