Define client options
Client options are general settings that affect all clients who log in to Web Help Desk. Review these options and update them as needed.
- In the toolbar, click Setup and select Clients > Options.
-
Select the checkbox to enable clients to log in to Web Help Desk using the web interface.
 For improved flexibility, you can override this option at the Location level.
 -
Select the attribute clients use to log in to Web Help Desk. If external authentication is required, User Name is automatically selected for you. See Configure the authentication settings for details.
 Tech use their name to log in to Web Help Desk, bypassing this setting.
 -
Determine whether new clients can create an account. If domain matching is enabled, clients can create an account if their email address includes an accepted domain.

For additional security, SolarWinds recommends selecting Only if the client's email matches an Accepted Domain and entering the accepted domains in the targeted field.
-
Select the checkbox if you want to email login information to new clients. Otherwise, leave the checkbox unchecked.

To change the text of the email that Web Help Desk sends, choose Setup > email > Templates and open the New Account Message template.
-
Select the checkbox to validate all new customer accounts and changes to email addresses on an existing accounts. Otherwise, leave this checkbox unchecked.

When selected, the customer will receive an email with a link to validate the new email address. The client cannot create or view tickets until Web Help Desk verifies the email address.
See Apply your email templates for details about creating or modifying the verification message text. -
Select the initial view clients see when they log in to the Client user interface.

-
Select a method to approve tickets.

Select email to send the approver an email that contains voting links to approve or deny a ticket. Select Web Interface to send the approver an email with a link to the web interface that contain the voting links.
-
Select a method for a client to confirm that their ticket was resolved.

Select email if your clients do not use the web interface or cannot reach the interface behind a corporate firewall.
Select Web Interface if your clients use a web browser to access the web interface.
-
Select the template used to display client and tech names within the application.

-
Select the template used to display client and tech names within the application where space is constrained, such as in lists.

-
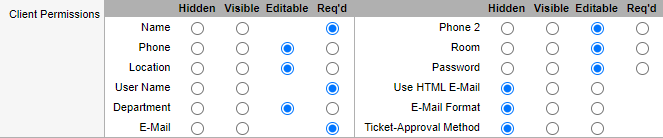
Select the permissions that apply for clients within the Client user interface.
- Click Save.
- In the toolbar, click Setup > Assets > Options.
-
Select the checkbox to display asset notes in the Client interface. This default value can be overwritten for each asset.

-
(Optional) Select the checkbox to limit the assets visible to the client.
 When the Clients Can Search Assets checkbox and this checkbox are selected, assets marked as Reservable and those that are specifically assigned to the client can only be viewed by the client.
 -
Click Save.