
Configure SolarWinds Observability Self-Hosted integration
To retrieve and process alerts from SolarWinds Observability Self-Hosted, complete the following tasks.
Enter a SolarWinds Observability Self-Hosted alert source
When you add the SolarWinds Observability Self-Hosted server link to Web Help Desk, it creates a communications link between the SolarWinds Platform and your Web Help Desk server. When an event occurs, Web Help Desk can generate a ticket from the alert and forward the ticket to the appropriate tech for troubleshooting and resolution.
-
Techs without administrative privileges cannot access SolarWinds Integration in the web console.
-
If you need to edit connection details for a SolarWinds source, delete the existing source and create a new source.
-
Log in to Web Help Desk as an administrator.
- Click Setup > SolarWinds Integration > SolarWinds Connection.
-
Click Add New SolarWinds Source.
- In the Add New SolarWinds Source screen, enter the new SolarWinds source name in the Source Name field.
-
Select the request type that most closely matches the connection.
For example, if you are creating a connection to SolarWinds SAM to address alerts related to server health, select a request type linked to a tech group that troubleshoots and resolves server issues.
-
You can select one request type for one SolarWinds connection.
-
To be listed on the SolarWinds Integration page, a request type must have the Use as FAQ / SolarWinds Integration option enabled, or it must be a parent to another request type with that setting enabled.
-
- Enter the SolarWinds Server IP Address or Fully Qualified Domain Name (FQDN).
-
Enter the SolarWinds administrator user name and password.
To ensure Web Help Desk can access the required SolarWinds alerts, enter administrator-level SolarWinds account and credentials data into Web Help Desk.
-
Click Test.
When Web Help Desk creates a connection with a SolarWinds Observability Self-Hosted alert source, the checked areas in the window contain green check marks.

- Click Next to continue.
Configure the alert filtering rules
You can configure an alert filter to recognize a specific issue in SolarWinds Platform and create a help desk ticket based on that issue.
While Web Help Desk can support SolarWinds Observability Self-Hosted alerts from multiple servers, the product can only process up to 60 alerts per second. If the incoming SolarWinds Observability Self-Hosted alerts exceed this limit, Web Help Desk will not be able to process all of the alerts.
Filters
Web Help Desk creates help desk tickets from SolarWinds Observability Self-Hosted alerts by matching the SolarWinds Observability Self-Hosted alert contents or features to filters you set up in the application. To create alert filtering rules, apply the property names that exist in your Web Help Desk alerts.
These alerts can include default names or other types of name configurations assigned by the SolarWinds Observability Self-Hosted user. After you set up the SolarWinds server in Web Help Desk and gather information about your SolarWinds Observability Self-Hosted alerts and associated properties, configure Web Help Desk to transform SolarWinds Observability Self-Hosted alerts into client tickets.
About rule configuration
By default, Web Help Desk does not monitor SolarWinds Observability Self-Hosted alerts. To transform alerts into Web Help Desk tickets, select and define the appropriate rules so the application can recognize the alerts.
The following table describes the filtering rule types.
| Filtering rule type | Rule description |
|---|---|
| Matching Rule |
Defines the characteristics alerts must contain for Web Help Desk to recognize and transform the alerts into tickets or ignore them. These characteristics include:
|
| AND/OR block |
Specifies whether Web Help Desk accepts or rejects alerts based on whether they meet Any or All child rules in a complex rule. |
| Child Rule |
Provides additional filtering on existing rules. For example, when an initial filtering rule transforms all alerts with a Critical severity into tickets, you can create child rules to transform only Critical severity alerts from specific operating systems into Web Help Desk alerts. |
| Complex Rule | A set of rules that contain at least one parent rule (which can be a Matching rule or an AND/OR block), plus one or more child rules. |
Matching rules
Adding a new matching rule notifies Web Help Desk to match certain variables in alert text fields or a defined severity level.
The following table provides the Web Help Desk filtering options.
| Filter option | Description |
|---|---|
| Accept alert | Enables Web Help Desk to recognize the alert. |
| Reject alert | Enables Web Help Desk to ignore the alert. |
| if Severity |
Matches alerts by severity level. If you select this option, choose one of the following:
|
| if Alert Field |
To further define rules, enter a SolarWinds Observability Self-Hosted alert field variable. |
Complex rules
You can add an And/Or block to a create a filter rule based on more than one condition. The Any rule creates a ticket when any child condition is true. The All rule creates a ticket only when all child conditions are true.

In the following All child rule example, a ticket is created when a node from an IP address is up and component availability is down.

Examples: Configure an alert filtering rule
You must configure an alert filtering rule with a severity or include a severity and a match to a specific alert field. You can add multiple alert field matches.
Configure a matching rule
The figures below show an example of a matching rule that accepts the alert if the value of the Node Status field is Up.
-
Click Add new matching rule.
-
Select Accept alert or Reject alert.

-
Configure the rule based on the severity of the alert, or an alert field value.
For both the Accept alert and Reject alert options, Ignore case and Ignore white space are active by default. To ensure the best results, leave these options selected.

Add an And/Or block
The figures below show an example of an And/Or block that accepts the alert if the severity is Critical or if the value of the Node Status field is Up.
-
Click Add new And/Or block.
-
Select Accept alert or Reject alert.

-
Select if Any to configure an OR rule, or select if All to configure an AND rule.

-
Click Add Child Rule.
-
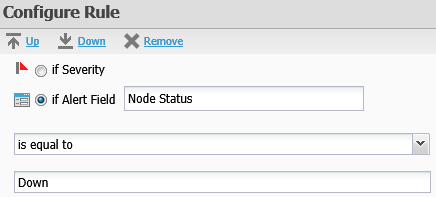
Configure the rule based on the severity of the alert, or an alert field value.

- To add another child rule:
In the Filters pane, click the And/Or block.
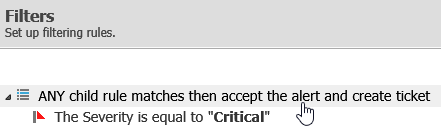
- In the Configure Complex Rule pane, click Add Child Rule.
Configure the rule.
Test the alert filtering rules
Test your filter rules to ensure they are filtering properties correctly. Your test should include the severity and any alert fields that you configured in the filter rule.
This example includes a test for the following filter rule.

-
After you have configured the filter rule, click Test.
- Select a severity.
- Click Add New Property, select an alert field, and enter the value.
-
Add all alert properties defined in the filter rule, and click Test.

If your rules are configured correctly, a message states that the filter rules match and the alert is accepted in the Test Results pane. Click Done.
If your rules are not configured correctly, a message states that the filter rules did not match and the alert is rejected in the Test Results pane. Click Back to resolve your configuration errors.