Create tickets
This section of the Web Help Desk tech training describes how tickets can be created, how to create a ticket through the tech interface, how to create a ticket through email, and the Web Help Desk ticket assignment logic. Use this material as it is, or copy and revise it to reflect your organization's practices and Web Help Desk configuration.
How to create Web Help Desk tickets
Clients can create tickets through email or through the Web using the Web Help Desk client interface. The client interface is what clients see when they log in to the Web console.
Techs can also create tickets through email or through the Web. In most cases, techs create tickets through the Web using the Web Help Desk tech interface. The tech interface is what techs see by default when they log in to the Web console.
A tech can access the client interface if the tech's profile is associated with a client account.
In addition, techs with the required privilege can define Web Help Desk tasks (scripts) which will create certain types of tickets automatically.
Create a ticket through the Web Help Desk tech interface
-
In the toolbar, click Tickets.

-
Click the My Tickets tab, and then click New Ticket.
 You can also click New Ticket from the remaining tabs except the Dashboard tab.
 -
If you are creating a ticket to report a client issue, complete fields in the Client Info tab to locate and select the client.
-
Enter and select the client details in the tab window.

-
Click Search.
-
In the Client Name column, locate and click the client.
If the client is new, click Create New, complete the fields, and then click Save. All bold fields are required.
-
-
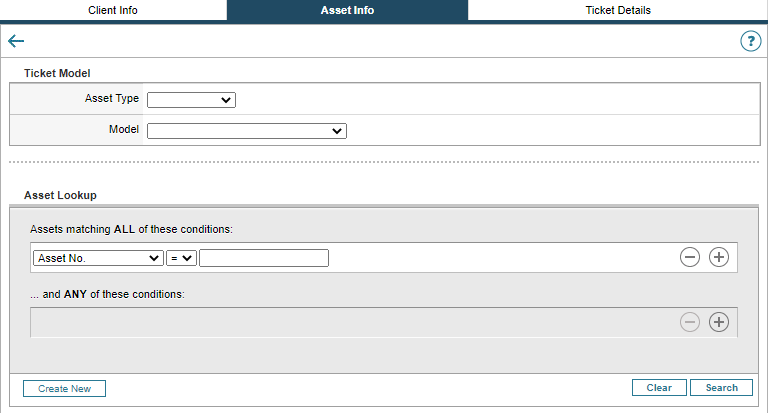
If the ticket requires an asset, click the Asset tab to look up and add the asset.
-
Click the Asset Info tab.
-
Select the asset type and model. You can also locate the asset using a boolean search in Asset Lookup.
-
Click Search.
-
Locate and select the asset in the search results.
You can see successfully added assets on the Asset Info tab. Refer to See count of attached assets on tickets.
-
-
Click the Ticket Details tab.
-
Select a location and room.

-
Select a department who resolves this client issue.

- Select a request type that corresponds with a group in your organization who resolves this client issue.

The Assign To field displays, showing which tech group receives this request based on the Web Help Desk ticket assignment logic.

You can override the ticket assignment logic and assign the ticket to yourself.
-
Enter a subject and the request details that describe the issue. If you need to add an attachment, click Add File.
 If an error message displays in the console stating that the attachment exceeds the file size limits, you can adjust the maximum attachment size at Setup > General > Options.
 -
(Optional) Add a note that provides additional information about the ticket issue.
To hide this note from the client, deselect the Visible to Client checkbox.
You can collaborate with techs and administrators in the Note box using the @ Mention feature. This feature allows you to add notes within a ticket and tag (or mention) the administrator or tech regarding ticket troubleshooting and resolution.
After you save the ticket, the tagged team member receives an email that reiterates the ticket note. This process can assist your team troubleshoot and resolve tickets in a timely manner.
To tag a tech or administrator in the note:
-
Click the @ drop-down menu and select a tech or administrator.

For example, Harold Jenkins is selected as the message recipient. The BBCode will highlight his name with blue text in the note. Click
 for more information.If the tech or administrator is out of the office or on vacation, their assigned backup receives the note.
-
Enter the message you want to send to the tech or administrator. For example:

-
Repeat step a through step c to add additional techs or administrators to the note.
-
Select the note options.
Deselect Visible to Client to hide the note conversations from the ticket clients.
Select Solution to assign this note as the solution.
Select Date Override to set a custom time stamp to the note.
-
Click Save.
The note is saved in the ticket. The tech or administrator will receive a message after you complete the ticket and click Send & email.

-
-
Under Status and Schedule, select the ticket priority that is appropriate for this ticket.

-
Under Recipients, select the client or tech checkbox to indicate who receive details about this ticket. If the recipient is not a client or tech, enter their email address in the Cc or Bcc fields and then select the corresponding checkbox. See Enable ticket updates from unauthorized users for guidance.

-
(Optional) Click the lock to toggle the ticket privacy setting.

If you select Private, users without permission cannot see the tickets.

-
Click Save to save the ticket.
Click Save and Send email to save the ticket and send an email to the specified recipients.
Techs and administrators mentioned in a note also email messages.
The tech, client, location, and ticket setup options determine who receives email.
Troubleshoot ticket issues
This section describes some issues you may encounter when saving or responding to a ticket.
Could not create transport for email messages
If you click Save and email and an error message displays indicating that the application could not create transport for email messages, Check the incoming email account settings at Setup > Email > Incoming Email Accounts. Verify that the settings are configured correctly.
TLS error after saving a ticket
If you click Save and email and an error message displays indicating that Transport Layer Security (TLS) 1.0 and 1.1 are not supported, upgrade your deployment to Web Help Desk 12.7.7 or later. This version supports the newer TLS 1.2 protocol. Microsoft deprecated TLS 1.0 and 1.1 beginning in October 2020. See the Microsoft Docs website for details.
Ticket emails are not sent
If Web Help Desk does not send the ticket email or stops processing the emails in the user mailbox, update the email password. The password may be expired or was changed by another user. Additionally, make sure that the user account is accessing the correct mail servers.
Client interface time does not match the user computer time
If you create a ticket or add notes from the Client interface, the ticket registered time does not match the user's computer. If you switch to the Tech interface, the time matches the time from the user's PC.
To correct this issue:
-
Return to the Tech interface.
-
Click Setup > General > Time and Place.
-
Click the Business Zones tab.
Click the Time Zone drop-down menu and select System Default Time Zone.
-
Click Save.
Enable ticket updates from unauthorized users
The Recipients section allows you to email the client or assigned technician with details about the ticket. You can also carbon copy (CC) and blind carbon copy (BCC) users who are not clients or techs.
When Web Help Desk receives a reply from users who are not clients or techs but were CC or BCC recipients in the ticket update email, the application notifies the sender that their email address contains an unauthorized domain. As a result, the ticket is not updated.
To enable ticket updates from CC or BCC users who are not clients or techs:
- Log in to Web Help Desk as an administrator.
- Click Setup > Tickets > Options.
-
Under General Options, select the Allow Non-User CC Updates checkbox.

- Click Save.
- Click Clients > Options.
-
In the Accepted Domains field, enter the email domain of the CC or BCC recipient's email address. For example, mycompany.com.

This field specifies which domains are accepted when Web Help Desk does not recognize a sender's email address.
If the email address domain is not in the Accepted Domains list, Web Help Desk will notify the sender by email that the address contains an unauthorized domain.
If the email address domain is included in the Accepted Domains list, a new account will be created for the unauthorized user. If the address matches an Accepted Domain that was defined for a location, the new account is assigned to that location.
- Click Save.
- Click email > Incoming Mail Accounts.
- In the email Account column, click the active incoming email account.
-
In the Request Type field, verify that the request type matches the request type in the ticket addressed by the non-user.

- Save your changes.
Delete a ticket note
- Log in to Web Help Desk as a technician.
- Select and open a ticket.
- In the Ticket Details tab, scroll down to Notes.
- Locate the note you want to delete.
-
In the Date column, click the date timestamp of the ticket.

-
Click Delete.

- Click OK when prompted.
Create a ticket through email
Clients and techs can create tickets by sending an email message to the dedicated help desk email address. Web Help Desk creates a ticket for each new message received through its dedicated email address.
Organizations can choose to set up help desk email addresses. For example, an organization can have one email for HR issues (hr@example.com) and another for all other issues (support@example.com). Tickets created through the HR address are assigned an HR request type, which routes them to a specific tech group. Tickets created through the general support address are assigned a general request type. Tech groups who receive general request types must evaluate the ticket and assign the appropriate request type to each ticket.
Identify the help desk email accounts your organization has set up in the table below.
| Email Address | Request Type | Tech Group |
|---|---|---|
How Web Help Desk assigns tickets
Web Help Desk uses the ticket request type, location, and department to determine which tech group should handle the ticket. Within the tech group, Web Help Desk looks at each tech's availability (the tech's work and vacation schedules) and workload. See the following chart for details.
