Launch and close a Dameware MRC session
You can launch a Dameware Mini Remote Control (MRC) session in Web Help Desk from a client ticket or an asset.
Each asset must have a valid IP address in Web Help Desk. If an asset does not have a valid IP address, you will not be able to establish a Dameware session.
When you start the application from Web Help Desk, it opens in Integration mode, allowing you to save information you collect from a remote support session in Dameware MRC to a Web Help Desk ticket. A banner appears during the session when the application runs in Web Help Desk Integration mode.
When you close your session, you can save the following session details to the client ticket:
- Tech notes
- Chat transcripts
- Screen shots
Launch a session from a client ticket
-
Click the My Tickets tab.

- Open an existing Web Help Desk ticket assigned to you.
-
Click the Asset Info tab.

-
In the D. Client Assets table, click the number associated to the asset in the No. column. For example, 485.

-
In the Ticket Assets table, click the Dameware MRC icon connected to the asset.

The Dameware MRC console displays, stating that you are running in Web Help Desk Integration mode.
If the Dameware icon is not present, verify that you configured tech access to Dameware MRC in Web Help Desk. -
Troubleshoot the asset as needed.
- When you are finished, close the session.
Launch a session from an asset
-
Search for the asset.
-
Locate the asset in the search results.
-
In the Asset No. field, click the Dameware integration button next to the asset number.

The Dameware MRC console displays, stating that you are running in Web Help Desk Integration mode.
-
Troubleshoot the asset as needed.
- When you are finished, close the session.
Close the session
- Click Disconnect.
-
Log in to Web Help Desk to save the Dameware troubleshooting information.
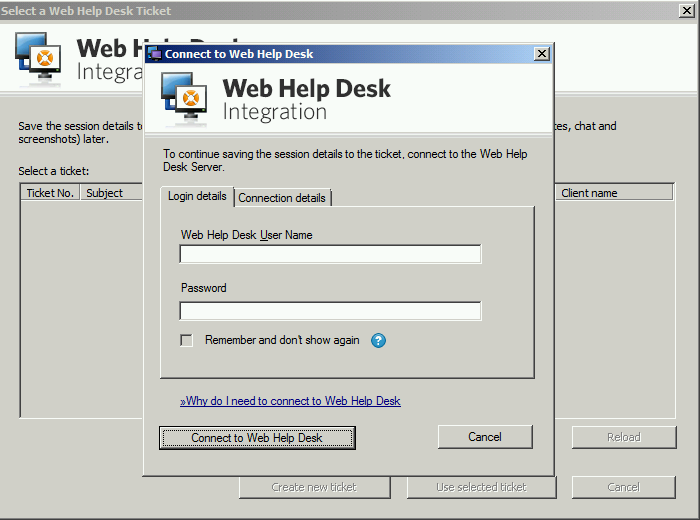
-
Select the ticket and click Use selected ticket to save the session details to the Web Help Desk ticket listed on the screen.
You must either have a ticket number or create a new ticket so the information can be saved to Web Help Desk.
To save the session to a new ticket, click Create new ticket.

-
Enter any information you or the client may want to refer to later about the troubleshooting session.
To make this information available to clients, select Make the session details and attachments visible to clients.
-
Click Save details to the ticket.

The ticket updates are uploaded to the ticket.

- Click OK to return to Web Help Desk.
When completed,
- The ticket updates or new ticket displays in your list of tickets.
- Chat sessions are saved in RTF format.
- Screen shots are stored in PNG format.
- Session details are incorporated into the note.