Configure the WSUS inventory task
The WSUS server inventory task uses the WSUS API to access data on your upstream and downstream WSUS servers and populate the WSUS reports located at Administration and Reporting > Reporting > WSUS Reports.

These reports provide information about WSUS server performance and update packages installed on managed systems by the WSUS server. Patch Manager includes several common WSUS reports that help you identify:
- Systems running approved updates
- Packages that failed to install during the update
- Systems with approved, installed, or failed Microsoft and third-party updates
Schedule your WSUS server inventory tasks to run each day outside of your normal operating hours. The WSUS Inventory task collects large amounts of data from all managed computers in your network, which can impact your business operations. When the task is completed, the data is stored in the Patch Manager database.
- Log in to the Patch Manager Admin Console as an administrator.
-
In the Patch Manager menu, expand Enterprise > Update Services.

- Select your WSUS server.
- In the Actions pane, click WSUS Inventory.
-
In the WSUS Inventory Options dialog box, select Direct or All.
If you select Direct, WSUS inventory will only gather the data from computers directly reporting to the WSUS server for which the targeted inventory is configured.
If you select All, the WSUS inventory will gather data about all computers reporting to upstream and downstream WSUS servers. Select this option if your WSUS servers are in Replica Mode with your upstream and downstream servers.
Select an option to review the description.

- Verify the remaining options, and click Save.
- Select a time and date when the WSUS Inventory task begins.
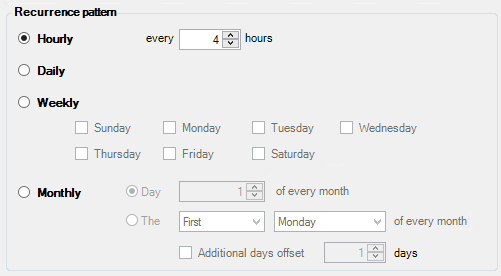
- Select how often Patch Manager runs the task.
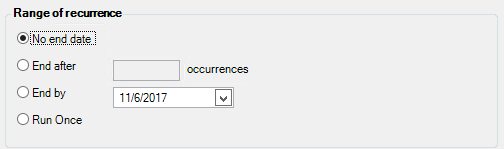
- Select a time to stop the task, and click OK.
SolarWinds recommends selecting No end date to ensure the WSUS server continues to receive updates from the WSUS database.
- In the navigation menu, expand Administration and Reporting and select Scheduled Tasks.
- Verify that the task is displayed in the Schedule Tasks pane.