Set up an Automation Server
When you install Patch Manager in large or distributed networks, your network environment may require additional Automation Servers to manage your deployment. To address this issue, Patch Manager uses Automation Servers to initiate RPC/WMI connections to remote systems.
When you deploy an Automation Server, Patch Manager can simultaneously target more systems. Additionally, deploying an Automation Server closer to the remote systems they manage allows the RPC/WMI connection to travel a shorter distance.
If an Automation Server is not set up correctly, you can re-provision the server. See Re-provision an Automation Server for details.
You can use Automation Server roles to manage a dedicated target or manage geographically distributed networks.
You can define specific worker process settings to limit the capacity of each Automation Server. See Automation Server Settings for details.
To set up an Automation Server:
- Download and run the Patch Manager Installer.
- Configure the Automation Server routing rules.
- (Optional) Configure the subnet routing rules.
Run the Patch Manager Installer
- Log in to the Customer Portal.
- Download the Patch Manager software.
- Click Downloads > Download Product.
- Click the Products drop-down menu and select Patch Manager.
- Click the Licenses drop-down menu and select your license tier.
- Download the Patch Manager FULL with SQL installer.
- Log out of the Customer Portal.
-
Launch the installer on your WSUS server.
During the installation, the installer extracts the .NET Framework files.
- Select the following, and then click Next:
- Install the Patch Manager Server Components
- Install the Patch Manager Administrations Console
- If you accept the License Agreement, click Next.
- Select the Destination location and Click Next.
-
(Important) In the SolarWinds Platform Install selection, select Advanced Install.

-
Select Start Copying Files, and click Next.
The Wizard installs the Administrator Console and closes automatically.
- When prompted, click Next to launch the SolarWinds Patch Manager Configuration Wizard.
- Select Automation Server, and click Next.
-
Enter the name of the Primary Patch Manager server and test the connection.
If the test passes, click Next.
If the test does not pass, troubleshoot the issue, and then click Next to test the connection.
- Configure the Windows Firewall for the server, and click Next.
- When prompted, enter the WSUS server information, and click Next.
- Enter a local administrator account that is in the WSUS Administrators group, and click Next.
- Select Install SQL Server Express, and click Next.
- Select the Default service account and click Next.
- Complete the Patch Manager Configuration Wizard and click Next.
Configure the Automation Server routing rules
Patch Manager uses Automation Server routing rules to manage tasks sent to each Automation Server. They define whether or not to assign a task to a default round-robin pool if an assigned server is unavailable.
- Log in to the WSUS server as an administrator.
- Launch the Patch Manager Administration Console.
-
In the navigation pane, expand Patch Manager System Configuration and select Patch Manager Servers.

- In the center pane, select the Automation Server.
-
In the Actions pane, click Patch Manager Server Wizard.

-
In the Patch Manager Server Configuration Wizard, select Edit an Existing Patch Manager Server configuration settings, and click Next.

-
Click the Server Name drop-down menu, select the Automation Server, and click Next.
If the remaining fields do not populate automatically, click Resolve.

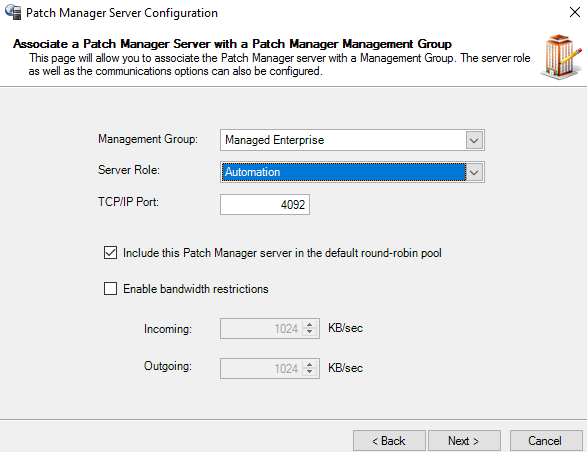
- Associate your Patch Manager Server with a Patch Manager Management Group.

- Click the Management Group drop-down menu and select Managed Enterprise.
- Click Server Role and select Automation.
- Review the remaining options, then click Next.
- Complete the Wizard.
-
In the navigation pane, expand Patch Manager System Configuration > Management Groups and select Managed Enterprise.

-
Select the Automation Server Routing Rules tab.

-
In the Actions pane under Routing Rules, select Add WSUS Server Rule.

-
Click the Server Name drop-down menu, select the WSUS server, and click Save.
If the remaining fields do not populate automatically, click Resolve.

-
Click Test Connection.
If the connection passes, a dialog box displays. Click OK.

If the connection does not pass, check the configuration settings in the window.
- Select the Automation Server and Absolute Rule checkboxes and click OK.
-
Restart the EminentWare Data Grid Server Service on the Patch Manager Server and the Automation Server.
If you do not have WSUS servers located at different sites or domains, you are finished.
If you have WSUS servers located at different sites or domains, configure the subnet routing rules.
(Optional) Configure the Subnet Routing Rules
In the navigation pane, expand Patch Manager System Configuration > Management Groups and select Managed Enterprise.
-
In the navigation pane, expand Patch Manager System Configuration > Management Groups and select Managed Enterprise.

-
Click the Automation Server Routing Rules tab.

-
In the Actions pane under Routing Rules, click Add Subnet Rule.

-
In the dialog box, enter the subnet, click Add Subnet, and then click OK.

- Select the Automation Server to use for the subnet, and then click Absolute Rule.
- Click OK.
- Repeat step 3 through step 6 for each additional subnet you want to add to the Automation Server.
