Install Dameware Central Server in two-server mode
This topic provides instructions on installing the Dameware Central Server in two-server mode. When you install the Dameware Central Server on two servers, the Dameware Server is installed on one server, and the Internet Proxy (and optionally, the Mobile Gateway) on the second server. The Internet Proxy and Mobile Gateway are only available with Dameware Remote Support centralized.
See Determine which Dameware Central Server deployment option to use for a description of all deployment options.
Before you begin, ensure that you:
- Obtain a copy of DamewareServer.exe, the Dameware Central Server installation file. The file is available on the SolarWinds Customer Portal. If you have not obtained a copy, complete Task 1 below.
- Review the system requirements and port requirements.
- Are familiar with your IP routing tables so that you can configure port forwarding rules for the port number to IP address and vice versa.
- Know how to set up a Domain Name Server (DNS).
- Know how to acquire a public IP address and set up Network Address Translation (NAT) rules.
- Open the following port:s 80, 443 (444 if 443 is not available), 6129, 6130, 6132, and 6133. You can use other ports if these ports are already in use.
- Obtain administrator access to your Windows firewall.
- Obtain access to the physical firewall, if required.
The installation is divided into separate tasks that need to be completed before you can begin using Dameware Remote Support.
Task 1: Download the Dameware Central Server installation file and license key(s)
If you have not yet created a SolarWinds account, see Access the Customer Portal to create an account.
- Go to the SolarWinds Customer Portal.
- In the Log In tab, enter your email address and password.
- In the Latest Downloads table, click Choose Download for the installation files for Dameware Central Server.
- To obtain your license keys, click Licenses > Manage Licenses.
Task 2: Run the installation file on Server 1
- Log in as an administrator to the first server on which you want to install the Dameware Central Server.
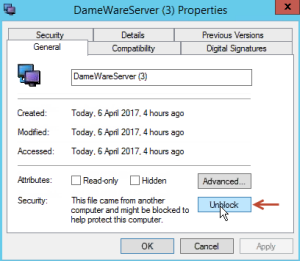
- Right-click the Dameware Server executable, and select Properties.
- If you see an Unblock button, click it, and then click OK.
If the executable is blocked, Dameware does not install correctly.
- Run
DamewareServer.exe.The Installation Wizard opens.
Task 3: Install Dameware on Server 1
- Click Next on the Welcome window.
- If you agree, accept the terms of the license agreement.
- Accept the default installation directory, or click Browse and select a directory.
- On the Select Install Option dialog box, click Advanced Dameware Central Server Install, and click Next.
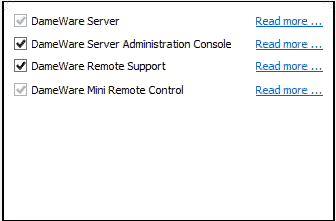
- On the Advanced Install Options dialog box, select the components that you want to install on the Central Server, and click Next.
The first server on which you install Dameware is considered the Central Server.
SolarWinds recommends that you accept the default setting, and install all components on the Central Server.
At a minimum, you must install Dameware Server on the Central Server.
- Select your shortcut preferences, and click Next.
- On the Ready to Install dialog box, click Install.
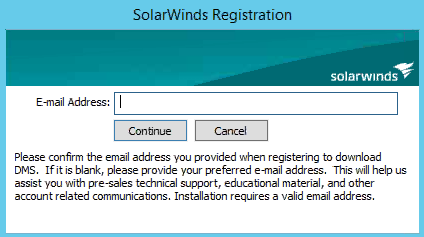
As the installation progresses, a dialog box opens, prompting you to enter an email address. If you do not enter an email address, the installation does not complete.
- On the final dialog box, click Finish.
Task 4: Enter your Dameware license keys
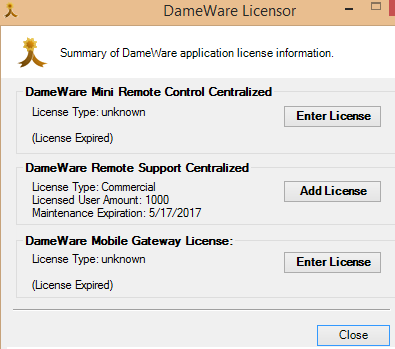
- On the Dameware Licensor dialog box, enter the Dameware Remote Support Centralized license key.
The Dameware Licensor dialog box opens at the end of the installation.
For detailed instructions on using the Licensor to activate your product, see Activate a Dameware license.
- If you are using the Dameware Mobile Gateway, enter that license key.
You are issued a separate license key for the Dameware Mobile Gateway.
To locate your Dameware license key, log in to the SolarWinds Customer Portal, and click Licenses > Manage License.
Task 5: Configure Dameware on Server 1
After the installation completes, the Configuration wizard automatically runs.
- On the Dameware Server Component Introduction panel, click Next.
- On the Select configuration options panel, click Advanced Configuration, and click Next.
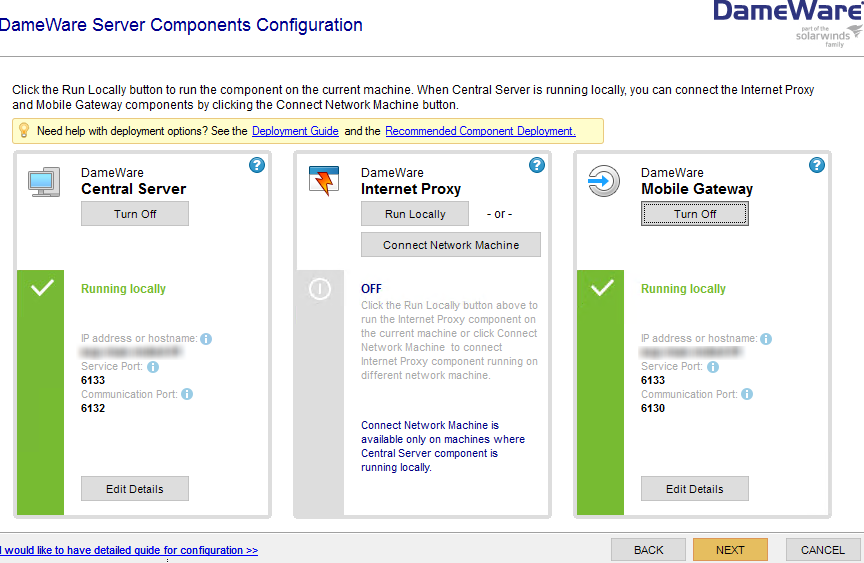
- On the Dameware Server Components Configuration panel, click Run Locally for the Central Server and the Mobile Gateway.
- On the Configuration completed panel, click Finish.
Task 6: Install Dameware on Server 2
- Copy the Dameware installation file to the second server, and run it.
- Click Next on the Welcome window.
- If you agree, accept the terms of the license agreement.
- Accept the default installation directory, or click Browse and select a directory.
- On the Select Install Option dialog box, click Advanced Dameware Central Server Install, and click Next.
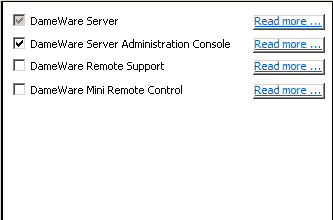
- On the Advanced Install Options dialog box, select the components that you want to install on the Central Server, and click Next.
SolarWinds recommends that you install the Dameware Server and the Dameware Server Administration Console.
At a minimum, you must install Dameware Server on the second server.
- Select your shortcut preferences, and click Next.
- On the Ready to Install dialog box, click Install.
As the installation progresses, a dialog box appears, prompting you to enter an email address. If you do not enter an email address, the installation does not complete.
- On the final dialog box, click Finish.
- Click Close on the Dameware Licensor dialog box.
Dameware licenses are maintained on the Central Server. You do not need to enter license keys again.
Task 7: Configure Dameware on Server 2
After the installation completes, the Configuration wizard automatically runs. As you work through the Configuration wizard, you have the option of configuring the Internet Session URL. You can configure the Internet Session URL now, or you can skip this step and configure the Internet Session URL at a later time.
- On the Dameware Server Component Introduction panel, click Next.
- On the Select configuration options panel, click Advanced Configuration, and click Next.
- On the Dameware Server Components Configuration panel, select the components you want to run on the local machine, and click Next.
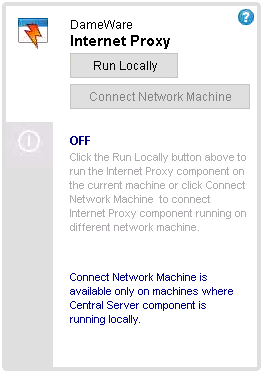
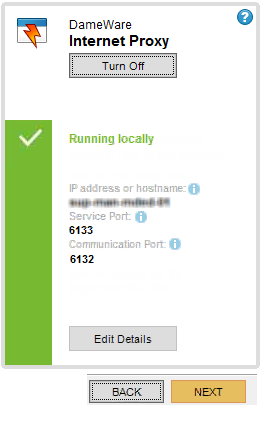
In this two-server scenario, click Run Locally for the Internet Proxy.
Depending on the volume of traffic you anticipate on the Central Server, you can also install the Dameware Mobile Gateway on the second server.
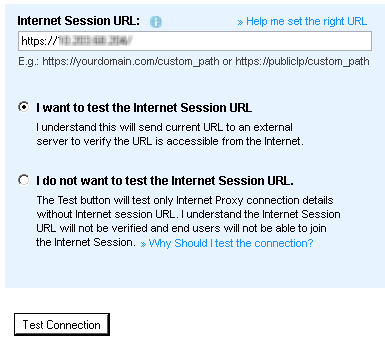
- At the end of the configuration, the Configuration Wizards prompts you to enter the Internet Session URL. Click Update Now.
The Internet Session URL is the URL that you send out to your customers. This field defines the DNS, which can be a fully qualified domain name or IP address. The Internet Session URL must be NAT'd to a public IP address.
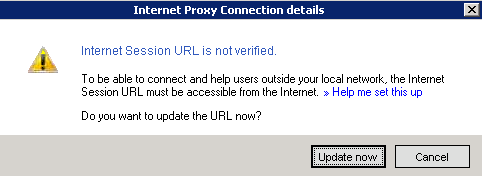
- Enter the Internet Session URL, and click Test Connection.
If you are using port 443, you do not need to specify that in the URL. Dameware assumes that you are using port 443. If you are using a different port number, you must add that port number to the URL.
The Test Connection button is hard-coded to test against port 443. If you have changed the port, the test fails, but the Internet Session URL can be valid. If the test fails and you are using port 443, then troubleshoot the Internet Session URL.
For more information on configuring the Internet Session URL, see Install the Dameware Internet Proxy with another web server, Specify the Internet Session URL in Dameware, and Modify your firewall or router to support Internet Sessions in Dameware Mini Remote Control.
- After you have tested the connection, on the Edit Internet Proxy Connection Details page, click Save.
On the Dameware Components Configuration panel, the Internet Proxy status turns green when the URL test passes.
- On the Dameware Components Configuration panel, click Next.
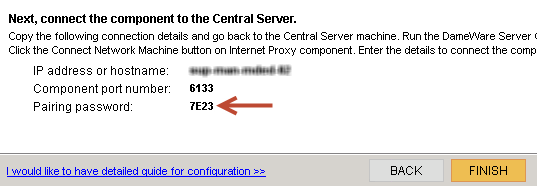
- On the Configuration completed panel, make note of the pairing password, and click Finish.
In the next task, you go back to the first server and use the pairing password to authenticate the connection between the Central Server and the Internet Proxy.
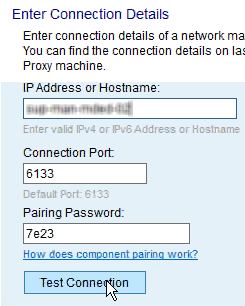
Task 8: Enter the pairing password on Server 1
- Log in to Server 1.
- Search for and open the Dameware Configuration Wizard.
- In the Dameware Proxy area, click Connect Network Machine.
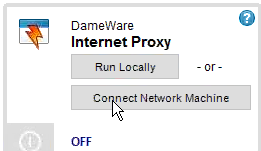
- Enter the IP Address or hostname, and pairing password of the Internet Proxy server.
- Click Test Connection, and click Save.
A successful test means that all components are interconnected and working.
- On the Dameware Components Configuration page, click Next.
- On the Configuration complete panel, accept the default user account credentials, or change them, and click Finish.
Task 9: Install the Dameware Remote Support client
After you deploy the Central Server, Install Dameware Remote Support client (centralized mode).