
Install Dameware Mini Remote Control client (centralized mode)
This topic provides steps for installing the Dameware Mini Remote Control client and establishing a connection with the Dameware Central Server.
Before you begin:
- Install Dameware Central Server for a Mini Remote Control Centralized installation. When you install the Dameware Mini Remote Control client, you configure it to connect with the Central Server.
- Collect the IP address and port number of the Dameware Central Server.
- See Dameware centralized installation system requirements and port requirements.
- Obtain a copy of the DamewareMRC32.exe (32-bit) or DamewareMRC64.exe (64-bit) installation files. The files are available on the SolarWinds Customer Portal. If you have not received a copy, complete Task 1 below.
The installation is divided into separate tasks that need to be completed before you can begin using Dameware Mini Remote Control.
Task 1: Download the Dameware Mini Remote Control installation file
If you have not yet created a SolarWinds account, see Access the Customer Portal to create an account.
- Go to the SolarWinds Customer Portal.
- In the Log In tab, enter your email address and password.
- In the Latest Downloads table, click Choose Download for the installation files for Dameware Mini Remote Control.
Task 2: Run the installation file
- Log in as an administrator to the server on which you are installing Dameware Mini Remote Control.
- Run
DamewareMRC32.exeorDamewareMRC64.exe.The Installation Wizard opens.
Task 3: Complete the Installation wizard
- Click Next on the Welcome window.
- If you agree, accept the terms of the license agreement, and click Next.
- Select an installation directory, and click Next.
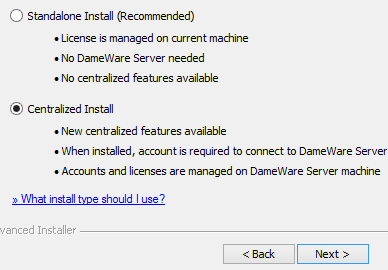
- Select Centralized Install, and click Next.
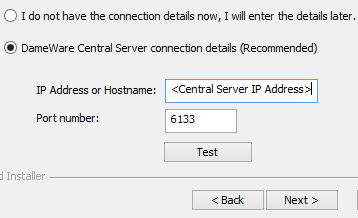
- Enter the IP address and port number of the Central Server, click Test, and click Next.
The default port number if 6133, and is seldom changed to another value.
- Select your shortcut preferences, and click Next.
- Click Install.
- On the final dialog box, click Finish.
Task 4: Connect to the Central Server
- Launch Dameware Mini Remote Control.
- Select Windows authentication or complete the Dameware authentication credentials, and click Connect to Server.
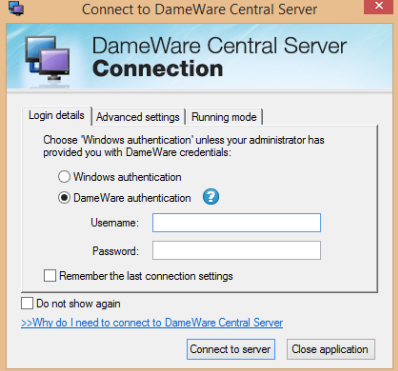
- To change the connection parameters, click Advanced settings.
You are now ready to use Dameware Mini Remote Control. Refer to the Getting Started Guide to begin using Dameware Mini Remote Control.