Run an NCM inventory scan and view inventory data
Perform inventory scans to collect detailed information about your devices, including:
- Serial numbers
- Port details
- IP addresses
- Vendors
- End-of-life dates
- End-of-support dates
- Maintenance providers
The collected inventory statistics are displayed in NCM inventory reports and in the detail view of each device.
For example, you can run an inventory scan of all IP addresses inventoried on each device. A searchable list of IP addresses can help you locate a specific address in a large network.
NCM uses SNMP communication to collect inventory information. Properly configure SNMP on all devices from which you want to collect detailed information.
To collect and review inventory data, perform the following tasks:
- Manually run an on-demand inventory scan, or schedule an inventory scan to ensure that inventory data is up to date.
- If necessary, adjust inventory settings.
- Access NCM inventory reports to view the collected data.
Run an on-demand inventory scan
You can run a scan at any time to get the latest statistics. You can scan all nodes or a subset of nodes. Running an on-demand scan creates an inventory job with the default settings and runs it on the selected nodes.
Scanning all nodes (a full inventory scan) can take anywhere from a few minutes to several hours to complete. The time period varies based on the number of nodes and the type of statistics you want to collect. For more information on how to establish what statistics are collected, see Adjust inventory settings.
- Click My Dashboards > Network Configuration > Configuration Management.
- Select the nodes you want to scan.
To select a single node or group of nodes, use Search or the Group By list to find the nodes. Then select them.
To select all nodes:
On Group By menu, select No Grouping.
Select the checkbox to the left of the column headings.
All nodes on the page are selected. If more nodes are listed on other pages, a message is displayed above the Group By menu.
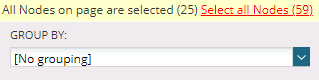
Click Select all Nodes.
-
Click Update Inventory.
-
On the confirmation prompt, click Run Now .
The Jobs List page opens and a new inventory job is created and runs automatically. The name of the job is Update inventory on demand (followed by the date and time).
-
Monitor the job status on the Job List page.
Schedule an inventory scan
To ensure that inventory information is always up to date, schedule inventory scans to run regularly. When you schedule an inventory scan, you can specify options such as what data to collect.
- Click My Dashboards > Network Configuration > Jobs.
- Click Create New Job.
- Name the job, and then select Update Inventory from Job Type.
-
Specify when the job runs:
-
To run the job once or on a simple schedule, select Basic. Click the tab that identifies how frequently the job runs, and then specify the start time and (if needed) the day(s).
-
To create a more complex schedule, select Advanced and then use the five fields to create a CRON expression.
-
- Add a comment if this job relates to a business rule, and click Next.
- Select the nodes to target with this job, and click Next.
- Select an email notification option, and click Next. If you click Email Results, the default email notification and SMTP server settings are populated. These settings can be overridden in each job.
- Select the information types to include in the Inventory job, and click Next.
- Review the settings for the job, and click Finish.
Adjust inventory settings
Node Inventory settings allows you to specify the type of inventory information NCM collects, and provides other options to help you manage the inventory process. For example, it may be necessary to change the number of devices that NCM can inventory concurrently.
- Click Settings > All Settings.
- Under Product Specific Settings, click NCM Settings.
- Under NCM Node Management, click Node Inventory.
- Select the information types to collect.
- Adjust the number of devices that should be inventoried concurrently. The default is five.
-
If you have VLANs extended across network trunks, and you want to inventory the relevant devices, select Extend VLANs inventory.
SolarWinds recommends against this situation due to the slow performance of the inventory process.
-
If the inventory process causes the NCM server to hang or if the process takes too long, select Disable Inventory Lookup.
Determine what caused the problem, for example, inadequate server capacity, before re-enabling Inventory Lookup.
- Click Submit.
Access NCM inventory reports
- Click Reports > All Reports.
- Group by Report Category.
- Select one of the NCM inventory report categories, such as:
- NCM Brocade Inventory
- NCM Cisco Inventory
- NCM F5 Inventory
- NCM Inventory
-
Click a report name to view it.
For more information about the available reports, see Predefined NCM reports.