Manually Installing Task Factory on ADF
These instructions walk through the alternative steps to create an Azure SSIS Integration Runtime (IR), and install SolarWinds Task Factory during the start-up process of the Integration Runtime.
System Requirements
You need the following prerequisites to set up Task Factory for your Azure Data Factory SSIS Integration Runtime:
- Azure subscription
- Azure SQL Database or Managed Instance Server
- Microsoft Azure Storage ExplorerEdition Restrictions
The following components are incompatible on an Azure Data Factory SSIS Integration Runtime :
- USPS Address Verification
- Task Factory Excel Power Refresh Task
- Note: Install Excel on the Azure Data Factory Integration Runtime through this installation script to enable this component.
Creating an Azure Storage Container
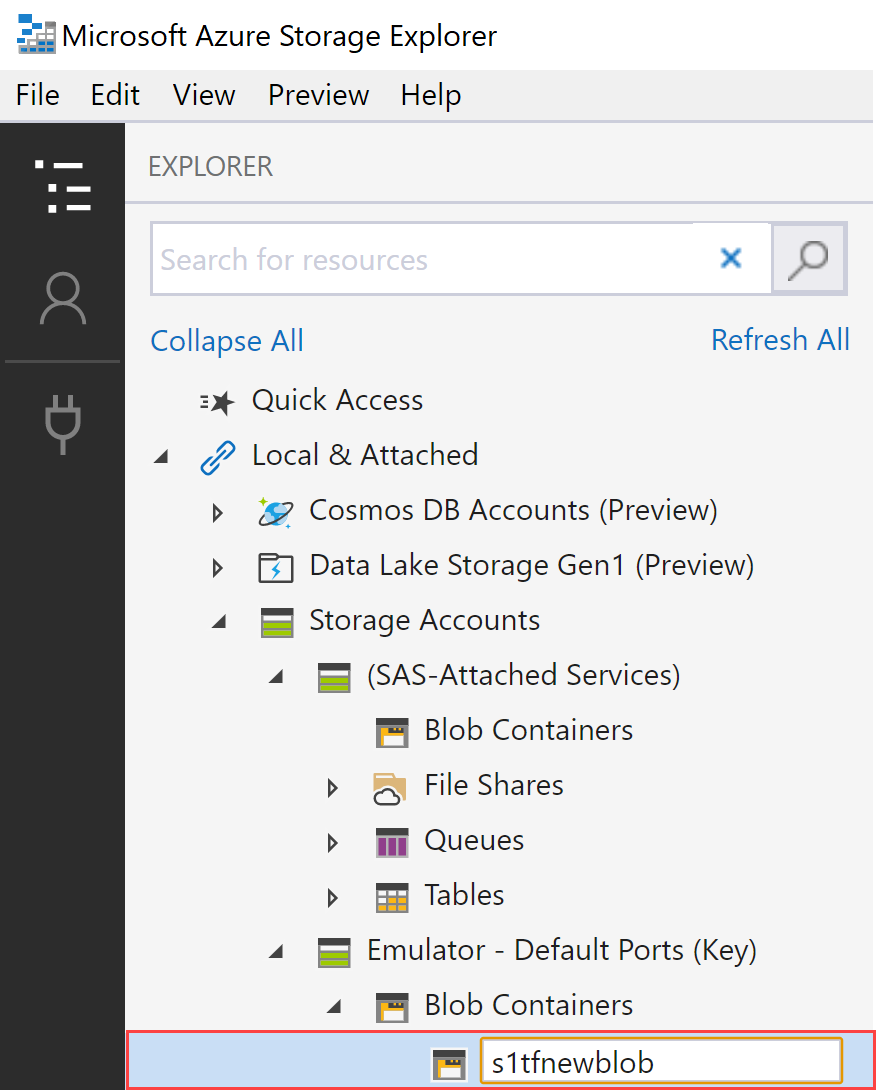
Create a new Azure blob storage container by completing the following: .
- Open Azure Storage Explorer, and browse to your blob container.
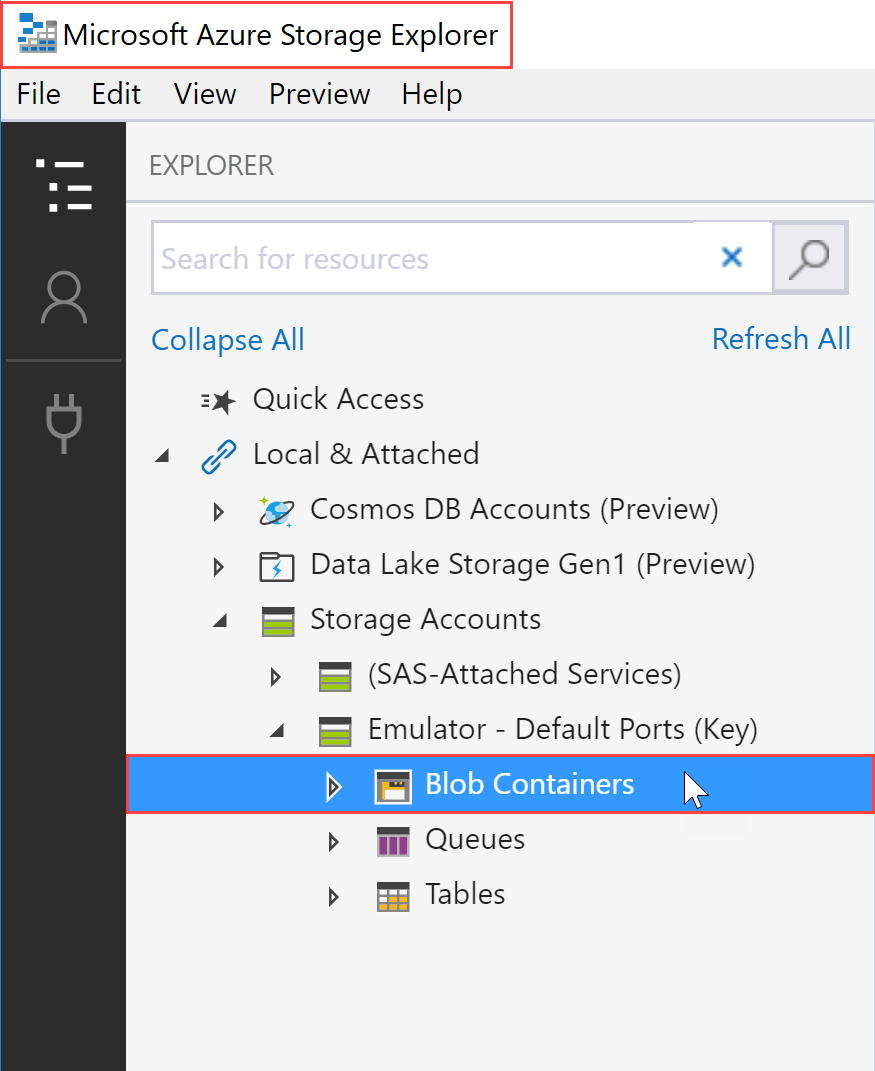
- Right-click Blob Containers, select Create Blob Container, and then name your blob.
Setting up the main.cmd File
Set up the main.cmd file by downloading the latest version of Task Factory and renaming the installation file TaskFactory_Install.exe. Download the ADF Task Factory installation zip file from our public blob container by opening Azure Storage Explorer and completing the following steps:
- Right-click Storage Accounts in the (Local and Attached) node, select Connect to Azure Storage, select Use a connection string or a shared access signature URI, and then select Next.
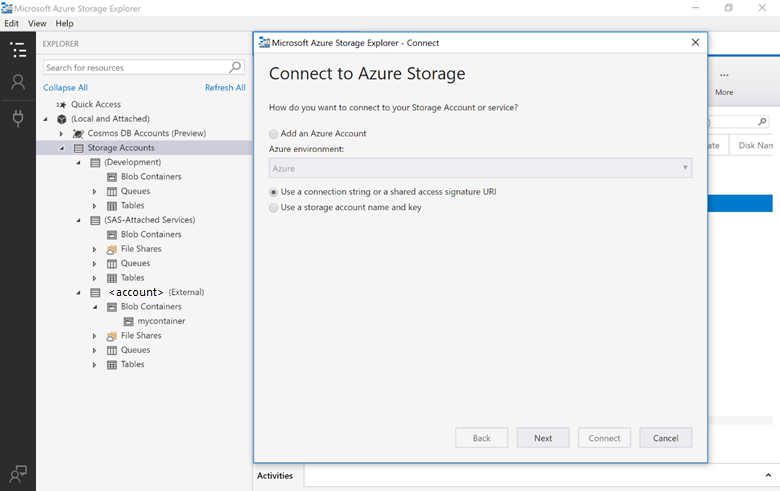
- Select Use a SAS URI and enter the following Shared Access Signature (SAS) URI for the Public Preview container:
https://pwsdownloads.blob.core.windows.net/taskfactory-adf/azure-configure-ssis-ir-taskfactory.zip?st=2018-11-06T14%3A48%3A00Z&se=2020-11-07T14%3A48%3A00Z&sp=rl&sv=2017-04-17&sr=c&sig=zQ4Bu7ka5AsosiefY0RGnrpw4PxXLfh5Dz3berixFko%3D
Select Next and then select Connect to continue.

3. Download the azure-configure-ssis-ir-taskfactory.zip file and extract the contents.
4. Open the cmd file and replace (Enter License Key Here) with your Task Factory activation key in the following command :
set DIR=%CUSTOM_SETUP_SCRIPT_LOG_DIR%
echo Step 1: Installing task factory %TIME%
::Install Task Factory
"TaskFactory_Install.exe" /q /L*V "%DIR%\install_log.txt"
echo Step 2: Activating license %TIME%
::Activate License
"C:\Program Files (x86)\Solarwinds\Task Factory\LicenseManager\PragmaticWorks.TaskFactory.Licensing.exe" activate (Enter License Key Here) %SSIS_CLUSTERID%
IF %ERRORLEVEL% NEQ 0 (
echo Error code %ERRORLEVEL%
)
echo Complete %TIME%
5. Upload your edited cmd file and TaskFactory_Install.exe to your blob storage container.
Creating Your Shared Access Signature URL
You need to provide an Share Access Signature URL (SAS) to the script for the Azure IR to see the Task Factory files. Create your SAS by completing the following steps:
- Right-click the blob container you created and select Get Shared Access Signature to open the Shared Access Signature window.
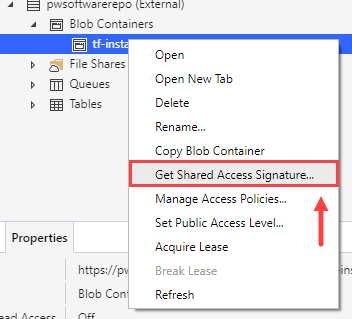
- Select the Write option in the Permissions section to enable the installation process to write a log file for the main.cmd, Task Factory installation, and activation processes.
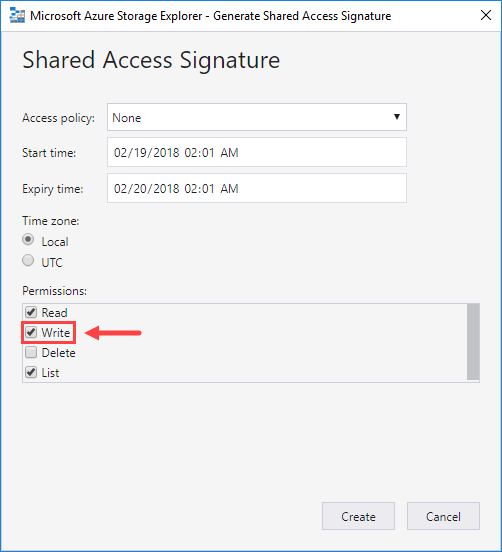
- Set the Expiry time to exactly one year from the current date and time. Select Create to display a URL on the next screen, and then copy and save that URL temporarily.
Creating Your Data Factory
Every time you want to create an SSIS IR, you need to delete the current SSISDB or create a new server without an SSISDB database.
Follow the tutorial to set up your Data Factory and Azure SSIS IR instance.
After you have created the Data Factory, log directories are created in your blob storage container. Log files are located under the main.cmd.log directory. If you had Storage Explorer open already, you might need to refresh the window.
Review the log files for any errors. If you don’t see any errors, you’re good to go.
Deploying Packages to Azure SSIS IR
Now that your Azure IR has been created and Task Factory is installed, you should be able to take any package created locally in SSDT, deploy it to Azure IR, and execute it successfully.
If you encounter any issues while installing or activating Task Factory in your Azure SSIS IR, contact our support team at support.solarwinds.com.
