SolarWinds Site maps
Enterprise Operations Console provides three customizable ways to visually represent your network deployment: Intelligent Maps, the Network Atlas Map, and the Worldwide Map.
Intelligent Maps
Intelligent Maps for SolarWinds Platform products display a map of the physical and logistical relationships between entities monitored by SolarWinds Platform products. This feature allows you to quickly isolate and identify critical hardware health and performance issues.
The integration of Intelligent Maps with EOC provides access to add, view, and customize maps from the EOC Enterprise Environment Summary page. You can create a map using auto-generation or you can create a custom map.
Importing wireless heat maps is not supported if you are using Intelligent Maps in EOC. EOC does not support wireless heat maps.
Create and manage a remote site map with Intelligent Maps
The Intelligent Maps integration with EOC provides administrators the same entities and items from remote sites that can be accessed from the stand-alone version of Intelligent Maps. You can also access Intelligent Maps from the My Dashboards under Home > Intelligent Maps.
To access the Intelligent Maps manager in EOC:
- Log in to your Enterprise Operations Console using an administrator account.
- Go to Settings > All Settings.
- Under Node & Group Management, click Manage Intelligent Maps.
- From the Maps page, you can create or edit a map. For instructions on creating a map, see Custom Intelligent Maps.
From Manage Intelligent Maps page in EOC, you can filter maps by selecting parameters in the filter panel, such as maps created for a particular site.
Although Intelligent Maps in EOC allows you to create and view elements of a maps from the EOC widget, there are instances in which, due to federation, some objects cannot be added or visualized in the EOC instance of the map.
Add the Intelligent Maps widget to EOC Summary dashboard
You can also add an Intelligent Maps widget to your Enterprise Environment Summary dashboard. Using the Intelligent Maps widget, you can display maps that have been created in EOC or maps that have been created on remote instances.
Adding Intelligent Maps to your summary is beneficial for visualizing remote site activity and identifying potential problems, such as downed connections, before they occur. For information on how to add a widget to your dashboard, see Manage EOC Widgets.
Network Atlas map (deprecated)
Network Atlas is an application for creating custom maps and network diagrams. It is pre-installed with your Enterprise Operations Console product and provides a graphical depiction of your entire network, specifically the utilization percentage of a connection between site locations, as well as provides you with the ability to create graphical representations of your network environment.
You can export or print Network Atlas maps and use them to document your network. You can also import Network Atlas maps from each of your remote sites for use in EOC.
Import and display a Network Atlas map (deprecated)
Import a Network Atlas map to monitor nodes, interfaces, applications, and network links. You can also view the coverage provided by wireless access points and wireless clients connected to those access points.
- In your operating system, go to Start > All Programs > SolarWinds > Run Network Atlas.
- Enter your SolarWinds Platform Web Console credentials.
- If you are running Network Atlas on a local computer, provide the localhost address, or if running remotely, the IP address of the main polling engine.
- Click Connect.
- Log in to your EOC.
- Navigate to My Dashboard > Enterprise Maps.
- Click the Customize Page icon
 .
. - In the upper-right corner, click Add Widgets.
- Under Group By, select Network Maps, and then click and drag the Map widget to Enterprise Maps area.
Valid areas to drop the tile are highlighted in green. -
After you have placed your tile, click Done Adding Widgets.
- Click Done Editing.
Worldwide map
Worldwide map is a representation of your connected devices (nodes) with information about the devices at a particular location.
In comparison to the Network Atlas, the Worldwide map does not display the status and utilization of connections between locations in your physical network. Instead, it provides details of the nodes in a location, such as the average response time, a device's network location and physical location, and the number of devices at that location.
You can configure the Worldwide map to place devices on the map automatically. Alternatively, you can manually drop offline devices—or devices not connected to your monitored network—to the map. Objects with the same position on the map appear as one location. To enable automatic placement of devices on the map, you must have Auto-Location active on each SolarWinds Platform site for EOC to show devices.

To learn more about the Worldwide map in EOC, see
Add a Worldwide map to EOC Maps
You can
Manually add a device node to the Worldwide map
The Worldwide Map can be configured to automatically add device locations. You can also manually add a location into the map and define a device positioned at that location.
- Go to My Dashboards > Enterprise Maps.
- On the Worldwide map widget, click Manage Map.
- In the upper-left corner, click Place Objects on the Map Manually.
- Click the area of the map to place your object node.
- In the window that opens, filter the object by the SolarWinds Site location, object type, or grouping, such as the device vendor. You can also search for devices by keyword.
- In the left column, select the object to place. The selection is displayed in the right column.
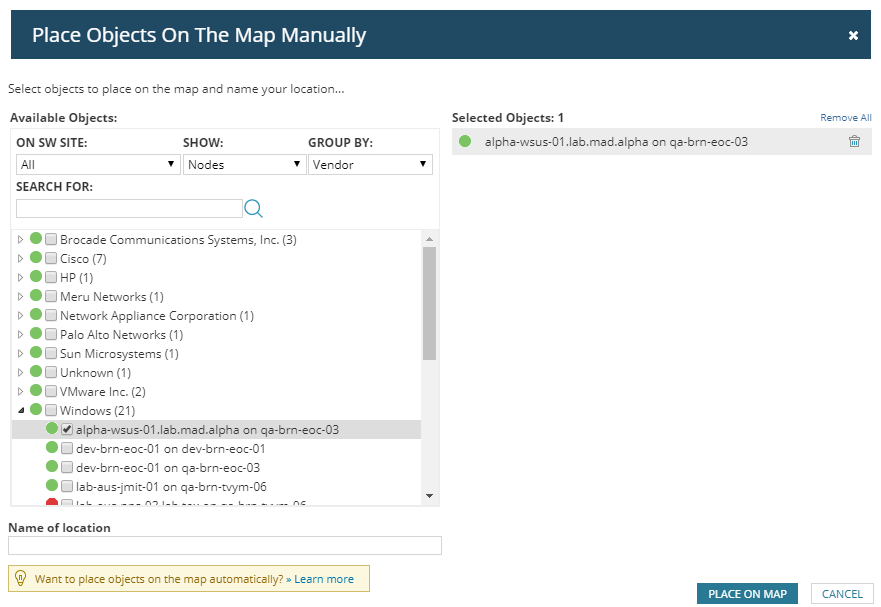
- Enter a name for the device location. You can later add additional devices to this location.
- Click Place on Map.
- In the bottom-left corner, click Submit.
Objects placed on the Worldwide map are reflected across all pages where the map tile is added.