Customize policy management in SCM
Starting with SCM 2023.3, you can define your own policies, check the logic of rules, and edit existing rules using a rule definition wizard. In addition, you can define data sources, expression on these data sources, and conditions using the Use the query builder. Alternatively, you can switch to a YAML editor if desired.
Add, copy, edit, and delete custom policies
Go to the Server Configuration Monitor Settings Policies tab to add, copy, edit, or delete SCM policies.
To add a custom policy, click Add, fill in the required fields, and click Save.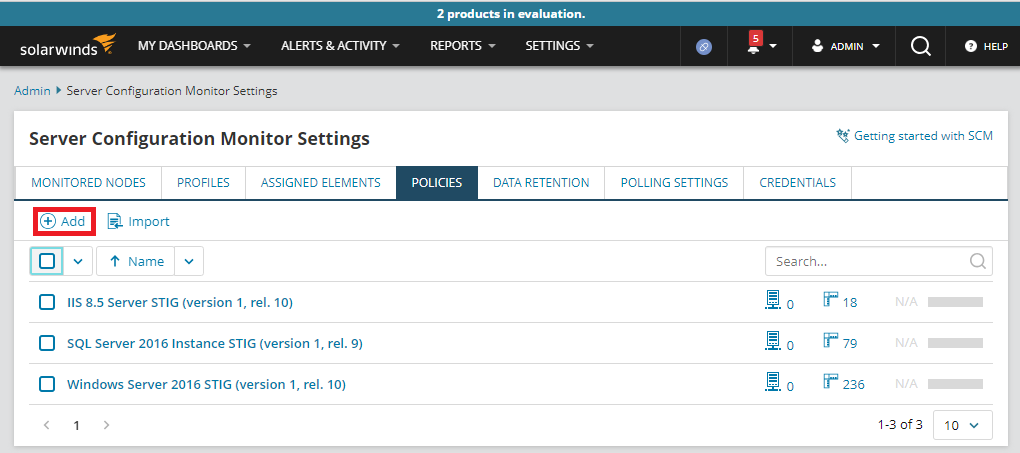
You can copy only out-of-the-box profiles (not custom policies), and then edit them to include your own policy definitions. To do so, select an out-of-the-box profile, and then click Copy.

After you copy a policy, edit it using the rule definition wizard (detailed in the Use the rule definition wizard to add rules, check the logic of rules, or edit rules section), and then click Save.
To delete a policy, select it from the list of policies and click Delete.

In the pop-up dialog box, confirm that you want to delete the policy.

Use the rule definition wizard to add rules, check the logic of rules, or edit rules
To add rules, check the logic of rules, or edit rules, see the corresponding section below.
Add a rule
To add a rule to the policy:
-
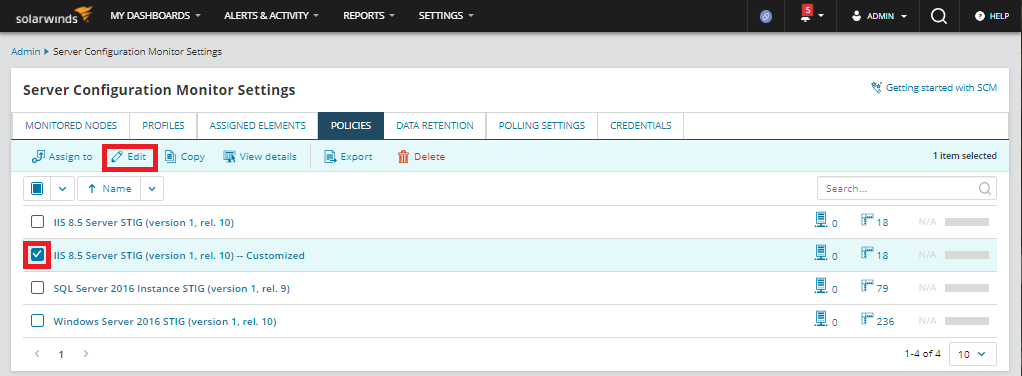
Select the policy from the Policies tab, and then click Edit.
-
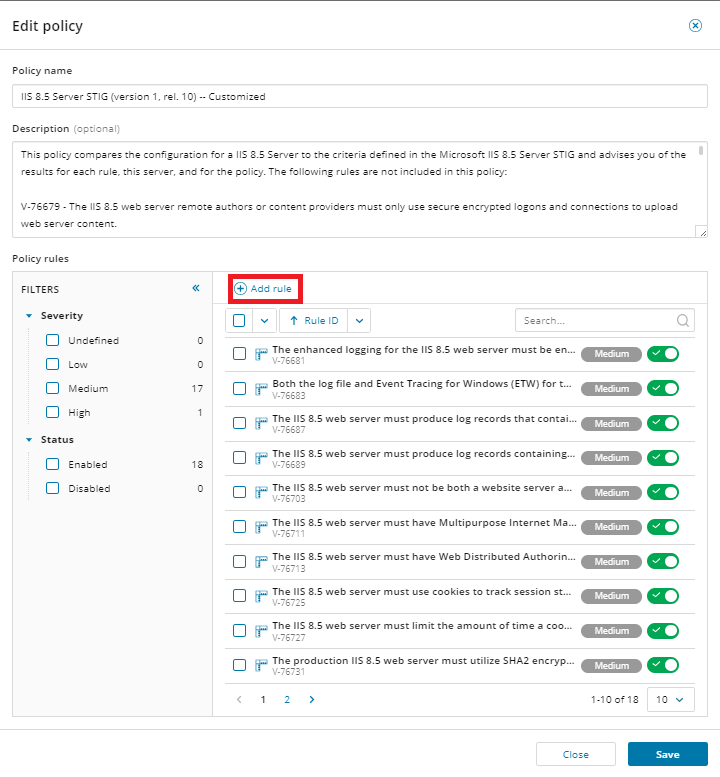
In the Policy rules section, select Add rule.
-
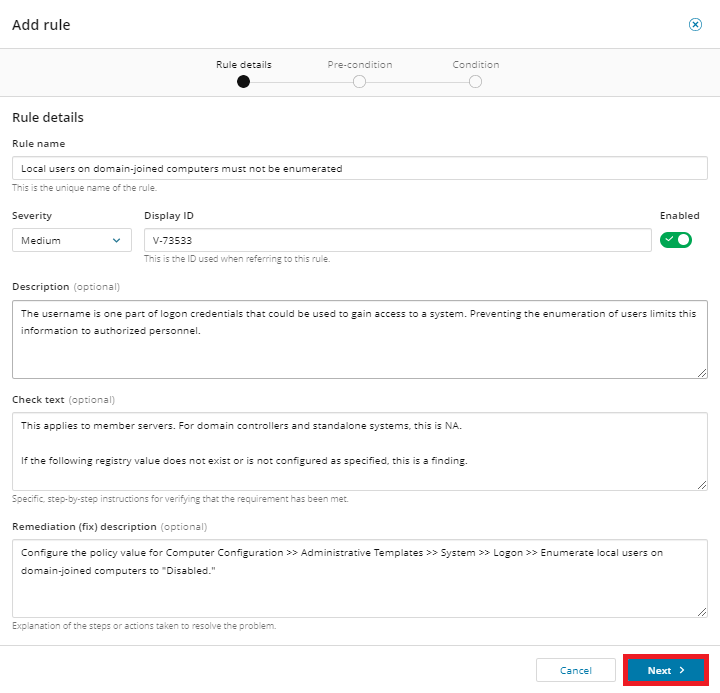
Add the rule details, including name, severity, display ID, and textual description of rule, how to check, and remediation. Then click Next.
-
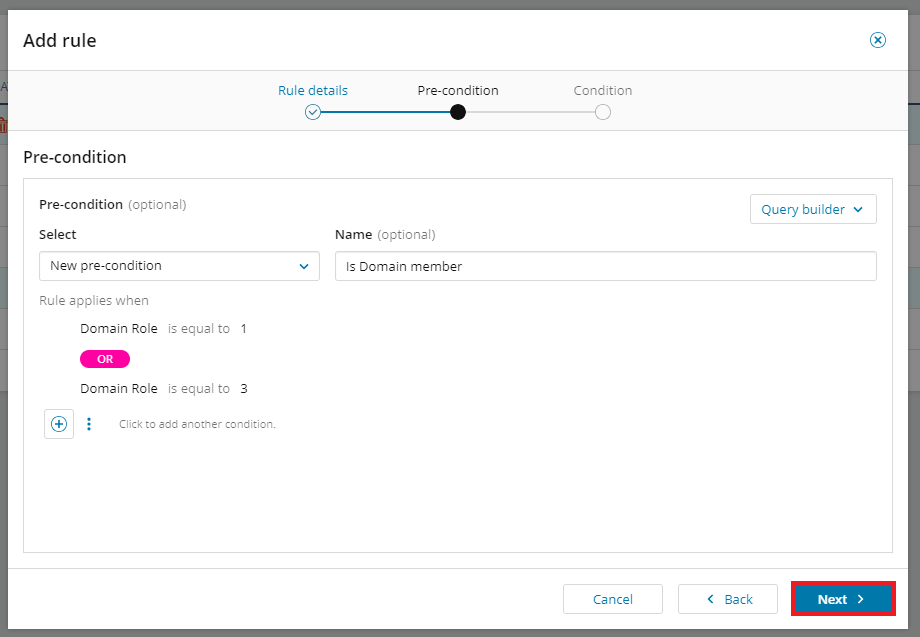
Pre-condition with the Use the query builder, defining when the rule is applicable, and then click Next.
-
Condition with the Use the query builder to define the rule logic itself, and then click Save.

-
Click Save again at the Policy level when prompted to do so.
Any modifications you make to policies or rules are saved in the system only after you confirm them in the top Policy dialog. Until then, changes are made only in the browser.
Check the logic of a rule
To check the logic of a rule in the policy:
-
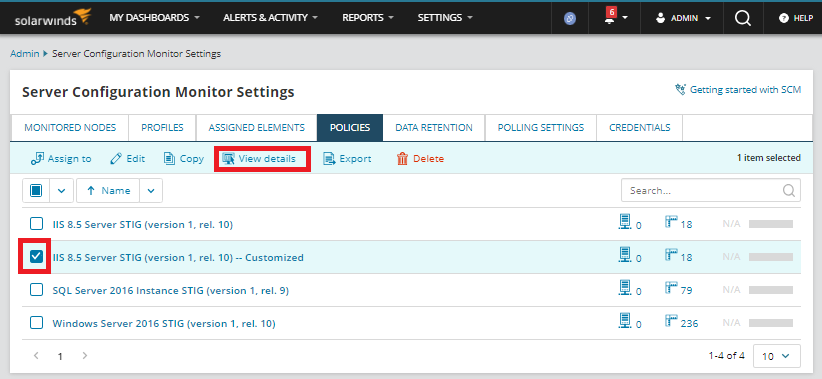
From the Policies tab, select the policy you want to view, and then click View details.
-
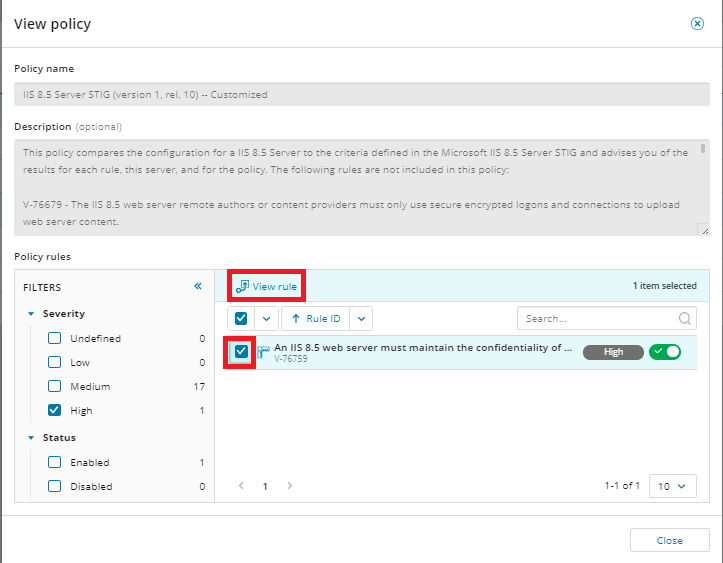
In the Policy rules section, use filters or the Search bar to find and select the rule you want to view.
-
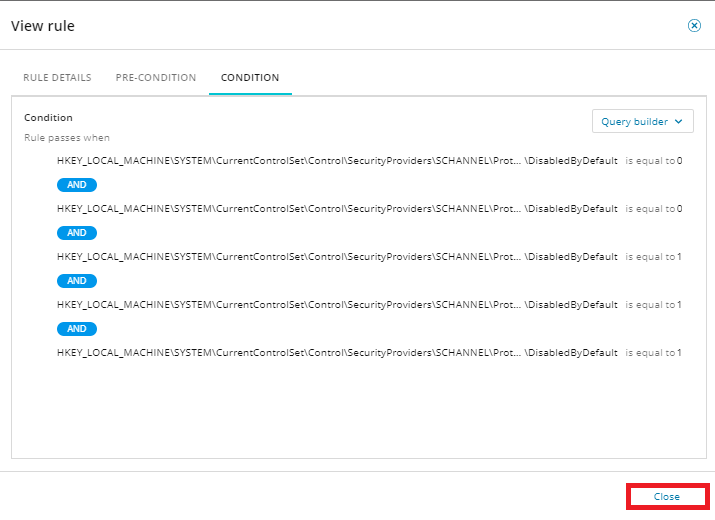
Click View rule to review the logic of the rule.
-
Review the Rule details, Pre-condition, and Condition tabs, and then click Close.
Edit a rule
To edit a rule in the policy:
-
From the Policies tab, select the policy you want to edit, and click Edit.

-
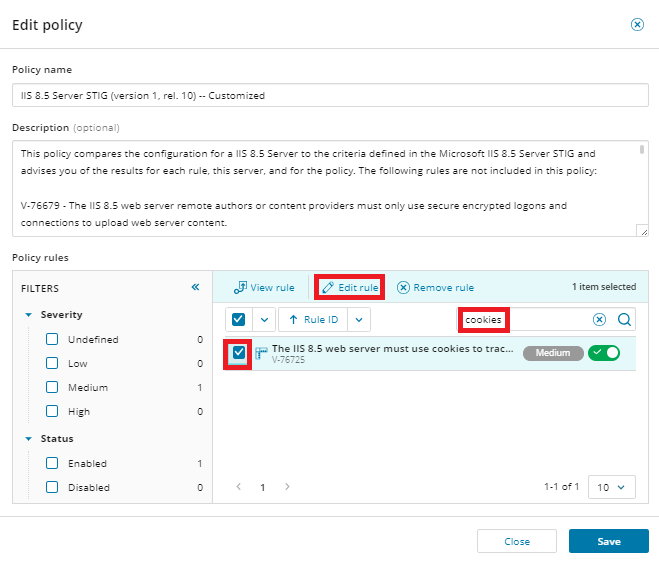
In the Policy rules section, use filters or the Search bar to find and select the rule you want to edit.
-
Click Edit rule (or Remove rule and then Save if you are certain you want to delete the rule from the policy).
-
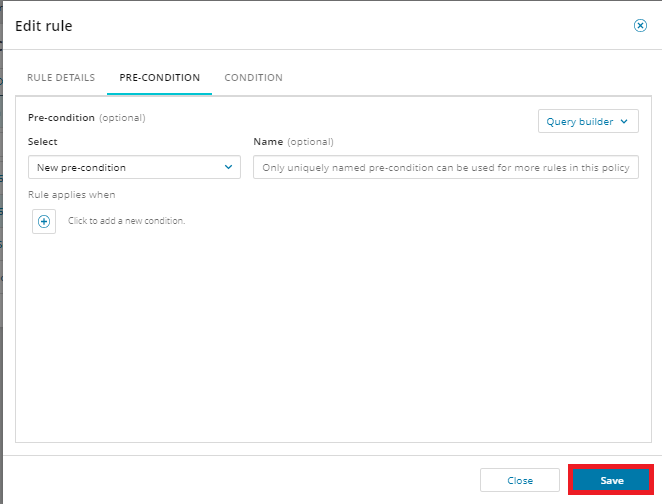
Make desired updates to the rule details, pre-condition, or condition, and then click Save.
-
Click Save again at the Policy level when prompted to do so.
Any modifications you make to policies or rules are saved in the system only after you confirm them in the top Policy dialog. Until then, changes are made only in the browser.
Understand and use the query builder
The query builder enables you to define:
-
Data sources including files, registry keys, database queries, and PowerShell scripts that map to SCM elements for polling during evaluation
When selecting or creating data sources, keep in mind that:
- Linux files and scripts are not currently supported as data sources.
- Naming is mandatory for PowerShell scripts and database queries, but optional for registry keys and files.
-
Expression on these data sources using operators such as:
-
Contains a substring, or
-
Registry value is equal to 0
-
-
Conditions with logical operators, such as Contains a substring, AND registry value is equal to 0
The structure of the query builder is the same as that of the YAML format used in the policy engine.
Reuse data sources
Data sources can be reused in the scope of all rules in the same policy. They are de-duplicated, created, and removed from the system automatically based on the conditions when the policy is saved.
When editing a data source, clicking Save affects all of the usages and modifies all rules that use the data source. Save as copy, on the other hand, changes only the one edited occurrence.
Use operators
The operators used in the query builder are the same as those used in YAML.
-
For numerical comparison, use:
-
is less than
-
is greater than or equal to
-
is greater than
-
is less than or equal to
-
-
For string comparison, use:
-
is equal to
-
is not equal to
-
-
For string regex testing, use:
-
matches
-
-
For file/registry checking, use:
-
exists
-
not exists
-
Use the Translate special operator
You can use the Translate special operator to rewrite the evaluated status on an expression or a group. However, you can translate only from Passed or Failed and vice versa, or from either of those to Unknown.


The translation status is then indicated next to the expression or group.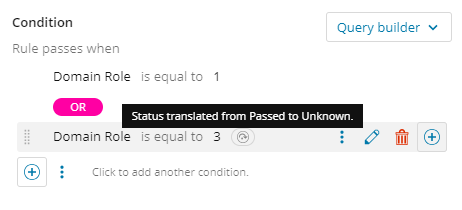
Group logical operators
You cannot combine multiple logical operators on the same level. You must use parentheses to nest them separately. There is no limit on the nesting.
See an example of an invalid grouping of logical operators: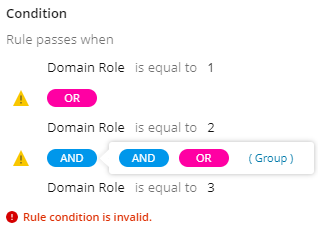
See an example of a valid grouping of logical operators: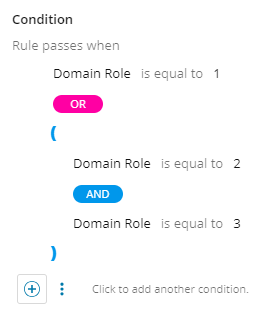
Use the query builder
To use the query builder:
-
Add or edit a policy, and then click Add rule; or select an existing rule and click Edit rule.
-
On the Pre-condition or Condition tab, click the option to add a new pre-condition or condition.
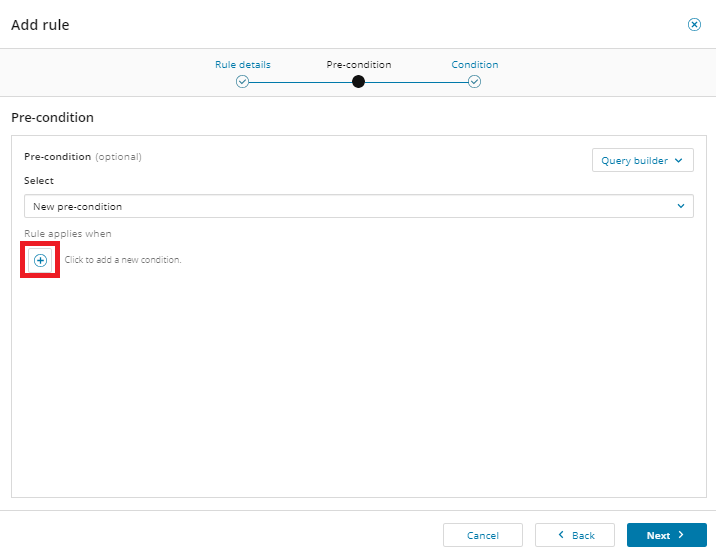
-
In the Define the condition dialog box, do one of the following:
-
Add an existing source from the drop-down menu and defining conditions. Then click Save. You will need to save again when prompted.
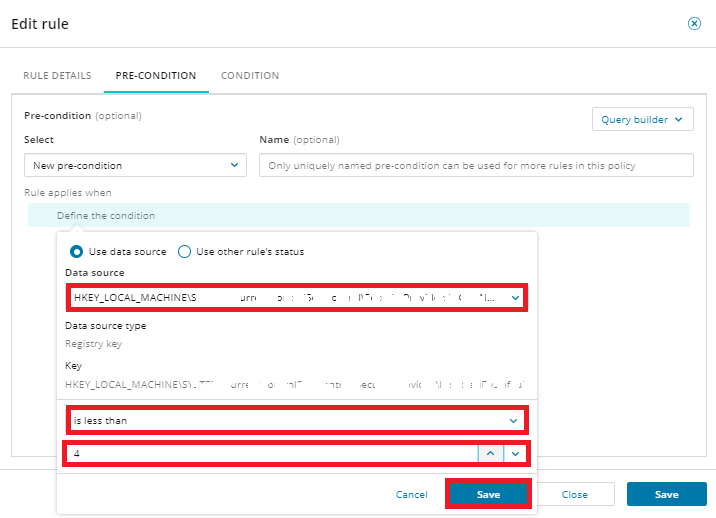
-
Add a new data source by selecting Add new data source from the drop-down menu.
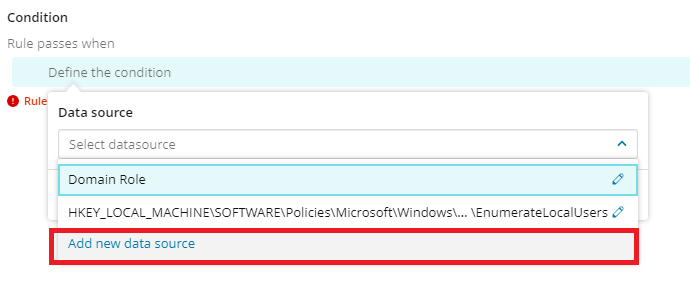
Then, in the Add new data source dialog box, add select a data source type from the drop-down menu and add relevant information. Then click Save. You will need to save again when prompted.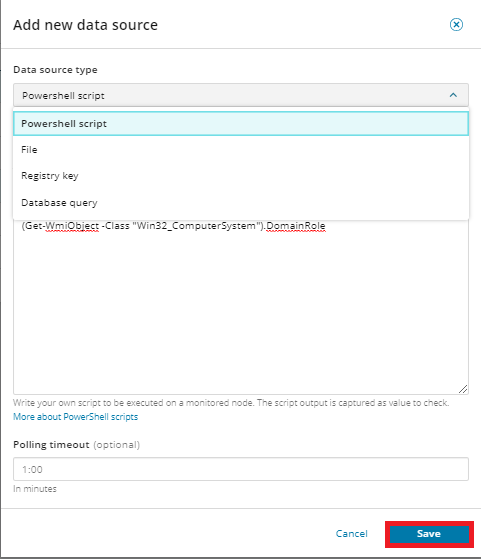
-
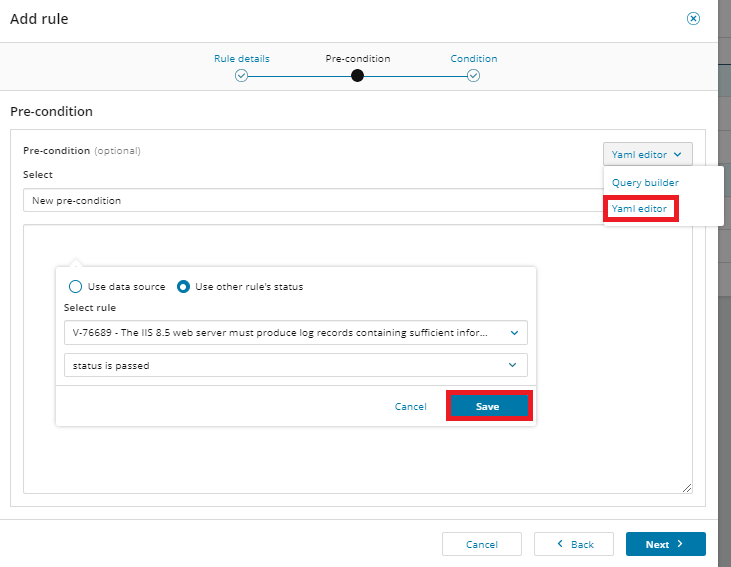
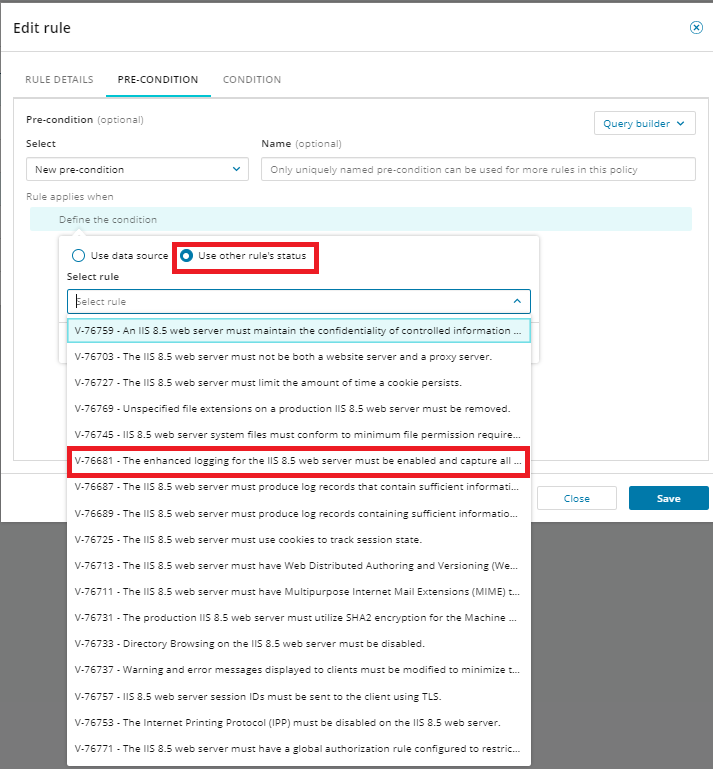
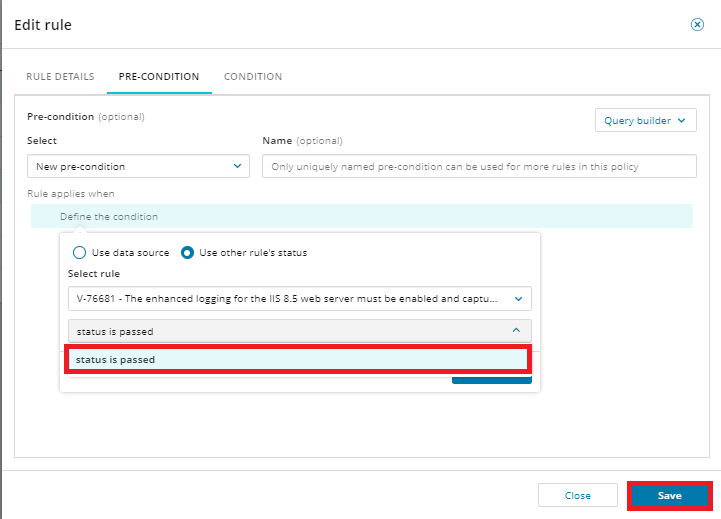
Click Use other rule's status, select a rule, and select status is passed from the drop-down menu. Then click Save. You will need to save again when prompted.
Any modifications you make to policies or rules are saved in the system only after you confirm them in the top Policy dialog. Until then, changes are made only in the browser.
-
Use the YAML editor
The YAML editor is available if the query builder does not meet your needs.
To use the YAML editor:
-
Add or edit a policy, and then click Add rule; or select an existing rule and click Edit rule.
-
On the Pre-condition or Condition tab, click the option to add a new pre-condition or condition.
-
From the Query builder drop-down menu, select Yaml editor, define your pre-conditions or conditions, and click Save. If necessary, click Next, and then click Save again.
