Deploy SolarWinds Platform products to Microsoft Azure
This topic applies to all SolarWinds Platform products.
This guide is intended for new installations of SolarWinds Platform products in Microsoft© Azure VM, using an Azure Virtual Network (VNet). It does not cover migrating products to the cloud. The information outlined in this guide is applicable for all SolarWinds Platform products that support cloud deployments.
To reduce the number of places you have to configure your ports, SolarWinds recommends all cloud instances be in the same availability zone and in the same VNet. SolarWinds recommends using availability zones closest to your monitored devices.
The only exception to this rule are High Availability backups. When deployed in Microsoft Azure, HA backups must be deployed in a different subnet.
How do I deploy SolarWinds Platform in Azure?
Before you begin
- Review SolarWinds Platform deployment options for Azure.
- Review the requirements.
- Prepare for the installation.
- Prepare the environment.
Installation and configuration time
- Install SolarWinds Platform in the Azure cloud.
- Deploy Azure Active Directory app.
- Configure Azure IAM Permissions.
Optional tasks
- Deploy SolarWinds Platform Agents in the cloud (optional).
- Install an Additional Polling Engine or additional web server (optional).
- Enable High Availability (optional).
- Troubleshooting
Task 1: Review Azure Deployment types
Your main SolarWinds Platform server and your SolarWinds Platform database server should be hosted at the same location, either both servers are on premises or both are in the cloud. Hosting the main SolarWinds Platform server and database servers separately is not recommended due to connectivity concerns.
SolarWinds recommends that all components (SolarWinds Platform server, SolarWinds Platform database) are deployed in the same region. If you run High Availability, deploy all components on one availability group.
Regardless of deployment location, it is important the main SolarWinds Platform server and SolarWinds Platform database are hosted on different servers.
SolarWinds is not responsible for fees incurred when deploying SolarWinds products to the cloud.
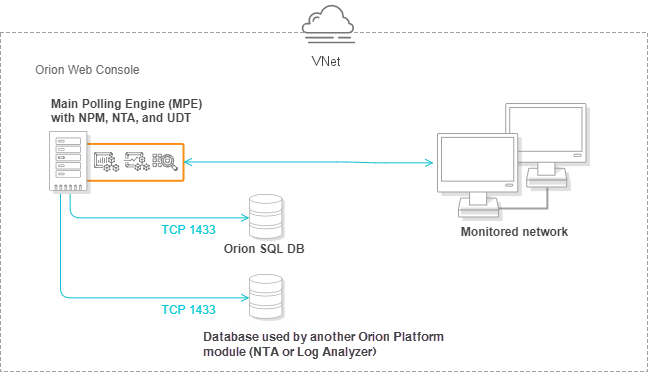
Cloud (main SolarWinds Platform server and database in the cloud)
SolarWinds recommends this deployment when your monitored environment resides mostly in the cloud, and you have a good understanding of how much computer capacity you require to monitor your environment.
You have the following options to deploy the database:
- Use the Azure SQL Database managed instance service (starting with Orion Platform 2019.4).
- Use the Azure SQL DB service (Orion Platform 2019.2 and later).
- Use the Microsoft SQL database deployed on an Azure VM.
For details on additional databases used by SolarWinds Platform products, such as NTA or Log Analyzer, see Databases used by SolarWinds modules.
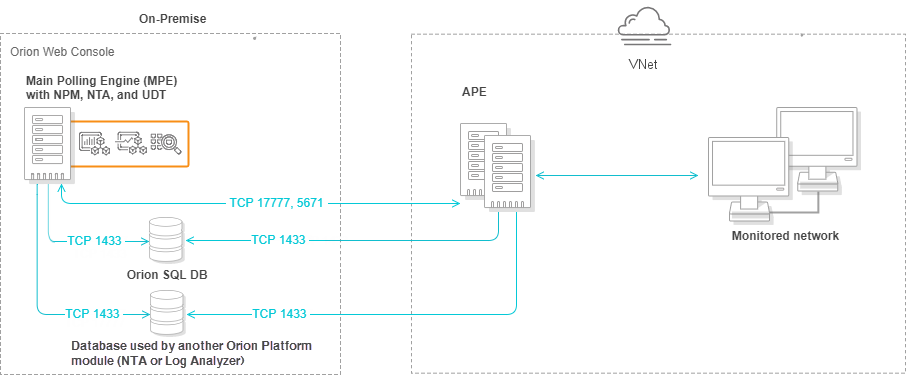
Hybrid (Additional Polling Engines in the cloud; main SolarWinds Platform server and database on premises)
Use this deployment type when the majority of your monitored networks are on premises or if your hybrid environment is geographically diverse and use different availability zones.
You can also deploy agents to your nodes in the cloud to reduce the amount of data transferred within the Virtual Machine instance - and from the Virtual Machine instance - to your main SolarWinds Platform server.
You will need to create a virtual private network (VPN) tunnel between the Additional Polling Engine (APE) in the Azure VM instance and your main SolarWinds Platform server and SolarWinds Platform database server.
For details on additional databases used bySolarWinds Platform products, such as NTA or Log Analyzer, see Databases used by SolarWinds modules.
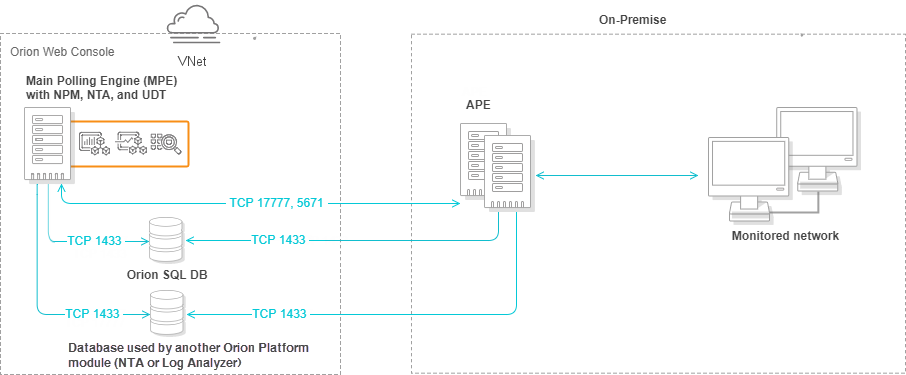
Hybrid (Main server and database in the cloud; APE on premises)
This deployment is recommended when your monitored environment includes a significant number of on-premises devices, or if you are migrating your infrastructure to the cloud.
For details on additional databases used by Orion Platform products, such as NTA or Log Analyzer, see Databases used by SolarWinds modules.
Task 2: Review requirements
To create a new database or a new database user in the Configuration Wizard, use an account with appropriate privileges.
| Requirements | Small (up to 500 elements) | Medium (501-2,000 elements) | Large (more than 2,000 elements) | XL (up to 1,000,000 elements) |
|---|---|---|---|---|
SolarWinds Platform server | D3_v2 | D4_v2 | DS4_v2 | DS5_v2 |
| SolarWinds Platform database using Azure SQL DB | All installed products must run on Orion Platform 2019.2 or later. Time zone setting of the SolarWinds Platform server must be in the same time zone as Azure SQL DB time zone (UTC). | |||
DTU Standard Tier S3 or better vCore General Purpose Tier 2 or better | DTU Standard Tier S3 or better vCore General Purpose Tier 2 or better | DTU Standard Tier S4 or better vCore General Purpose Tier 2 or better | DTU P15 vCore Hyper-Scale 40 vCPU | |
| SolarWinds Platform database using Azure SQL Database managed instance | Gen5 | Gen5 | Gen5 | Gen5 |
SolarWinds Platform database deployed in an Azure VM | A4_v2 | DS4_v2 Standard | E8s_v3 | E64as_v4 IOPS 30,000+ |
| Additional Polling Engine | Only relevant for environments that monitor over 12,000 elements at default polling intervals. | D4s_v3 | D4s_v3 | |
| Additional Web Server | Less than 50 concurrent users: DS12_v2 More than 50 concurrent users: DS4_v2 or larger | |||
Azure instances required for additional databases
Some Orion Platform products, such as NTA or Log Analyzer, use additional databases. For more details, see Databases used by SolarWinds modules.
To use Azure SQL database, review requirements for the SolarWinds Platform database.
To deploy a supported version of MS SQL server on an Azure VM and use it as the database for NTA or Log Analyzer, review the requirements in the following table (the table uses NPM license levels for reference).
| Instance Details | Medium (SL2000) | Large (SLX) |
|---|---|---|
| Instance type | D12_v2 | D15_v2 |
| CPU | 4 CPU | 16 CPU |
| RAM | 30.5 GB RAM | 122 GB RAM - 2.5 TB is Flow Storage, 300k FPS (NTA) or EPS (LA) with 30-days retention, Azure Storage Disk with Provisioned IOPS recommended) |
| Disk | System SSD 80 GB (included in D12_v2) + Data Azure Storage Disk Volume 500 GB* | System SSD 320 GB (included in D12_v2) + Data Azure Storage Disk Volume 2.5 TB* |
* Azure Storage Disk volumes are not your dedicated hardware. Consider using Azure Reserved Instances of storage disk volumes for SQL servers.
Task 3: Prepare SolarWinds Platform for installation
This checklist helps you prepare for SolarWinds Platform product installations.
 | Review release notes | Review product release notes and available documentation in our Success Center. The VMAN appliance is not supported in cloud deployments. | ||
| Review system requirements | Ensure your cloud instance has the required hardware and software specifications for your installed products. Certain products may require more or additional resources than the base cloud requirements. If you install multiple products, a good rule of thumb is to add one CPU core per additional product. Product requirements include: For all port requirements, see Port Requirements for all SolarWinds products. | ||
| Determine your deployment type | Which components are you hosting in the cloud? Keep in mind the Azure pricing model and your estimated usage. If you intend to set up SolarWinds High Availability now or in the future, review the Enable High Availability section before setting up your cloud instances. The VNet and port requirements are different and may be difficult to change in the future. If you intend to deploy agents, review the Deploy Agents in the cloud section. Agents have additional port requirements. | ||
| Review licenses and gather keys | Review your product licenses and determine if you need to make any changes. You can download license keys for your new SolarWinds Platform products through your Customer Portal. Verify any license upgrades and requirements with your SolarWinds account manager or contact SolarWinds. | ||
| Gather credentials | Make sure you have all account credentials, such as your SQL database credentials, your SolarWinds Customer Portal account, your Azure credentials, and Windows local admin server credentials. | ||
| Schedule the installation | Set up the maintenance window, preferably during off-peak hours. Depending on the number of products, size of database(s), and size of environment, you may require multiple hours to complete your installation. | ||
| Notify your company | Send a message to your company of the upgrade schedule and maintenance window. If you need additional help, contact and allocate specific staff to be available. |
Task 4: Prepare the environment
Depending on your licensed SolarWinds Platform products, you may need to prepare multiple servers and configure ports in your firewall before installation.
Gotchas
- Starting with Orion Platform 2019.4, you can deploy SolarWinds Platform products directly from Azure Marketplace.
- Carefully review the port requirements for your products. Incorrect ports can cause network communication and polling issues. See the Port requirements for all SolarWinds products for details.
- Review your DNS settings or your hosts file to ensure that you can resolve host names, including LDAP servers for user authentication, in your environment.
| Prepare the cloud network (optional) | SolarWinds recommends using a public DNS hostname and a public IPv4 address. |
| Create your VNet | Create the VNet that will contain your SolarWinds Platform environment. |
| Create the network security group and open ports |
For your server ports and firewall, open ports according to the port and feature requirements. SolarWinds Platform uses these ports to send and receive data, issue management commands, and perform additional actions depending on the features. For example, SolarWinds High Availability has additional port requirements beyond product needs. For more information, see Window Azure's help. If you set a public IP address, you may want to use stricter security settings, including strong passwords. |
| Prepare the servers | Prepare server instances as needed for your SolarWinds Platform products and deployment: Any server instance in the cloud must be part of the same security group.
|
| Run all Windows updates | Before installation, check for and run all Microsoft Windows Updates on all servers. If a Windows update automatically launches during installation, your system may restart if required by the update. The installation may not complete if your system is waiting to restart. |
| Verify connectivity | Ensure that you can connect to your nodes from your cloud instance and vice versa. Polling Engines and Additional Web Servers must be able to connect to the database server. |
Task 5: Install the Orion Platform on Azure VM instances
Use the SolarWinds Installer to upgrade and install SolarWinds Platform products.
What you should know:
- If you have products out of maintenance, the SolarWinds Installer will provide the latest possible upgrades for your products. Information and a link will display warning you of the issues that can occur. Having even one product out of maintenance can restrict the upgrade options for products currently under maintenance. For example, if you have IPAM out of maintenance and want the latest NPM upgrade, you may not be able to upgrade until IPAM is also upgraded due to compatibility.
Recommendation: Renew. SolarWinds highly recommends renewing your maintenanceto receive the latest upgrades and installs for all products. - The SolarWinds Installer will alert you to warning or critical level requirements issues during the System Check.
Recommendation: Verify product requirements before you get started. View the checklist at the beginning of this guide for links to help.
Step 1: Create an Azure VM instance for your SolarWinds Platform server
- Sign in to your Azure VM console and launch a virtual machine according to your recommended deployment size.
- Choose your instance type.
- Select the Resource Group that contains all of your SolarWinds Platform servers.
Use this instance to deploy your SolarWinds Platform servers in the cloud.
Step 2: Create a database server in Azure
You can either use the Azure SQL Database, Azure SQL Database managed instance, or create an Azure VM instance and deploy a supported version of the MS SQL Server there.
When you finish creating the database server, make sure that the database is able to communicate with the SolarWinds Platform server.
Create Azure SQL Database server
Follow these steps if you are using Azure SQL Database as the SolarWinds Platform database.
- Sign in to your Azure VM console and create a SQL Server.
- Configure your SQL Server.
- Create an Azure SQL Database for the SolarWinds Platform database.
Create Azure SQL Database managed instance
Follow these steps if you are using Azure SQL Database managed instance as the SolarWinds Platform database.
- Sign in to your Azure VM console and create a managed instance.
- Ensure connectivity between the Azure SQL Database managed instance and your SolarWinds Platform server.
Create a VM instance with SQL
Follow these steps if you are hosting your SolarWinds Platform database server in the cloud.
- Sign in to your Azure VM console and launch an instance according to your recommended deployment size.
- Choose your instance type.
- Select the Security Group that contains all of your SolarWinds Platform servers.
The SQL server must use the same timezone as your main SolarWinds Platform server.
Step 3. Install the SolarWinds Platform server
Installation step 1. Run the Installer and select products to install
Starting with Orion Platform 2019.4, you can deploy SolarWinds Platform products using Azure Marketplace. In Azure Marketplace, search for the product to install and complete the wizard.
- Save and run
installer.exeon the server dedicated to your main SolarWinds Platform server. - A welcome screen displays a list of products to install. The installer walks you through upgrading and installing in one process.
- Select the product(s) you want to install using the SolarWinds Installer.
- (Optional) Select to Send usage metrics to help SolarWinds improve products. SolarWinds only receives data collected during the installation and upgrade process.
- Click Next.
Installation step 2. Create the additional database (optional)
Follow this step if you are deploying the NTA Flow Storage database or the Log Analyzer database in Azure.
Create another Azure SQL database or deploy another VM and deploy the NTA Flow Storage database on it.
If you are not hosting your NTA Flow Storage or Log Analyzer database in the cloud, run the appropriate installer on a physical server. Install the additional database and the SolarWinds Platform database on separate SQL server instances.
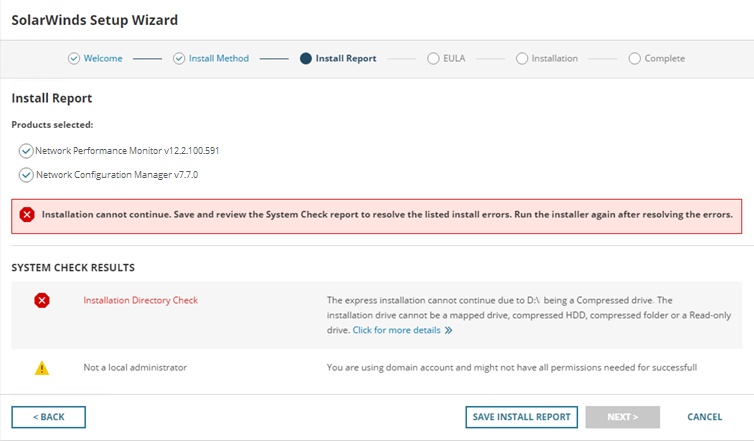
Installation step 3. Review the System Check
A series of system checks run per product to verify if your server meets recommended system requirements. These checks include:
- Hardware resources, including RAM, hard drive space, and number of CPUs.
- Software installed, including the Operating System version, .NET, and other required tools.
- Ports for data access and tasks.
- Specific checks for product configurations and additional requirements.
If your environment does not meet specifications, the installer provides:
- Warning message: does not block the installation. Details provide recommended actions and best practices to update your environment for better performance.
- Critical issue: blocks the installation until resolved. Details provide required updates for your environment to support the products. After addressing the issues, run the installer again.
For more information, select Click for more details. Click Save Install Report to save a list of issues to resolve. You can also click Copy the issue to clipboard to paste the details in a text file.
The following is an example of a report.
Installation step 4. Review the EULA agreement
The EULA is displayed for you to review and accept. If you agree with the license agreement, click the accept option and click Next.
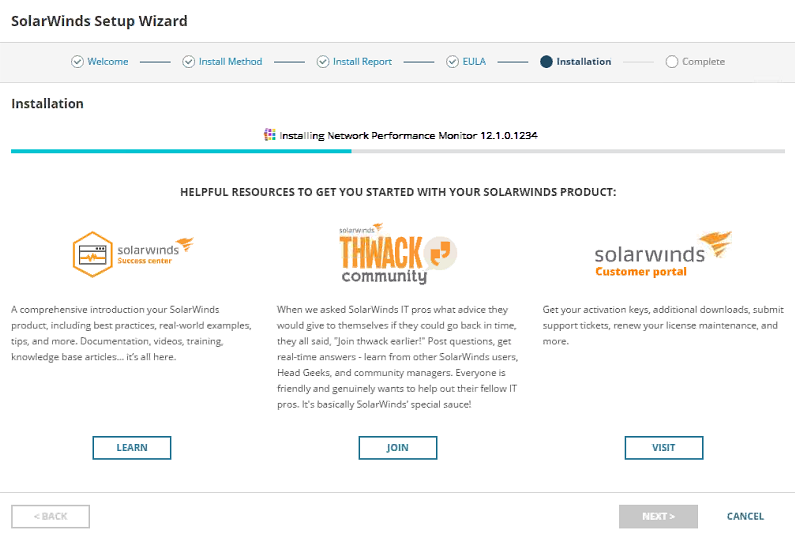
Installation step 5. Monitor the installation progress
Progress messages are displayed as products are installed. The installer displays any issues, halting the installation to allow you to review and fix. The installer may run multiple product installations prior to running the Configuration wizard. Installations requiring the configuration opens the wizard and walks you through the installation steps.
You can always run the SolarWinds Installer again to check for updates.
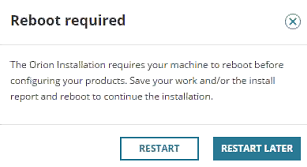
If a reboot is required as part of the installation, the installer will prompt you. You cannot continue the installation until you have restarted the computer.
Installation step 6. Complete the Configuration wizard
When the installation completes, the Configuration wizard opens. Depending on your product, the wizard may include additional options and screens.
- In the welcome dialog box, click Next.
- If prompted to stop services, click Yes.
- If you performed a Standard installation with an existing SQL database, select one of the following for authentication:
- Authenticate as currently logged in user: pass through authentication to the SQL server using the account currently logged in for installing the SolarWinds Platform product.
- Switch user: provide separate SQL, Windows, or Azure AD credentials.
Unless you have joined your on-premises and cloud domains, you must use a dedicated SQL Server account. Windows authentication may not work as expected in the cloud.
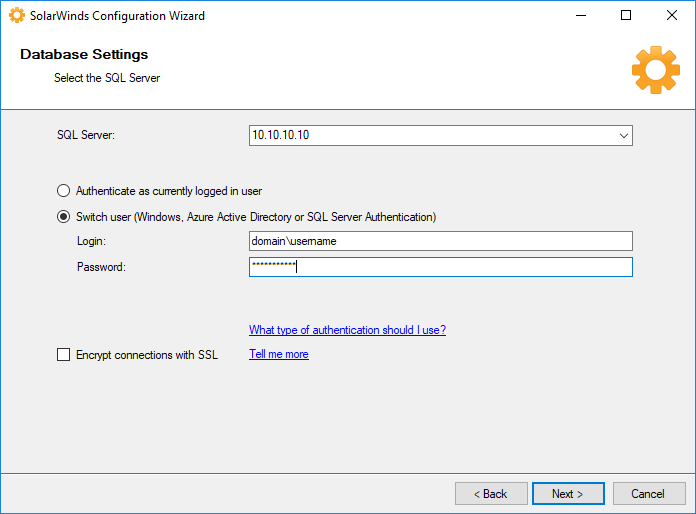
In the Database Settings dialog box, create a new database in your SQL server.
SolarWinds recommends that your main SolarWinds Platform server and your SQL server are both hosted on premises or in the cloud to prevent alerting loss or other undesirable behaviors in case of network connectivity issues.
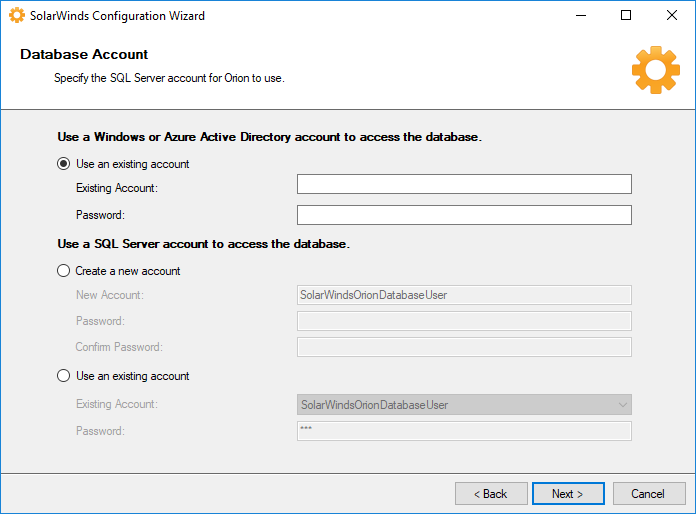
- In the Database Account dialog box, create an account or use an existing account that the polling engine and SolarWinds Platform Web Console use to access the database. You can use a SQL user account, a Windows, Active Directory, or Azure AD account. Please note that if the account is covered by a password expiration policy and the password expires, SolarWinds Platform stops working.
- In the Website Settings dialog box, complete selections for your installation:
- Select All Unassigned unless your environment requires a specific IP address for the SolarWinds Platform Web Console. The Port is 80 by default.
Specify the Port and the Website Root Directory where the system installs the Web Console files.
If you specify any port other than 80, include that port in the URL used to access the Web Console.
To configure SSL, click Enable HTTPS and select your SSL certificate.
You must install your SSL certificate on the server before running the Configuration wizard. You can install the certificate and run the Configuration wizard again.
If a certificate is not available, select the option to Generate Self-Signed Certificate. The Configuration wizard automatically generates a self-signed certificate issued to the hostname or FQDN and adds it to the trusted certificate store.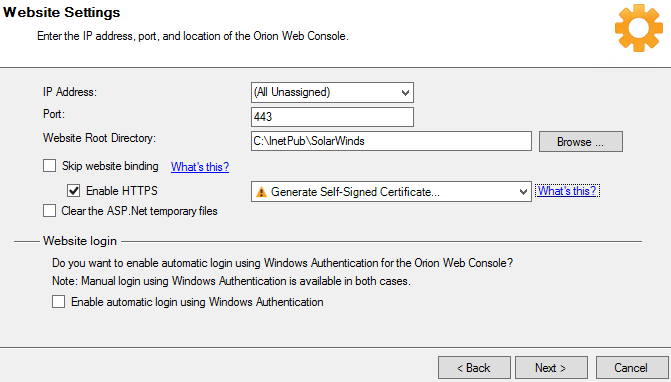
- If prompted to create a directory or website, click Yes.
- Review the list of services to install, click Next.
- Click Yes if prompted to disable the SNMP Trap Service and enable the SolarWinds Trap Service.
- In the Completing the Configuration wizard dialog box, click Next.
When completed, click Finish to launch the SolarWinds Platform Web Console.
Click Start > All Programs > SolarWinds > SolarWinds Platform Web Console
or
Open a web browser on your SolarWinds Platform server and enter
http://ipAddressorhttp://hostname, whereipAddressis the IP address of your server andhostnameis the host name of your server.SolarWinds recommends using a public DNS name or IPv4 address.
- Log in with user name
adminand leave the password field blank.For security purposes, SolarWinds recommends that you change the password to your admin account.
Task 6: Deploy Azure Active Directory app
The Azure Active Directory is an access point that allows an external application or service, such as the SolarWinds Platform, to connect to the Azure Portal. The Azure AD app must be configured to allow read-access to the SolarWinds Platform for polling of VM status and metrics. See Integrating applications with Azure Active Directory for more information.
Step 1: Register a new application
- Log into the Azure Portal.
- Click Azure Active Directory > App Registrations > New application registration.
- In the Create pane, enter a Name for the AD app.
Use a recognizable name, such as SolarWinds Platform, SAM, or SolarWinds.
- Select
Web app/APIas the Application type. - Enter a properly formatted URL, such as
https://documentation.solarwinds.com/en/Success_Center/. - Click Create to display the AD app in the App registration pane.
Step 2: Record Application ID
- Click the Display Name of the new AD app to display registration details.
- Record the Application ID for use as the Client / Application ID in the SolarWinds Platform Web Console.
Step 3: Generate an Application Secret Key
The Application Key is used when adding an Azure account to the SolarWinds Platform.
- Click All settings > Keys, to open the Keys pane.
- Enter a Description of the key.
- For the Duration, select
Never expires. - Click Save to display data in the Value field. The value that appears is the Application Secret Key.
Task 7: Configure Azure IAM Permissions
You next need to configure Identity and Access Management (IAM) permissions to integrate the Azure Active Directory app with the SolarWinds Platform. Your account must be assigned to the User Access Administrator role to manage account permissions and perform actions, such as stopping polling.
To configure your IAM permissions, see Configure Azure IAM permissions for cloud monitoring in the SolarWinds Platform.
Role-based Access Control (RBAC) may be customized for your organization and can affect how the SolarWinds Platform works with Azure.
Task 8: Deploy SolarWinds Platform Agents in the cloud (optional)
If you are deploying SolarWinds Platform Agents from the cloud to on-premises devices, follow the manual deployment steps. Otherwise, complete the steps below to deploy agents in the cloud.
Step 1: Review agent requirements
SolarWinds Platform Agent requirements.
Step 2: Update network security groups ports
Update ports based on the agent communication type.
Agent-initiated communication
- The monitored device must be able to reach the SolarWinds Platform server using the IP address.
- Port 17778 must be open on the SolarWinds Platform server or APE.
Server-initiated communication
- The SolarWinds Platform server must be able to reach the monitored device using the IP address.
- Port 17790 must be open on the monitored device.
- Open port 22 on Linux-based devices to install the agent.
- Open ports 135 and 445 on Windows devices to install the agent.
Step 3: Deploy the agent on Azure
You have the following options:
- Manually deploy an agent on Azure
- Automatically deploy an agent to established instances on Azure
Manually deploy an agent on Azure
You can manually deploy agents to a virtual machine using Remote Desktop Connection in two ways.
Deploy through the command prompt
Click Settings > All Settings in the menu bar.
Under Product Specific Settings, click Agent & Remote Collector. Then, on the Agent Management view, click Download Agent Software.
In Orion Platform 2020.2 and earlier, click Agent Settings to get to the Agent Management view with the Download Agent Software link.
- Click Windows, and click Next.
- Click Mass Deploy to Multiple Machines, and click Next.
- Download the MSI and MST files.
- Run a command prompt as administrator from the context menu.
- Enter the following command:
msiexec /i "SolarWinds-Agent.msi" TRANSFORMS="SolarWinds-Agent.mst"
Deploy the agent using the interactive wizard
Click Settings > All Settings in the menu bar.
Under Product Specific Settings, click Agent & Remote Collector. Then, on the Agent Management view, click Download Agent Software.
In Orion Platform 2020.2 and earlier, click Agent Settings to get to the Agent Management view with the Download Agent Software link.
- Click Windows, and click Next.
- Click Install Manually, and click Next.
- Click Download MSI.
- Copy the MSI file to the client machine, and run it.
- In the Installation wizard, select Agent Initiated Communication or SolarWinds Platform server Initiated Communication.
- Enter the SolarWinds Platform server IP address or hostname, and the SolarWinds Platform administrator account credentials.
- Optional: For Server-initiated communication (passive), in the SolarWinds Platform Web Console:
- Click Settings > All Settings.
- Under Node & Group Management, click Manage Agents > Add Agent.
- Click Connect to a previously installed agent > click Next.
- Enter the name, IP address, and port number for the agent and click Server-initiated communication.
Automatically deploy an agent to established instances on Azure (Optional)
- Click Settings > All Settings in the menu bar.
Under Product Specific Settings, click Agent & Remote Collector. Then, on the Agent Management view, click Download Agent Software.
In Orion Platform 2020.2 and earlier, click Agent Settings to get to the Agent Management view with the Download Agent Software link.
- Click Windows, and click Next.
- Click Mass Deploy to Multiple Machines, and click Next.
- Download the MSI and MST files.
- Log in to your Windows Azure account.
- Create a bucket and upload the MSI and MST files. http://docs.aws.amazon.com/AmazonS3/latest/gsg/CreatingABucket.html
- Create a PowerShell script to run on each virtual machine when it is launched for the first time, downloading and executing the MST and MSI files on each virtual machine where you want to install the agent.
- Log in to your Azure account.
You can perform the following steps through the API or Azure CLI command line interface.
- Create an instance, and paste your PowerShell script under Advanced Details in the User Data text box. Select the As Text option.
- For instances that are already created, take the following steps:
- Stop the instance where you want to deploy the agent.
- Right-click the instance and click Instance Settings > View/Change User Data.
- Paste your PowerShell script in the text box as Plain Text.
- Optional: For Server-initiated communication (passive), in the SolarWinds Platform Web Console:
- Click Settings > All Settings.
- Under Node & Group Management > Manage Agents > Select Add Agent.
- Click Connect to a previously installed agent > Click Next.
- Enter the name, IP address, secret, and port number for the agent and click Server-initiated communication.
Disclaimer: Please note, any content posted herein is provided as a suggestion or recommendation to you for your internal use. This is not part of the SolarWinds software or documentation that you purchased from SolarWinds, and the information set forth herein may come from third parties. Your organization should internally review and assess to what extent, if any, such custom scripts or recommendations will be incorporated into your environment. You elect to use third-party content at your own risk, and you will be solely responsible for the incorporation of the same, if any.
Task 9: Install an Additional Polling Engine or additional web server (optional)
If you have Additional Polling Engines (APE) or an additional web servers (AWS), the final installation screen reminds you of those installations. SolarWinds recommends using the Scalability Engine Installer.
Step 1: Create an VM instance for your APE or SolarWinds AWS
- Sign in to your Azure VM console and launch an instance according to your recommended deployment size.
- Choose your instance type.
- Select the Security Group that will contain all of your SolarWinds Platform servers.
Step 2: Ensure your APE or SolarWinds AWS can communicate with your main SolarWinds Platform server
If the DNS does not resolve the host names in Azure's VM, update your hosts file.
- On your main SolarWinds Platform server, add your APE or SolarWinds AWS information to your hosts file.
- On your APE or SolarWinds AWS, add your main SolarWinds Platform server to your hosts file.
See Unable to resolve primary SolarWinds Platform server name for detailed troubleshooting instructions.
Step 3: Install APE and SolarWinds AWS
- Log in to the cloud instance for your Additional Polling Engine.
- Download this installer through the SolarWinds Platform Web Console.
- For the APE installer, click Settings > All Settings > Polling Engines.

- For the AWS installer, click Settings > All Settings > Web Console Settings.

- For the APE installer, click Settings > All Settings > Polling Engines.
- Run the installer on your APE or AWS.
- Repeat installing on all Additional Polling Engines and web servers in your environment.
Task 10: Enable High Availability (optional)
- Create an Azure Virtual Network.
Azure does not support the use of a virtual IP address. As a result, SolarWinds Platform High Availability cannot be deployed in Azure if both members of the same HA pool also reside in the same subnet. Each member of an HA pool must be deployed into a different subnet. A virtual hostname (using, for example, Azure DNS) can be used to direct users to the active member of the HA pool. See Azure's help for more information.
- Create or update network security groups.
- Open port 5671 (TCP) on the primary and standby servers.
- Open ports 4369 and 25672 (TCP) on the main SolarWinds Platform server and its standby server. These ports are not required when protecting Additional Polling Engines.
- Allow outbound connections on port 1433 (TCP) on the HA server to connect to the SQL database.
- Create a primary server.
- Create a secondary server.
SolarWinds recommends that your standby server has similar specifications as the primary server. - Download and install the secondary server software.
- Create your HA pool using a virtual hostname.
Do not use a Virtual IP (VIP) address when enabling High Availability in the cloud. Instead, you must use a virtual hostname.
Troubleshooting
If you receive errors, try the following:
- A timeout and error message when attempting to add or view an Azure instance is likely the result of adding two or more virtual machines with the same name, even if they are assigned to different resource groups. The auto-monitoring polling logic expects a unique machine name for each instance in Azure. To resolve, upgrade to SAM 6.6.1 on Orion Platform 2018.2. See this article for full details.
- If you cannot connect to the main SolarWinds Platform server from your APE or SolarWinds AWS, check that the hosts file includes the main SolarWinds Platform server.
- If you experience issues and are not on the latest product versions, SolarWinds recommends completing a full upgrade. Use the SolarWinds Installer to create the upgrade path. Many of these updates solve issues you may experience part way through your upgrade.
- Check our Success Center for troubleshooting. SolarWinds recommends searching on the name of the product, the version number, any error codes or messages displayed, and the general issue you found.
- Check your Customer Portal for any new hotfixes.
- If you receive (500) internal server error after an upgrade, use the SolarWinds Platform permission checker to make sure your Group Policy is not locked. See this article for full details.
- If your views do not load when first opening the console, run the Configuration wizard again.
If an issue occurs you need additional help with, contact Support. SolarWinds recommends gathering diagnostics, a screenshot of the issue, and any error codes you receive. Attach and add this information to your ticket. You may also want to gather additional diagnostics on your additional polling engines and web servers.