Portal Security
Authentication Methods
SQL Sentry Portal Service
The following authentication methods are available for connecting the SQL Sentry Portal service to your SQL Sentry database:
- Integrated Windows Authentication is available in versions 2020.8.31 or later. It is not available in version 2020.8.
- SQL Server Authentication is available in all versions.
- The SQL Server account must have read, write, and execute access to the SQL Sentry database.
- Azure Active Directory is available in Versions 2023.1 and later.
SQL Sentry Portal User Access Requirements
You need to create a contact in SQL Sentry and apply a domain/username in the Login field to use that user in SQL Sentry Portal. Create a user by completing the following steps:
-
Right-click the Users node (Contacts > Users) in the Navigator pane, and then select New.
-
Enter the user's first and last name, email address, optional pager address (SMTP-based), and an optional description in their respective fields. Enter a login in the domain/user format that will be used for SQL Sentry Portal authentication.
-
Click Save to save your user.

Users logging into SQL Sentry Portal through a browser must have access to the Windows Server hosting SQL Sentry Portal. For a user to access SQL Sentry Portal, the following sets of requirements must be met:
- The Windows user identity is associated with a SQL Sentry contact (or is in an Active Directory group that is associated with a SQL Sentry contact) or it is associated with a SQL Sentry contact group (or is in an Active Directory group that is associated with a SQL Sentry contact group).
Rights Based Security
Starting with version 2021.1, SQL Sentry Portal supports Rights Based Security. See the Rights Based Security article for more information.
Feature Based Security
Starting with version 2021.8, SQL Sentry Portal offers Feature Based Security which layers on top of Rights Based Security.
Feature Based Security is applied to contacts or contact groups in the SQL Sentry client, which are linked to an AD user or AD user group. Once the users are added through the client, they are available on the Users and Groups page in the SQL Sentry Portal. Feature Based Security uses roles to control access and is Default Deny. This means new users will only be able to access the Health view until they are assigned to roles that add more permissions.
Note:
New Installations vs. Upgrades
- During a new installation, no roles are assigned to default users/groups.
- When upgrading SQL Sentry from a version that predates Feature Based Security (earlier than 2021.8) to one that supports Feature Based Security (versions 2021.8 or later), existing users and groups receive Alerts, Performance, and Query Tuner roles to maintain their existing access.
Permissions Page
Select the Permissions button from the top right in the navigation menu to open the Permissions page.

The Permissions page has four main sections worth noting:
- SQL Sentry database environment drop-down
- Note: If you are using distributed SQL Sentry databases, roles must be configured per SQL Sentry database (if you have multiple SQL Sentry databases such as SQLSentryUS and SQLSentryUK).
- Users or Groups
- With Versions 2022.4 and later, create new users and groups in SQL Sentry Portal from the Users and Groups tabs.
- User or Group Details
- Feature Access grid

Users
The Users section lists all users that exist as contacts in SQL Sentry.
If a user belongs to one or more groups, they will be listed under groups in the User Details section.

The following information is displayed in User Details:
| Details | Description |
|---|---|
| First Name | The user's first name. |
| Last Name | The user's last name. |
| The user's registered email address. | |
| Login | The user's login information for SQL Sentry Portal. |
| Groups | Any group(s) where the user is included. |
| Edit | Select Edit to open the Edit user window. |
| Delete | Select Delete to open the Delete user window. |
Creating New Users
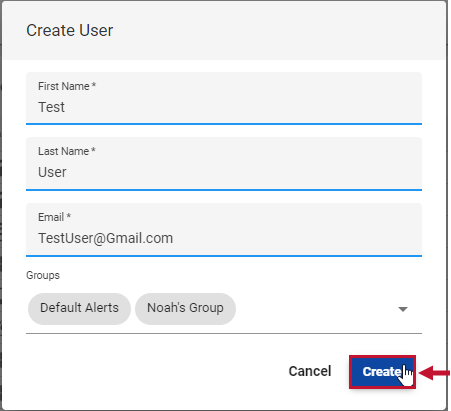
Starting with Version 2023.1, you can create new SQL Sentry Users on the Permissions page in SQL Sentry Portal. Create a new user by completing the following steps:
- Select the Users tab and then select Create New User to open the New User window.
- Enter a First Name, Last Name, and Email for the new user.
- Select any groups you want the user to join from the drop-down menu.
- Select Create to finalize your changes and create the new user.
Editing Users
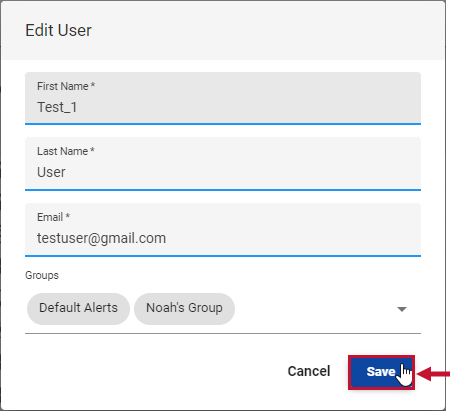
Starting with Version 2023.1, you edit existing SQL Sentry Users on the Permissions page in SQL Sentry Portal. Edit a user by completing the following steps:
- Select the Users tab and then select the user you want to edit.
- Select the Edit button to open the Edit User window.
- Make any desired changes to the user profile and then select Save to apply your changes.
Deleting Users
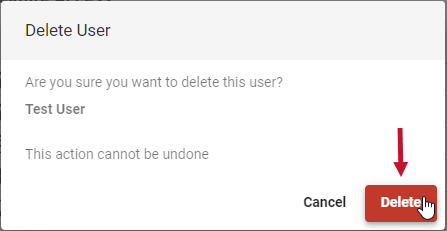
Starting with Version 2023.1, you can delete SQL Sentry Users on the Permissions page in SQL Sentry Portal. Delete a user by completing the following steps:
- Select the Users tab and then select the user you want to delete.
- Select the Delete button to open the Delete User window.
- Select Delete to delete the user.
Groups
The Groups section lists all groups that exist in SQL Sentry. Roles applied at the group level are inherited by the users in that group. The groups display the number of members next to the group name. Select a group to display the list of users and Feature Access for that group.

Creating New Groups
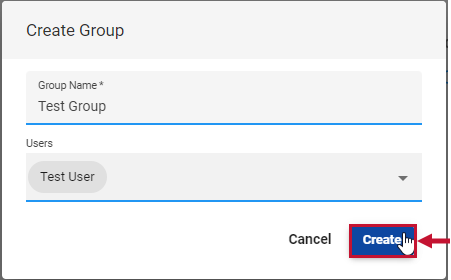
Starting with Version 2023.1, you can create new SQL Sentry Groups on the Permissions page in SQL Sentry Portal. Create a new group by completing the following steps:
- Select the Groups tab and then select Create New Group to open the Create Group window.
- Enter a Group Name for the new Group.
- Select any user(s) you want to add to the group from the drop-down menu.
- Select Create to finalize your changes and create the new Group.
Editing Groups
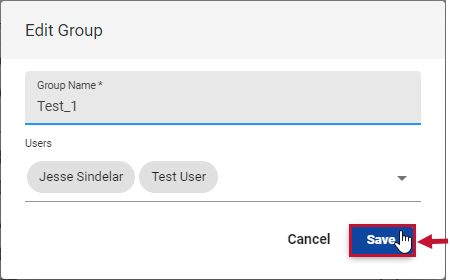
Starting with Version 2023.1, you edit existing SQL Sentry Groups on the Permissions page in SQL Sentry Portal. Edit a Group by completing the following steps:
- Select the Groups tab and then select the Group you want to edit.
- Select the Edit button to open the Edit Group window.
- Make any desired changes to the Group and then select Save to apply your changes.
Deleting Groups
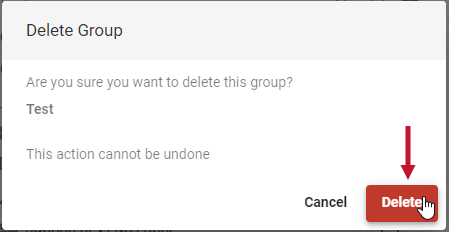
Starting with Version 2023.1, you can delete SQL Sentry Groups on the Permissions page in SQL Sentry Portal. Delete a Group by completing the following steps:
- Select the Groups tab and then select the Group you want to delete.
- Select the Delete button to open the Delete Group window.
- Select Delete to delete the Group.
Feature Access Grid
The Feature Access grid is where you assign roles to users and groups.
Note: There are no edit or save buttons on the Permissions page. Any changes that are made in the Feature Access grid are automatically saved and are immediately in effect.


Roles set at the site level will flow through to the targets in that site. In this example, all sites and targets belong to the Default Site.

If a role is applied to a site within a site, then anything within that sub-site will inherit the role. In the following example, the Performance role is applied to site SquadD, (which is within the Default Site). The user (or group) will gain Performance role access to all targets within SquadD (SQUADD-PE.ENG.LOCAL, SQUADD-STABLE.ENG.LOCAL, and SQUADD-DEV.ENG.LOCAL) without gaining that additional access to other targets.


Default Roles
The following default roles are available:
Administrator
The Administrator role provides access to the Permissions page in SQL Sentry Portal. Administrators can only see targets for which they are an administrator for on the Permissions page. The targets are also filtered by Rights Based Security for the administrator and selected user/group. This means that an administrator cannot assign Feature Based Security permissions to a target that the selected user cannot already access.
Alerts
The Alerts role provides access to viewing the Alerts view in SQL Sentry Portal.
Performance
The Performance role provides access to all metrics & chart data, including the Performance Analysis Dashboard, Custom Charts, Custom Dashboards, and charts on other views such as Top SQL, Storage, and TempDB. Users with the Performance role may create, edit, and delete the custom charts and dashboards that they can access.
Note: If a dashboard contains a custom chart for a target that is restricted from the user, the chart will display a "This data is restricted" message instead of the chart.

Query Tuner
The Query Tuner role provides access to the query and session information on the Top SQL, Blocking, Deadlocks, and TempDB views in SQL Sentry Portal.
Custom Roles
Unsupported: Custom roles may be created directly through the SQL Sentry database. There is no UI or support available at this time.
Once a custom role is inserted into the SQL Sentry database, the role appears in the Feature Access grid and may be assigned to users and groups the same way as default roles.
Step 1. Create a custom role
Run the following to create a role.
DECLARE @newRoleID UNIQUEIDENTIFIER;
SET @newRoleID = NEWID(); /*a GUID*/
INSERT INTO [Security].[FeatureRole] ([ID], [Name])
VALUES (@newRoleID, 'CustomRoleName');
Step 2. Apply permissions to your custom role
Use the following permissions and GUIDs to build your insert statement:
| Permission | GUID |
|---|---|
| Administrator | 41BA7923-244B-4D44-A5A5-393EE3C2261C1 |
| Alerts | A99A187E-925F-49C7-9037-F4EE9443874E |
| Blocking | 869B8B31-AE09-4145-9B9D-964C7196DF42 |
| Deadlocks | 1CF9D61E-45EA-4851-B39C-0916FF1A5A24 |
| Performance | 01E6DA0E-EDF9-4A96-8336-63E225AF4CDA |
| TempDB | A8367D7C-FAB2-4979-A3BA-3887FDB6A52D |
| Top SQL | C5D894C2-B721-4ECB-A596-7C9002F31783 |
| Storage | 7AFF7534-912E-48C9-93CB-EB201648861D |
Run the following insert statement to apply permissions to the role. This example adds Blocking permissions to the CustomRoleName.
INSERT INTO [Security].[FeatureRolePermission] ([RoleID], [FeatureID])
VALUES (@newRoleID, '1CF9D61E-45EA-4851-B39C-0916FF1A5A24');
On the Permissions page, a fifth role named CustomRoleName now exists and provides Deadlocks permissions to any user/group assigned this role.
