Monitor Windows domain controllers for brute force hacking attempts
You can monitor your Windows domain controllers using the SEM Agent. After you install and configure the agent, the software tracks brute force and other types of hacking attempts to your domain controllers and reports all events to the SEM Manager.
These events include:
- Unauthorized access to your administrative accounts
- Failed logon attempts
- Account lockouts
- User and group modification
- Change management events
Install the SEM agent on all domain controllers to ensure the SEM Manager captures all your domain events (even if they are not replicated across all domain controllers).
You can view the events on the SEM Console using the change management filter and create custom filters to report all activity on your domain controllers.
Install and configure the SEM agent
When you install the SEM agent, you have the option to install USB Defender. This application works together with the SEM agent to provide real-time notification when a USB drive is installed in your domain controller server. By default, USB Defender generates events related to USB mass storage devices attached to your SEM agents.
For additional security, Microsoft implemented a method in their operating system to log security events. As a result, SEM agents on systems running Windows Server 2008 or Windows 7 require different connectors than the agents running on systems with the legacy Windows operating systems.
If you are running both old and legacy Windows operating systems in your environment, create a connector profile for each operating system.
For SEM agent software and hardware requirements, see the system requirements in the SEM Installation Guide.
Install a SEM agent on a single Windows domain controller
-
Download the SolarWinds SEM Agent installer for Windows from the SolarWinds Customer Portal.
See Install the SEM agent the SEM Installation and Upgrade Guide for instructions.
-
Extract the ZIP file contents to a local or network directory.
-
Run Setup.exe.
-
To start the installation wizard, click Next.
-
Accept the End User License Agreement if you agree, and then click Next.
-
In the Manager Name field, enter the host name of your SEM Manager, and then click Next.
Do not change the default port values.
-
Confirm the Manager Communication settings, and then click Next.
-
(Optional) To install USB Defender with the SEM agent, select the check box.
-
Confirm the settings on the pre-Installation summary, and then click Install.
-
When the installation is complete, click Next to start the SEM agent service.
-
Inspect the agent log for any errors, and then click Next.
-
To exit the installer, click Done.
The SEM agent is installed on your system and begins sending events to your SEM Manager and SEM Console.
The SEM agent continues running on your system until you uninstall the software or manually stop the SEM agent service.
Configure Windows domain controller connectors
Configure the following connectors that apply to your installation on your Windows domain controllers:

- On the SEM Console, navigate to Configure > Nodes.
- Under Refine Results, expand the Type group, and then select the Agent check box.
- Select an agent, and then click Manage node connectors.
- Find the connector to configure. Type part of the connector name in the search box, or use the filter menus in the Refine Results pane.
- Select an available connector, and then click Add Connector.
- Complete the connector configuration form. The following fields are common across most connectors:
- Name: Enter a user-friendly label for your connectors.
- Log File: Enter the location of the log file that the connector will normalize. This is a location on either the local computer (Agents), or the SEM appliance (non-Agent devices).
- Output: Normalized, Raw + Normalized, Raw. You only need to configure these values if SEM is configured to save raw (unnormalized) log messages.
- Click Add.
- To start a connector, select a configured connector, and then click Start.
Maintain and monitor multiple domain controller Agents
Connector Profiles help you maintain and monitor multiple domain controllers in your SEM console. You can use these profiles to configure and modify connector settings at the profile level, as well as provide a group you can use to filter incoming event traffic from your SEM Agents to your SEM console.
Create a connector profile based on a single SolarWinds SEM Agent
Follow this procedure to create a connector profile based on a single SEM Agent and a corresponding filter to monitor activity on all systems in the profile.
-
Install the SEM Agent software on all systems you want to include in your new connector profile.
See the SEM Installation and Upgrade Guide for instructions on how to download and install the SEM Agent.
-
Configure a single SEM Agent to serve as the template for your connector profile.
-
On the SEM menu bar, navigate to Configure > Connector Profile.
-
Click Create Connector Profile.
-
Enter a profile name and description.
-
From the Template list, select the new SEM Agent, and then click Save.
-
In the Groups list, locate your new connector profile.
Use the Refine Results pane if needed.
-
Next to your connector profile, click
.png?ver=1762450501) , and then select Edit.
, and then select Edit. -
In the Available Agents pane, locate the SolarWinds SEM Agents you want to add to your connector profile.
-
Click the arrow next to each SEM Agent you want to add to the Contained Agents pane.
-
When complete, click Save.
Create a filter for all activity in a Connector Profile
- Log in to the SEM Console.
- On the toolbar, click Live Events.
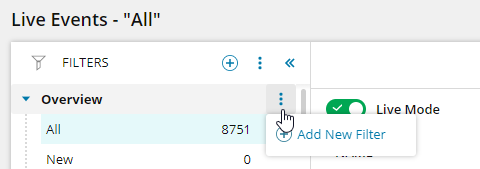
- To create a filter at a group level in the Filter Values pane, for example, the Overview group, move the mouse pointer over a group heading to expose the vertical ellipsis, and click Add New Filter.

Or:
To create a filter at the root level, click the add
 icon, and then select Add New Filter.
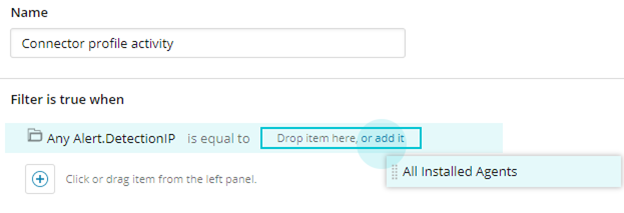
- Enter a descriptive name for your new filter in the Name field on the right.
- In the first column under Filter Values on the left, expand Event Groups, and select Any Alert.
- Drag DetectionIP from the second column on the left into the filter builder.
When you drag a value into the filter builder, the correct drop location is illuminated with a blue line.

- In the same way, expand the Connector Profiles group, select your profile, and drag it into the filter value drop location.

- Click Save.
Create and enable a critical logon failures rule
Clone and enable critical account logon failures rule to track failed logon attempts to the default Windows Administrator account. The default action for this rule is to generate a HostIncident event, which you can use in conjunction with the Incidents report to notify auditors you are auditing the critical events on your network.
-
Log in to the SEM Console.
-
On the toolbar, click Rules.
-
On the Rules toolbar, click Create rule from template.

-
In the search box, enter:
"critical account" failures
- Select the Critical Account Logon Failures rule template, and then click Next.
- Review and edit the existing conditions and values where needed, and then click Next.
- Review and adjust the rule details where needed, and then click Create.
See Create a new rule for additional guidance.
Tune Windows Logging for SEM implementation
After you install and configure your SEM Agents, optimize your SEM deployment by tuning your Windows operating system to log the specific events you want to see in your SEM console and store in your SEM database. Set your group and local policies according to your environment requirements. See Configure Windows audit policy for use with SEM for more information.
