Generate a Patch Manager report
When you generate a Patch Manager report (such as a WSUS report), Report Viewer opens in a new window. Use Report Viewer to customize the report layout and filter and sort the report results. When you are finished, configure the report viewer email settings, and then export and email the report results to one or more users.
Beginning in 2.1.7, you can generate a report in the SolarWinds Platform Web Console when Patch Manager is integrated with the SolarWinds Platform. See the Patch Manager Getting Started Guide for details.
This section describes how to:
- Generate a WSUS report
- Customize report layouts
- Filter and sort the report results
- Configure the report viewer email settings
- Export and email the report results to one or more users
Generate a WSUS report
After you set up the WSUS inventory, you can review the server status using the WSUS reports. These reports provide information about your WSUS server performance and update packages installed on managed systems by the WSUS server.
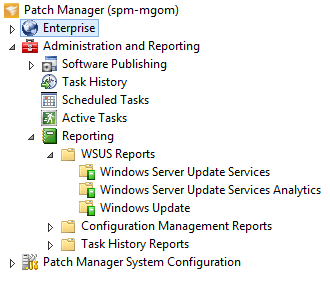
The WSUS reports are located at Administration and Reporting > Reporting > WSUS reports.

Windows Server Update Services reports
These WSUS reports provide high-level information about update packages installed on the managed systems by the WSUS server. This information includes the installation percentage for each update.
Below is a list of helpful Windows Server Update Services reports you can generate using Report Viewer.
| Report Name | Description |
|---|---|
| Computers with approved update percentages | Reports the percentage of systems running approved updates. |
| Percent Failed | Reports the percentage of update packages that were not installed during the update. |
| Percent Installed | Reports the percentage of update packages that were installed during the update. |
| Percent Not Installed | Reports the percentage of uninstalled update packages. |
| Update Approvals | Reports the update title, computer group name, release date, and administrator for each approved update. |
Windows Server Update Services Analytics reports
These WSUS reports provide detailed information about update packages installed on the managed systems by the WSUS server. This information includes the update state for each update and computer.
Below is a list of helpful Windows Server Update Services Analytics reports you can generate using Report Viewer.
| Report Name | Description |
|---|---|
| Computer Update Status | Reports all Microsoft and third-party updates to each managed system and whether they are approved, installed, or failed. This report does not explain why an update failed. |
| Computer Update Status - Approved Updates with ID and Revision | Reports the approved upgrade packages and whether they are installed or not installed. |
| Computer Update Status Approved Updates Not Installed | Reports the approved upgrade packages that were not installed. This report does not state whether the upgrade was applicable for each system. |
| Computer Update Status by Group | Describes the update completion status of all computers in a WSUS group. The update status is based on a selected time and date range. |
Windows Update reports
These WSUS reports provide information about the Windows Update Agent. This agent runs on the managed computers and checks the WSUS server for the latest published updates.
Generate a WSUS report
- Log in to the Patch Manager Administrator Console.
-
In the navigation pane, expand Administration and Reporting > Reporting > WSUS Reports.
-
Select a report category.
For example, Windows Server Update Services Analytics.
- In the center pane, select a report.
- In the Actions pane, click Run Report.
Create a custom WSUS report
You can create custom Patch Manager reports using the Report Definition Builder. For example, you can create a WSUS report that displays all pending updates, update IDs, and update revision numbers in your environment. Using these values, you can install updates directly from the Report Viewer.
-
Schedule and run at least one inventory task for your managed computers.
See Schedule inventory tasks to populate empty reports for details about scheduling inventory tasks in Patch Manager. -
In the navigation pane, expand Administration and Reporting > Reporting > WSUS Reports.
- Select a report category.
- In the Reports pane, select the report you want to create.
- In the Actions pane, click New Report.
- In the Reports Definition Builder window, select the fields you want to include in the report.
- Select the column and sort order for your fields.
- Apply any filters you want to save in your report, and then click Next.
- Name the report.
- Select any scheduling preferences, and then click Finish.
Customize the report layout
You can customize how the information is displayed in the report. Any change you make to a report layout displays in all reports.
The following table lists the procedures for customizing a report layout.
| Task | Procedure |
|---|---|
| Increase the number of lines Report Viewer displays per page |
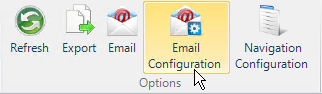
Click Navigation Configuration, and then enter a value up to 100,000. The default value is 2,000. |
| Reorganize the columns in the report |
Drag and drop any column to a new position. For example, drag the Domain or Workgroup (Update Server) and Name (Update Server) columns to the far right of the data grid. |
| Resize the columns | Reposition the column separators in the header row. |
| Group results by the values in a column |
Drag the column header into the group bar. For example, drag Computer Name into the group bar, as shown below.
|
| Show or hide available columns |
|
| Save a custom layout | Click Save Layout. |

Filter and sort the report results
You can sort the report list by the clicking the sort icons in each column. This sorts the entire report list by the contents of the selected column. You can sort each column in either ascending or descending order.
| Task | Procedure |
|---|---|
| Filter report results |
|
| Sort a report by the values in a specific column |
Click the column header once to sort in ascending (A-Z) order. Click the column header twice to sort in descending (Z-A) order. |
 in any column to expose the filter options for that column.
Configure the Report Viewer email settings
- In the Report Viewer window, click Email Configuration.
-
Complete the options in the Console Email Settings dialog box.

- Enter the SMTP Server and Sender Email Address (required).
- If your email server uses a custom port, modify the Port value.
- If your email server uses a secure connection, select Use SSL or Use TLS.
- To specify one or more recipients who must receive a report, enter the email address(es) in the Favorite Recipients field separated by semicolons.
- If your email server requires credentials to send email, select Use Credentials, and then complete the related fields.
- Click OK.
Email the report results to one or more users
-
In the Report Viewer window, click Email.

-
Complete the Email Recipients dialog box.

- In the Recipient field, enter at least one email address.
- (Optional) Enter a description.
-
Click Add.
- Click OK.
- In the Export Options window, select the format to use for your report.
- In the Export Filename field, browse to or enter a custom path or filename, or accept the default.
- Click Export.
Export a report
- Log in to the Patch Manager Web Console.
-
Expand Administration and Reporting > Reporting.

-
Expand a report category that contains the report you need.
For example, Task History Reports.

-
Select a report type.

-
In the top center console under Reports, select the custom report you want to export.

-
In the Actions menu, click Run Report.
-
In the Report Results menu options, click Export.

-
In the Export Options window, select a report format.

-
In the Export Filename field, enter a new path for the report or accept the default.
Record this path so you can locate the report after the export. - Click Export.
- When prompted, click OK.
- Navigate to the path you recorded in the Export Filename field to access and open the report.