Import IP addresses
IPAM provides two methods to easily import IP addresses and subnet data into your network, either by importing from spreadsheets as described in this topic, or bulk adding by entering Subnet/CIDR prefixes.
With the IPAM 2019.4 and newer releases, you can import and export IPv6 addresses.
For exporting IP Addresses, see Export Subnets.
Import from spreadsheet
The IPAM Import wizard enables you to easily import IP addresses, and subnet and network data that is held on spreadsheets. You can import IPv4 and IPv6 groups, supernets, and IPv6 global prefixes, and the hierarchy structure of your network.
Imported data respects user delegation permissions.
All imported spreadsheets require a header row with unique column names. These do not need to match the IPAM field names as you can associate each column with the field into which it is imported. Any columns that do not have corresponding fields in IPAM can be added as custom fields.
A subnet spreadsheet contains an IP address on each row. Only the IP Address is mandatory.

For a structure spreadsheet, only the Type of each object needs to be provided. This can be Group, Supernet, Subnet, IPv6Subnet, GlobalPrefix, PrefixAggregate, etc.

Subnet or Structure spreadsheets can be imported as individual .csv, .xls, or .xlsx files.
To import a structure spreadsheet with associated subnet spreadsheets, save the subnet spreadsheets in a subdirectory called Subnets and create a zip file containing all the files as shown below.

You can choose whether to import data into new and existing IP subnets, preserving the hierarchies in the structure spreadsheet, or into an imported subnet folder with a flat file structure to be organized later.
- Navigate to My Dashboards > IP Addresses > Manage Subnets & IP Addresses.
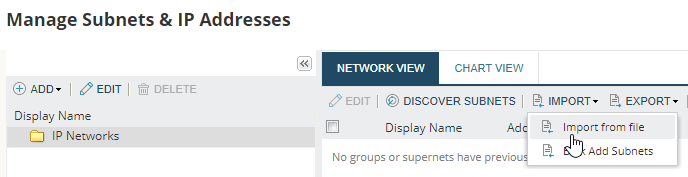
- Click Import > Import from file.
The Preparing to import a spreadsheet page is displayed. This page enables you to download example spreadsheets that can help you create your own spreadsheets.
- Click Next to proceed.
You can avoid showing the Preparing to import a spreadsheet page every time by checking the Don’t show this again box.
- Click Browse.
- Navigate to the required file, and click Open.
- Select the type of import, and click Next:
IP Addresses: Select this if you have a single spreadsheet list of IP addresses,
Structure only: Select to import a spread containing the structure for your IP addresses
Structure and IP Addresses: Select of you have zipped the structure spreadsheet with associated IP address spreadsheets in a sub-directory (see above).
Import IP Addresses
- The IP Address column matching page is displayed, showing the IPAM IP address fields and what the wizard has determined to be the corresponding columns in the spreadsheet. If these are not correct or you do not want to import anything for a field, use the drop-down menu to select an alternative field.
Select [Do not import] for fields that do not have a corresponding column in the spreadsheet.
The only mandatory field for this import is the IP Address.
- Click Next.
- The Subnet Column matching page is displayed, showing the IPAM subnet fields and what the wizard has determined to be the corresponding columns in the spreadsheet. If these are not correct, or you do not want to import anything for a field, use the drop-down menu to select an alternative field.
Select [Do not import] for fields that do not have a corresponding column in the spreadsheet.
There are no mandatory fields for subnet information.
- Select the option for where you want the imported subnets to go, and click Next:
- IPAM will automatically create subnet hierarchy in selected location based on import
- IPAM will import subnets into the "Imported Subnet" folder (flat file structure)
- If your spreadsheet contains additional columns to those IPAM uses by default, these can be imported as custom properties. Click Add Custom Property to import a column, or Add All to import all columns.
- Click Next.
- The spreadsheet contents are validated. If errors are found, you are given the option to go back and fix these errors, import only the valid entries, or completely cancel the import.
- Click Next.
- On the Confirm choices page, click Import.
The Import Summary page is displayed. Go to Complete the Import to continue.
Import only the Structure
- The Subnet column matching page is displayed, showing the IPAM Subnet fields and what the wizard has determined to be the corresponding columns in the spreadsheet. If these are not correct or you do not want to import anything for a field, use the drop-down menu to select an alternative field.
Select [Do not import] for fields that do not have a corresponding column in the spreadsheet.
The only mandatory field is the Type.
- Select option for where you want the imported subnets to go, and click Next:
- IPAM will automatically create subnet hierarchy in selected location based on import file (hierarchy preserved)
- IPAM will import subnets into the "Imported Subnet" folder (flat file structure)
- If your spreadsheet contains additional columns to those IPAM uses by default, these can be imported as custom properties. Click Add Custom Property to import a column, or Add All to import all custom text fields.
- Click Next.
- The spreadsheet contents are validated. If errors are found, you are given the option to go back and fix the errors, import only the valid entries or cancel.
- On the Confirm choices page, click Import.
The Import Summary page is displayed. Go to Complete the Import to continue.
Import Structure and IP Address
- The Subnet column matching page is displayed, showing the IPAM Subnet fields and what the wizard has determined to be the corresponding columns in the spreadsheet. If these are not correct or you do not want to import anything for a field, use the drop-down menu to select an alternative field.
Select [Do not import] for fields that do not have a corresponding column in the spreadsheet.
The only mandatory field is the Type.
- Select the option for where you want the imported subnets to go, and click Next:
- IPAM will automatically create subnet hierarchy in selected location based on import file (hierarchy preserved)
- IPAM will import subnets into the "Imported Subnet" folder (flat file structure).
- If your spreadsheet contains additional columns to those IPAM uses by default, these can be imported as custom properties. Click Add Custom Property to import a column, or Add All to import all custom text fields.
- The spreadsheet contents are validated. If errors are found, you are given the option to go back and fix the errors, import only the valid entries or cancel.
- Click Next.
- The IP Address column matching page is displayed, showing the IPAM IP Address fields and what the wizard has determined to be the corresponding columns in the spreadsheet. If these are not correct or you do not want to import anything for a field, use the drop-down menu to select an alternative field.
Select [Do not import] for fields that do not have a corresponding column in the spreadsheet.
The only mandatory field is the IP Address.
- Click Next.
- On the Confirm choices page, click Import.
The Import Summary is displayed.
Complete the import
The number of IP addresses that have been imported but have not been assigned to a parent subnet is displayed.
- Click Next.
If any IP addresses have been imported but have not been assigned to a subnet, the Assign Subnets to Ophaned IPs page is displayed.
A warning banner will be displayed at the top of the Manage Subnets & IP Addresses page until all orphan IP addresses are assigned to subnets.
- Select the IP Addresses you want to assign to specific subnet.
- Select an IP Address and click Assign Subnet to create a subnet and assign subnets to this.
- If you select an IPv4 address, all unassigned IPv4 addresses will be assigned to this subnet.
- If you select an IPv6 address, all unassigned IPv6 addresses will be assigned to this subnet.
You can hit Save to accept the default name and values and edit later, or set up any Subnet information here.
- Click Assign IPs to Existing Subnets to add addresses to subnets that have already been created.
The Manage Subnets & IP Addresses page is displayed showing the results of this import.