Create and manage custom properties
In addition to the physical properties of a database instance (such as database vendor, version, and IP address), you can create custom properties. Custom properties are used to associate business or organizational attributes to monitored database instances. For example, you could use custom properties to specify the location of a monitored database instance or the DBAs responsible for an instance.
You can include custom properties as variables in email templates for alert notifications. Receivers of email alert notifications can set up rules to prioritize, forward, or otherwise process incoming notifications based on the custom property values in the emails. You can also include custom properties in alert assignment rules.
Custom properties can be created through the REST API in DPA 2019.4 and later. They can be created through the user interface in DPA 2021.3 and later.
Only DPA administrators can create and manage custom properties.
Access the Custom properties page and view property details
-
From the DPA menu in the upper-right corner, click Options.
-
Under Monitor Setup > Database Instances, click Custom properties.
The Custom properties page lists existing custom properties. It shows the number of database instances each property is assigned to and the number of values defined for the property.

-
To see more information about a property, click the blue arrow on the right (
 ) to open the Details pane.
When the Details pane is open, the blue arrow is replaced with a vertical blue bar to indicate which custom property is associated with the details pane.

The Details pane shows all defined property values, the database instances using this property, and the value assigned to each database instance. If more than one value is assigned to a database instance, click the number to display the list of values assigned to that instance.

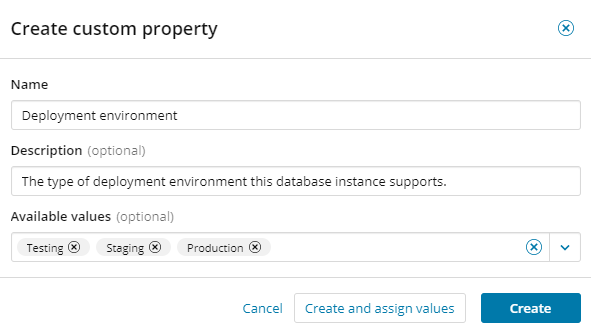
Create a custom property
-
At the top of the Custom properties page, click Create custom property.
The Create custom property dialog box opens.
- Enter a unique name to identify the property.
- (Optional) Enter a description.
- (Optional) Define one or more values for this custom property. To define each value:
- Type a value in the Available values field.
Press Enter.
-
Do one of the following:
- To save the property and close the dialog box, click Create.
- To save the property and open the Assign custom property values page, click Create and assign values.
Assign property values to database instances
If a custom property applies to a database instance, assign the appropriate property values to that instance. You can assign multiple values for the same property.
-
On the Custom properties page, select the custom properties whose values you want to assign. Then click Assign values.
The Assign custom property values page lists all database instances. It includes a column for each selected property.

You can also open this page from the Details pane by clicking Commands > Assign values.
- (Optional) If you change your mind about the property values you want to assign, update the properties shown on the Assign custom property values page:
Click Select custom properties.
The Available custom properties dialog box opens. The currently selected properties are checked.
- Select or deselect properties to specify which properties you want to include.
- Click Apply to update the properties shown on the Assign custom property values page.
- (Optional) Use the Filters pane on the left to reduce number of database instances in the list. For example, select a database type to list only instances of that type.
- To assign or unassign property values for individual database instances, do the following:
To assign a value, click the down arrow and select the value from the drop-down list. If the value you need is not in the list, add it by typing the value in the text box and pressing Enter.

You can assign multiple values to the same property.
To remove one value assigned to a property, click the x next to the assigned property.
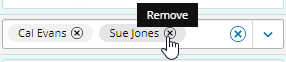
To remove all values assigned to a property, click the x on the right side of the property box.

Removing an assigned value from a property on a database instance does not delete the value. It is still available to be assigned to other database instances. To delete the value and remove it from all assigned instances, you must edit the custom property definition.
-
To assign the same property value to multiple database instances:
- Select the database instances.
-
Click Assign to selected instances.
The Assign value to selected instances dialog box opens.

When you use this dialog box to assign values to multiple instances:
- You can only select values that were previously defined for the property. You cannot add new values.
- This dialog box does not display the values that are currently assigned to a property.
- If a value is currently assigned and you use this dialog box to assign a new value, the existing value is not replaced. Both values are assigned.
-
Select each property whose value you want to assign, and then choose a value from the drop-down list.

-
Click Apply changes.
Your changes are shown on the Select custom properties page.

-
Click Save to save your updates.
To return to the Custom properties page, click Back .
Edit a custom property definition
-
On the Custom properties page, select a custom property and click Edit custom property. Or, in the Details pane for that property, click Commands > Edit custom property.
The Edit custom property dialog box opens.
- Edit the Name and Description as needed.
-
To add a value, type the value name in the Available values box and press Enter.
-
To remove a value, click the x on the oval that shows the value name.
-
If you remove values by accident, you can add them back:
-
Click the down arrow on the Available values box.
The drop-down shows all values deleted during the current editing session.

- Click a line to add that value back.
- Repeat these steps to add other deleted values back.
-
-
To change the name of a value:
-
On the oval that shows the value name, click anywhere except the x.

-
Type the new name and click Apply.

-
-
Do one of the following:
- To save your changes and close the dialog box, click Save.
- To save your changes and open the Assign custom property values page, click Save and assign values.
If you removed a value that is currently assigned to one or more database instances, a confirmation message is displayed.
-
If you do not want to delete the values that are in use, click Cancel to return to the Edit custom property dialog box. Then complete the steps to add that value back.
-
If you want to delete the values that are in use, click Delete.
Delete a custom property
When you delete a custom property, any property values that were assigned to database instances are automatically removed.
-
On the Custom properties page, select one or more properties and click Delete. Or, in the Details pane for a property, click Commands > Delete.
-
On the confirmation prompt, click Delete.