Create a ticket checklist
Beginning in Web Help Desk 12.6, you can add a checklist to a Web Help Desk ticket. The checklist helps a tech assigned to several tickets ensure that all tasks in a ticket are completed before the ticket is closed. It also ensures that all necessary steps are documented for governance purposes.
Techs can apply shared templates to a ticket. If the ticket requires a tech to complete a set of tasks that are not included in your checklist templates, you can manually add a checklist in a ticket. Any changes to a template (such as editing the template, selecting an item, or deselecting an item) are recorded in the ticket history.
Administrators can create a ticket checklist template that lists the tasks required for a specific request type—for example, on-boarding a new employee. When completed, the administrator can assign the template to a request type, share the template with all techs, and delete the template when necessary
Add a checklist
You can add up to 30 checklist items in a ticket.
- Log in to the Web Help Desk Administrator Console.
- Open a new or existing ticket.
- Click the Ticket Details tab.
-
In the Details section, locate the Checklist field and click Add checklist.

-
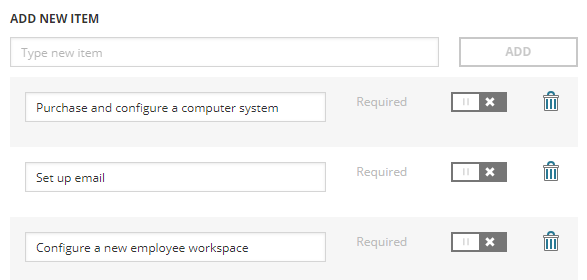
In the Add Checklist window under Add New Item, enter a checklist name using up to 100 English characters.
If you created a checklist template that includes the checklist items you need, click the Load From Template drop-down menu and select a template.

-
Click Add.
The checklist item displays in the Add Checklist window.

-
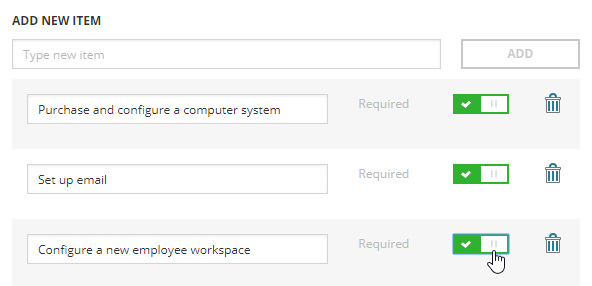
(Optional) Enable Required to require this checklist item to be completed before a tech can close the ticket.

-
Repeat step 4 through step 7 to add or remove any additional checklist items. Enable Required for each checklist that is required to close the ticket.
To populate the window with checklist items from a shared checklist template, click the Load From Template drop-down menu and select the template.

-
(Optional) Save the checklist as a template.
- Click the Save Checklist as a Template checkbox.
-
Enter a checklist template name using up to 50 English characters.

-
Click Save As Template.
The template is saved to the Checklist Templates window.
-
Click Save.
The checklist items display in the ticket. To rearrange the order, drag and drop a checklist item to a new location.

Edit a checklist
- Log in to the Web Help Desk Administrator Console.
- Open an existing ticket.
- Click the Ticket Details tab.
-
In the Checklist row, click Edit.

-
Edit the checklist.
For example, you can add a new checklist item or click the trash can icon to delete an item.
The checklist item name can include up to 100 English characters. - Click Save.
Delete a checklist
- Log in to the Web Help Desk Administrator Console.
- Open an existing ticket.
- Click the Ticket Details tab.
-
In the Checklist row, click Delete.

The checklist is removed from the ticket.
Create a ticket checklist template
When you create a new Web Help Desk ticket, the ticket may include several child tickets that require techs from HR, Facilities, and other areas of your organization to complete service requests. For example, the ticket may include a request type called New Hire that automatically generates child tickets for setting up a workspace, computer systems, and cube for the new employee. To ensure that all tasks are completed, you can create a checklist template that includes a checklist items for each service request and apply the ticket to the parent request type.
A checklist template can include up to 30 required or not-required checklist items. After you create the checklist template, assign the template to a request type. When a new ticket is created with the targeted request type, the checklist items are pulled from the template and added to the ticket. This process helps you ensure that all tasks associated with the parent ticket (such as child tickets) are completed by the assigned techs.
- Log in to the Web Help Desk Administrator Console.
- Click Setup > Tickets > Checklist Templates.
- In the Checklist Templates window, click Create New.
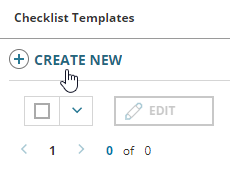
- In the Checklist Name field, enter a checklist template name using up to 50 English characters.
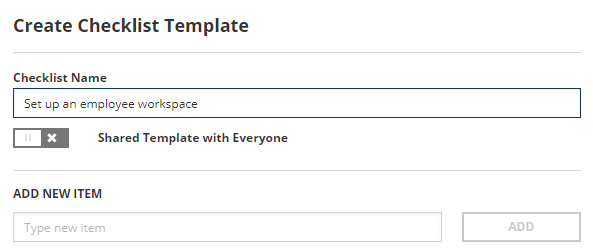
- (Optional) Enable Select Shared Template With Everyone to share the template with all techs.
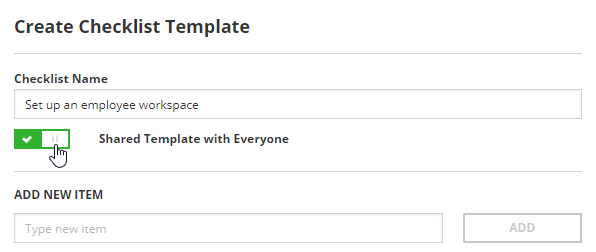
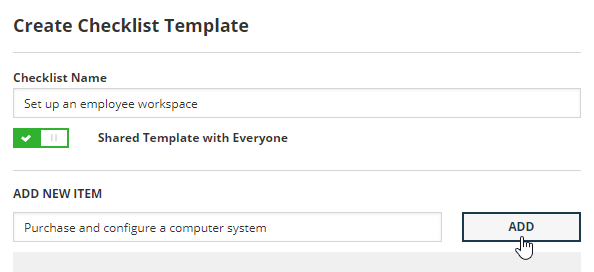
- In the Add New Item field, enter a checklist task, and click Add.
- Click Save.
- Repeat step 6 and step 7 for all remaining checklist items.
You can add up to 30 checklist items for each template.
- (Optional) Select Required next to each checklist item that the tech must complete before the ticket can be closed.
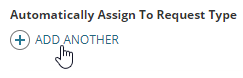
- (Optional) Automatically assign the checklist to a request type.
After you create a checklist template, you can assign the template to a request type at any time.
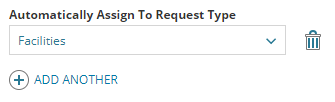
Click Add Another.
Assign the checklist template to a request type. For example, Facilities.
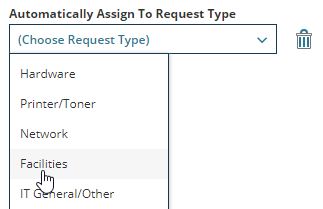
The request type displays in the drop-down menu.
-
Click Save.
The new template is added in the Checklist Template window.

The
 icon indicates that you chose to share the template with everyone in step 5.
 If you assigned the checklist to a template, the Assigned to field includes the name of the assigned request type.

Edit a checklist template
-
Log in to the Web Help Desk Administrator Console.
-
Click Setup > Tickets > Checklist Templates.
-
In the Checklist Templates window, select the checkbox next to the checklist template you want to edit.

-
In the toolbar, click Edit.

-
Edit the checklist template.
For example, you can add a new checklist item or click the trash can icon to delete an item.
The checklist item name can include up to 100 English characters. -
Click Save.
The checklist template is updated based on your edits.
Delete a checklist template
-
Log in to the Web Help Desk Administrator Console.
-
Click Setup > Tickets > Checklist Templates.
-
In the Checklist Templates window, select the checkbox next to the checklist template you want to delete.
-
In the toolbar, click Delete.

-
When prompted, click OK.
The checklist template is deleted from the Checklist Templates window. If the template was assigned to a request type, the assignment and template are deleted.
Assign a ticket checklist template to a request type
When you create a checklist template, you can assign the template to a request type when you create the template. If you skipped this procedure, you can assign a template to a request type at any time.
- Log in to the Web Help Desk Administrator Console.
- Click Setup > Tickets > Checklist Templates.
-
In the Create Checklist Template window, select the targeted checklist template, and then click Edit.

The
icon indicates that the template is shared with everyone. -
Click Add Another.
-
Assign the checklist template to a request type. For example, Facilities.
The request type displays in the drop-down menu.
-
Click Save.
The template is assigned to the request type. The Assigned to field includes the request type name.
The
icon indicates that the template is shared with everyone.