Intelligent Maps for SolarWinds Platform products
This topic applies only to the following products:
SolarWinds Observability Self-Hosted
NAM — NPM — NTA — SAM — UDT — VMAN — VNQM — WPM
Intelligent Maps are a troubleshooting feature that displays a map of physical and logical relationships between entities monitored by the SolarWinds Platform products you have installed. Intelligent Maps help you quickly isolate and identify critical health and performance issues.
Intelligent Maps is not compatible with Microsoft Internet Explorer 11. For best performance, SolarWinds recommends using an alternative browser, such as Microsoft Edge, Google Chrome, or Mozilla Firefox. For additional requirements, see the SolarWinds Platform system requirements.
Intelligent Map types
Auto-generated Intelligent Maps
Auto-generated maps are accessible through automatically generated sub-views that display contextual relationships for monitored entities in the SolarWinds Platform. From an entity's details page, click the Map subview to display a map of relationships relevant for the entity.
Custom maps can be created from the web-based Maps Editor and displayed on any SolarWinds Platform Web Console using the Maps widget. Select entities to map and the Intelligent Maps feature displays physical and logical relationships between them. You can add the custom map on any SolarWinds Platform Web Console view using the Map widget.
Auto-generated Intelligent Maps
These auto-generated maps are available in the SolarWinds Platform Web Console as a subview on any entity details page. They display an entity's immediate dependencies, topology, or application connections between entities.
Auto-generated Intelligent Maps are created without any user intervention: entities are added or removed as changes occur in the environment.
The contextual maps allow users to extend the maps using identified relationships for troubleshooting purposes. If desired, this can be used to see a custom map in the map editor (edit mode), but due to the dynamic nature of the auto-generated maps, layouts and other changes do not persist.
To access auto-generated Intelligent Maps, go to an entity Details view and click the Map subview in the menu on the left.

| 1 | Map icon: Click the icon to view the Orion Map. |
| 2 |
Canvas: Displays the map of relationships of the entity. |
| 3 |
Seed object: The entity whose relationships the map displays. This is the entity from which you accessed the map. The color or the ring around the entity signifies the entity health, based on thresholds set for the entity. See Thresholds for details. For more details about an entity on the map, click the entity. The map adjusts accordingly and details about the entity are displayed in the Inspector Panel (7). |
| 4 |
Healthy topology connection: For topology connections, the line width represents the interface bandwidth. T |
| 5 | Metric pill: By default, it displays the outbound traffic and percent utilization. If polled values for the metric exceed the threshold, the pill displays errors and discards. Hover over the metric pill to show which metric it displays. |
| 6 |
Connection with issues: The color signifies that a threshold has been exceeded. Yellow means warning and red signifies a critical threshold. See Thresholds for more details. Click the connection to see details in the Inspector Panel (8). |
| 7 |
Tools to adjust the map: Zoom in, zoom out, pan, or change layout. See Adjust the Orion Map. |
| 8 |
Inspector Panel: Displays details about the entity or connection selected on the map, according to the active navigation bar. When you open the Map from an entity details page, the Inspector Panel only displays the entity name, IP, vendor, and machine type.
|
| 9 |
Related: Click this button to display entities related to the selected entity in the Inspector Panel: descendants, ancestors, and dependencies. To add a related entity to the map, select the check box in front of the entity, and click Apply. |
| 10 |
Connected: Click this button to display entities connected to the selected entity by a protocol-based relationship or actual data flow, such as topology (NPM) or Application Dependency Connections (SAM), in the Inspector Panel. To add a connected entity to the map, select the check box in front of the entity, and click Apply. |
| 11 | Alerts: Click this button to display a list of active alerts associated with the entity in the Inspector Panel. |
| 12 | Recommendations (only with VMAN): If you have VMAN installed, this section presents recommendations for the entity. |
Custom Intelligent Maps
You can create Intelligent Maps either based on the auto-generated maps, or from scratch.
You can set permissions for individual users to access Intelligent Maps and create, manage, or edit customized maps.
View a list of maps, create maps, and edit maps from the Maps view
To access Intelligent Maps created by users, click My Dashboards > Maps in the Home section.

| 1 |
List of maps: Review available Intelligent Maps. By default, the list shows maps created by you and public maps. Click a map name to view the map (View mode). |
| 2 |
Button bar: Create a new map or select a map in the list (1) and edit or delete it. |
| 3 |
Sort, filter, and search controls: Use the filter and search options to find Intelligent Maps. Sort maps by name, time since last update, or creation date. |
Add entities or adjust connections in Edit mode
Edit mode is where you create or edit maps. To enter Edit mode:
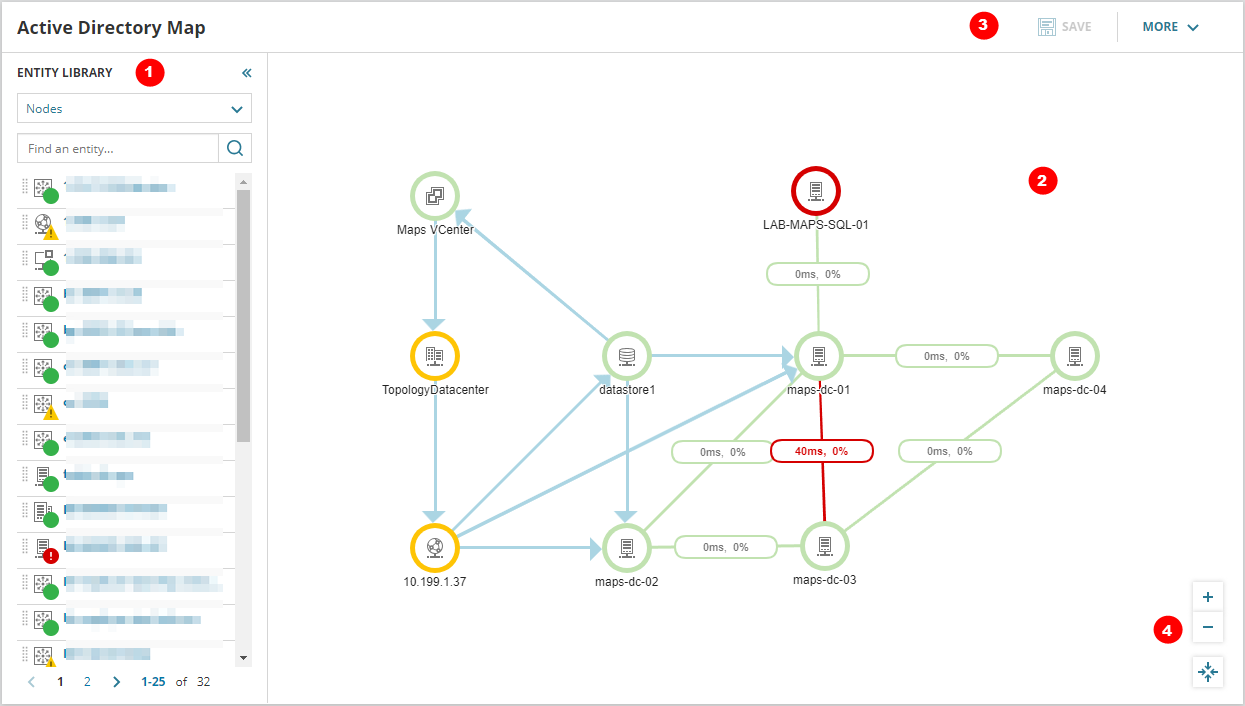
| 1 | Entity Library: Drag entities from the library to the canvas. | ||||||||||||||||||||||||||||||
| 2 |
Canvas: Place entities in the correct position. If there are relationships between entities on the map, the connections are automatically added to the map as well. |
||||||||||||||||||||||||||||||
| 3 |
Button bar: Save the map or use commands in the More menu, such as create a new map, save the map under another name, delete the map, or switch to View mode. |
||||||||||||||||||||||||||||||
| 4 |
Map controls: Zoom in, zoom out, and center and adjust the map to the view.
|
View popups and display details on mapped entities in View mode
View mode displays a full screen view of user-created maps for easy troubleshooting and investigation.

| 1 | Entity: Click an entity to display details in the Inspector Panel. | ||||||
| 2 |
Inspector Panel: Displays details about the entity or connection selected on the map. See Inspector Panel above.
In the View mode, you cannot add related entities to the map. Entities in the Inspector Panel do not have check boxes. This is only available from the auto-generated map subviews. |
||||||
| 3 |
Popup: Hover over an entity to see additional details. You can also execute commands from the command menu, such as go to details view, edit the entity, mute alerts for the entity, or unmanage the entity. |
||||||
| 4 |
Button bar: Click Share to copy the map address to the clipboard, click More > Edit to switch to Edit mode. |
||||||
| 5 | Map controls:
|
Find maps featuring a specific node
-
Go to Maps management. Click My Dashboards > Home > Maps.
-
In Filters, expand Child Entity and start typing the node name into the Entity name box and click the Search button.
The list of maps will be filtered to only display maps including an entity with the entered string in its name.

Map widget
When you create a custom Intelligent Map, you can add it to a view using the Map widget.
Click an entity on the map to go to the entity details view.
What else can you do with Intelligent Maps?
- Set account permissions for maps users to view and manage Intelligent Maps.
- View details for entities on mapped entities, such as the Map Summary, connected entities, dependent entities, related alerts, or VMAN recommendations
- View connections between displayed entities, such as topology connections, application dependency connections, or dependency connections
- Customize the auto-generated maps, such as add/remove related entities, create a group from mapped entities
- Adjust the auto-generated map by zooming in, zooming out, or panning
- Create a custom Intelligent Map, add entities, adjust their position, and save the map
- Add the Intelligent Map to your views as a widget
- Create a custom alert based on the Intelligent Maps entity
- Send mapped objects via email as a report and send the Intelligent Map as a PDF
- Review historical data of past events within configured maps, such as an entity's down time, alerts, and status.