Work with entities in auto-generated Intelligent Maps in the Map subview
This SolarWinds Platform topic applies only to the following products:
Hybrid Cloud Observability Essentials — Hybrid Cloud Observability Advanced
NAM — NPM — NTA — SAM — UDT — VMAN — VNQM — WPM
Display details of a mapped entity in the Inspector Panel
- Click an entity on the map.
- When the entity is selected, its details are displayed in the Inspector Panel, and the map changes focus.
You can list related entities, connected entities, alerts, and recommendations (if you have VMAN installed).
Select an entity on the map from the Inspector Panel
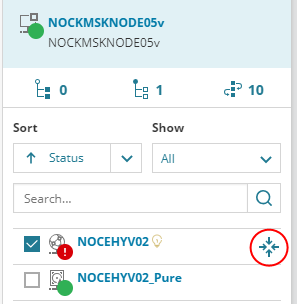
For each entity on the map, there is a selected box in the Inspector Panel. To the right of the entity, there is a chevron icon.
The Inspector Panel lists entities on the map, as well as related or connected entities that are not on the map:
- Entities on the map have a selected box on the left and a chevron icon on the right.
- Related or connected entities have an empty box on the left.
Click the chevron icon in the Inspector Panel to select an entity on the map. The Inspector Panel displays details for it - related and connected entities, alerts, and/or VMAN recommendations.
![]()
Center the map around an entity
- Press the Alt key. The chevron icons in the Inspector Panel change into the center icon.
-
Click the center icon for the entity to center the map around.
The map centers around the entity.
Add entities to the map from the Inspector Panel
You can only add entities from the Inspector Panel on auto-generated maps in the Map subview. Custom Intelligent Maps do not support this feature, and the check boxes are not available.
For auto-generated Intelligent Maps, review the check boxes in front of entities in the Inspector Panel. A gray box indicates the seed entity that you cannot remove from the map. The name of the seed entity is also in the map title.
- If a box is selected (blue with a checkmark), the entity is displayed on the map.
- If a box is not selected, click it, and click Apply to add the entity to the map.
Automatically add related data on the map
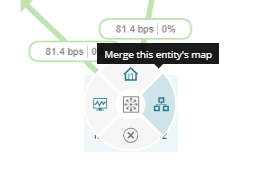
To automatically add relational data, use the "Map It" feature.
Map It is only available for auto-generated Intelligent Maps. It is not available on custom Intelligent Maps.
- On the Intelligent Map, hover over an entity, hold the Alt key down, and click the Map It icon.
- Related entities are added on the map.
You can also go to the entity details page by clicking the home icon.
Open an entity in PerfStack
This feature is only available in auto-generated Intelligent Maps.
- To view performance metrics for a mapped entity, open the entity in PerfStack.
- On the map, hover over an entity, hold the Alt key down, and click the PerfStack icon.
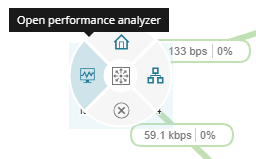
- The selected entity opens as a new Analysis project showing default metrics.
Remove an entity from the map
To remove an entity from the Inspector Panel:
Clear the blue box for the entity in the Inspector Panel and click Apply.
To remove an entity from the map:
- Select an entity on the map and click Delete on your keyboard.
- The entity, and all connected entities, are removed from the map.
Revert an action
This feature is only available on auto-generated Intelligent Maps.
- When you apply your changes, the Revert button in the top right corner of the map becomes active.
- Click Revert to undo the last action.
Save entities on a map as a group
This feature is only available on auto-generated Intelligent Maps.
You can create groups from entities on a map.
- Make sure the map displays the entities to include in the group.
- Click Save > Save as New Group.
- Provide a name for the group. The group details view opens.
To add entities to the group, open the map for the group. On the Maps subview, adjust the map, and then click Save > Update This Group.