Send Amazon CloudWatch Metrics to Loggly
Loggly provides the infrastructure to aggregate and normalize log events so they are available to explore interactively, build visualizations, or create threshold-based alerting. In general, any method to send logs from a system or application to an external source can be adapted to send logs to Loggly. The following instructions provide one scenario for sending logs to Loggly.
Metrics are stats relating to the performance of your systems. You can push your Amazon CloudWatch metrics to Loggly using our AWS Lambda Script. Please note these instructions are for Cloudwatch Metrics, which are different from CloudWatch logs.
Set up AWS
For this step you need to install the AWS Command Line Interface (AWS CLI). If you don’t have the AWS CLI installed, see the AWS CLI site to learn more about its installation and usage.
pip install --upgrade awscliIf you are new to AWS, see the AWS credentials site to learn how to get an AWS Access Key, Access ID and Region information.
1. Encrypt Loggly Customer Token
Ensure the AWS CLI is configured and is using the correct AWS Access Key ID, AWS Secret Access Key and Default region name using the aws configure command.
aws configureFollow the AWS instructions to create a Customer Master Key (CMK) with the alias name: logglyCustomerToken
Encrypt the Logglycustomertoken using the AWS CLI.
Retain the quotation marks around the word TOKEN, as shown below.
aws kms encrypt --key-id alias/logglyCustomerToken --plaintext "TOKEN"In the code, replace TOKEN with your customer token from the source setup page.
Sample Output:
You should output similar to the example below. If you receive an error, make sure the user has access to the CMK.

2. Get the Lambda Code
Clone the git repo: cloudwatch-metrics-to-loggly
git clone https://github.com/loggly/cloudwatch-metrics-to-loggly
cd cloudwatch-metrics-to-loggly
Install the required npm packages.
npm installEdit index.js to set up an encrypted customer token.
Copy the base-64 encoded, encrypted token from the CLI output (CiphertextBlob attribute) from Step 1 and replace your KMS encrypted key in the script with the copied ase-64 encoded, encrypted token.
Enter the command below to install Zip.
sudo apt-get install zipZip your code.
zip -r Cloudwatch-metrics-to-loggly.zip index.js node_modulesThe resulting zip (Cloudwatch-metrics-to-loggly.zip) is what you will upload to AWS in Step 3 below.
3. Configure the Lambda Function
Sign in to your AWS account and open the IAM console – https://console.aws.amazon.com/iam/
In your IAM console, create a new role, for example, CloudWatch-Full-Access-Role. Use the following information to navigate the AWS site:
-
Access management > Roles
-
Type of trusted entity: AWS service
-
Use case: Lambda
-
Policy: CloudWatchFullAccess
-
Permissions boundary: Create role without permissions boundary
Go to AWS Lambda Console. Click Author from scratch under Lambda Functions.

Use the command below to copy from the remote instance to the local box.
scp -i mykey.pem somefile.txt root@my.ec2.id.amazonaws.com:/Fill in the following details.
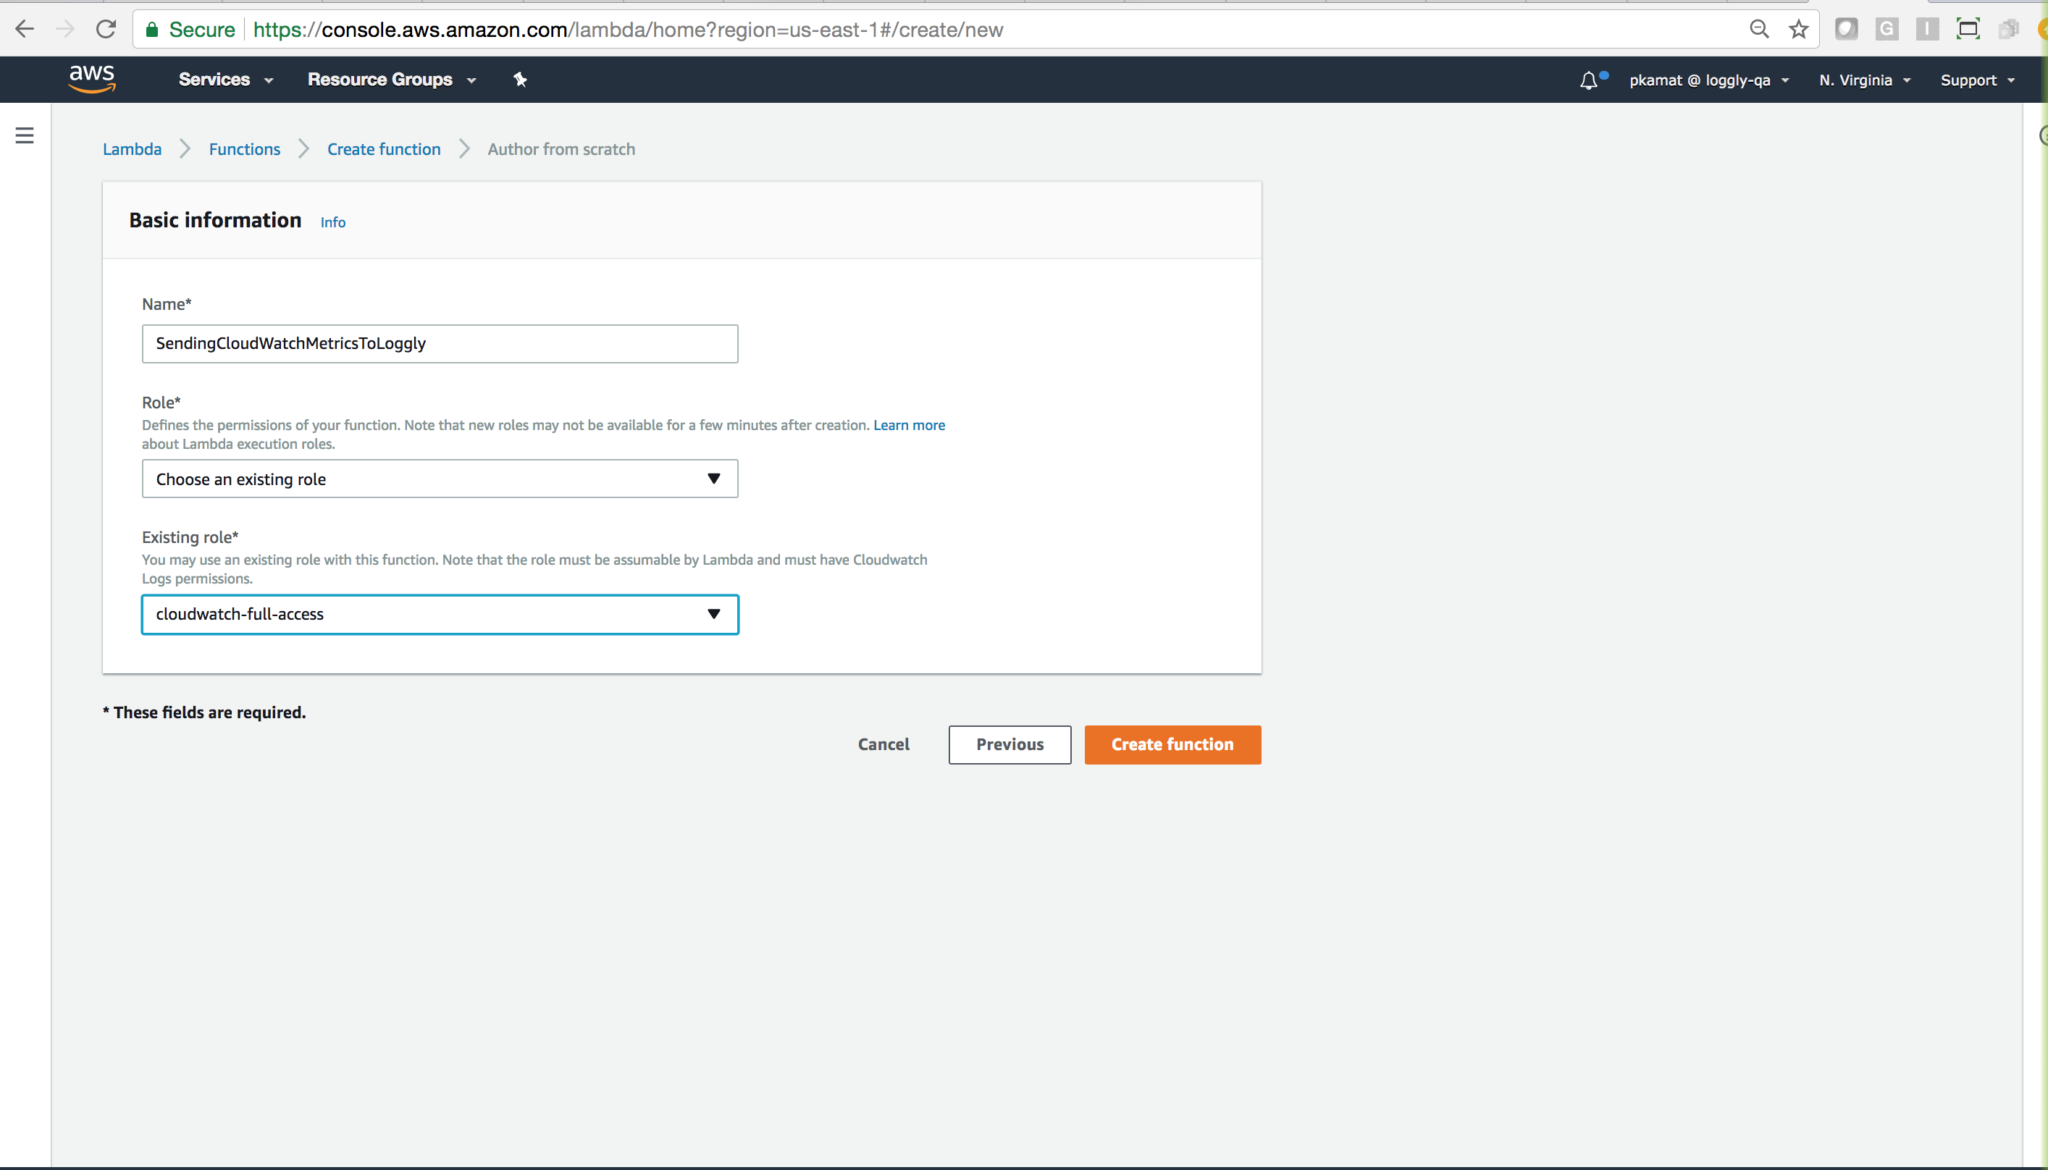
Name and Role: Type the name and Choose an existing role.
Set the Role as created above: cloudwatch-full-access (you can name it differently as needed) 
Code entry type: Upload lambda function (zip file you made above in Step 2)
Runtime: Select Node.js 12.x.
Handler: index.handler
 Memory: Set memory at 256MB Set Timer to 2 minutes.
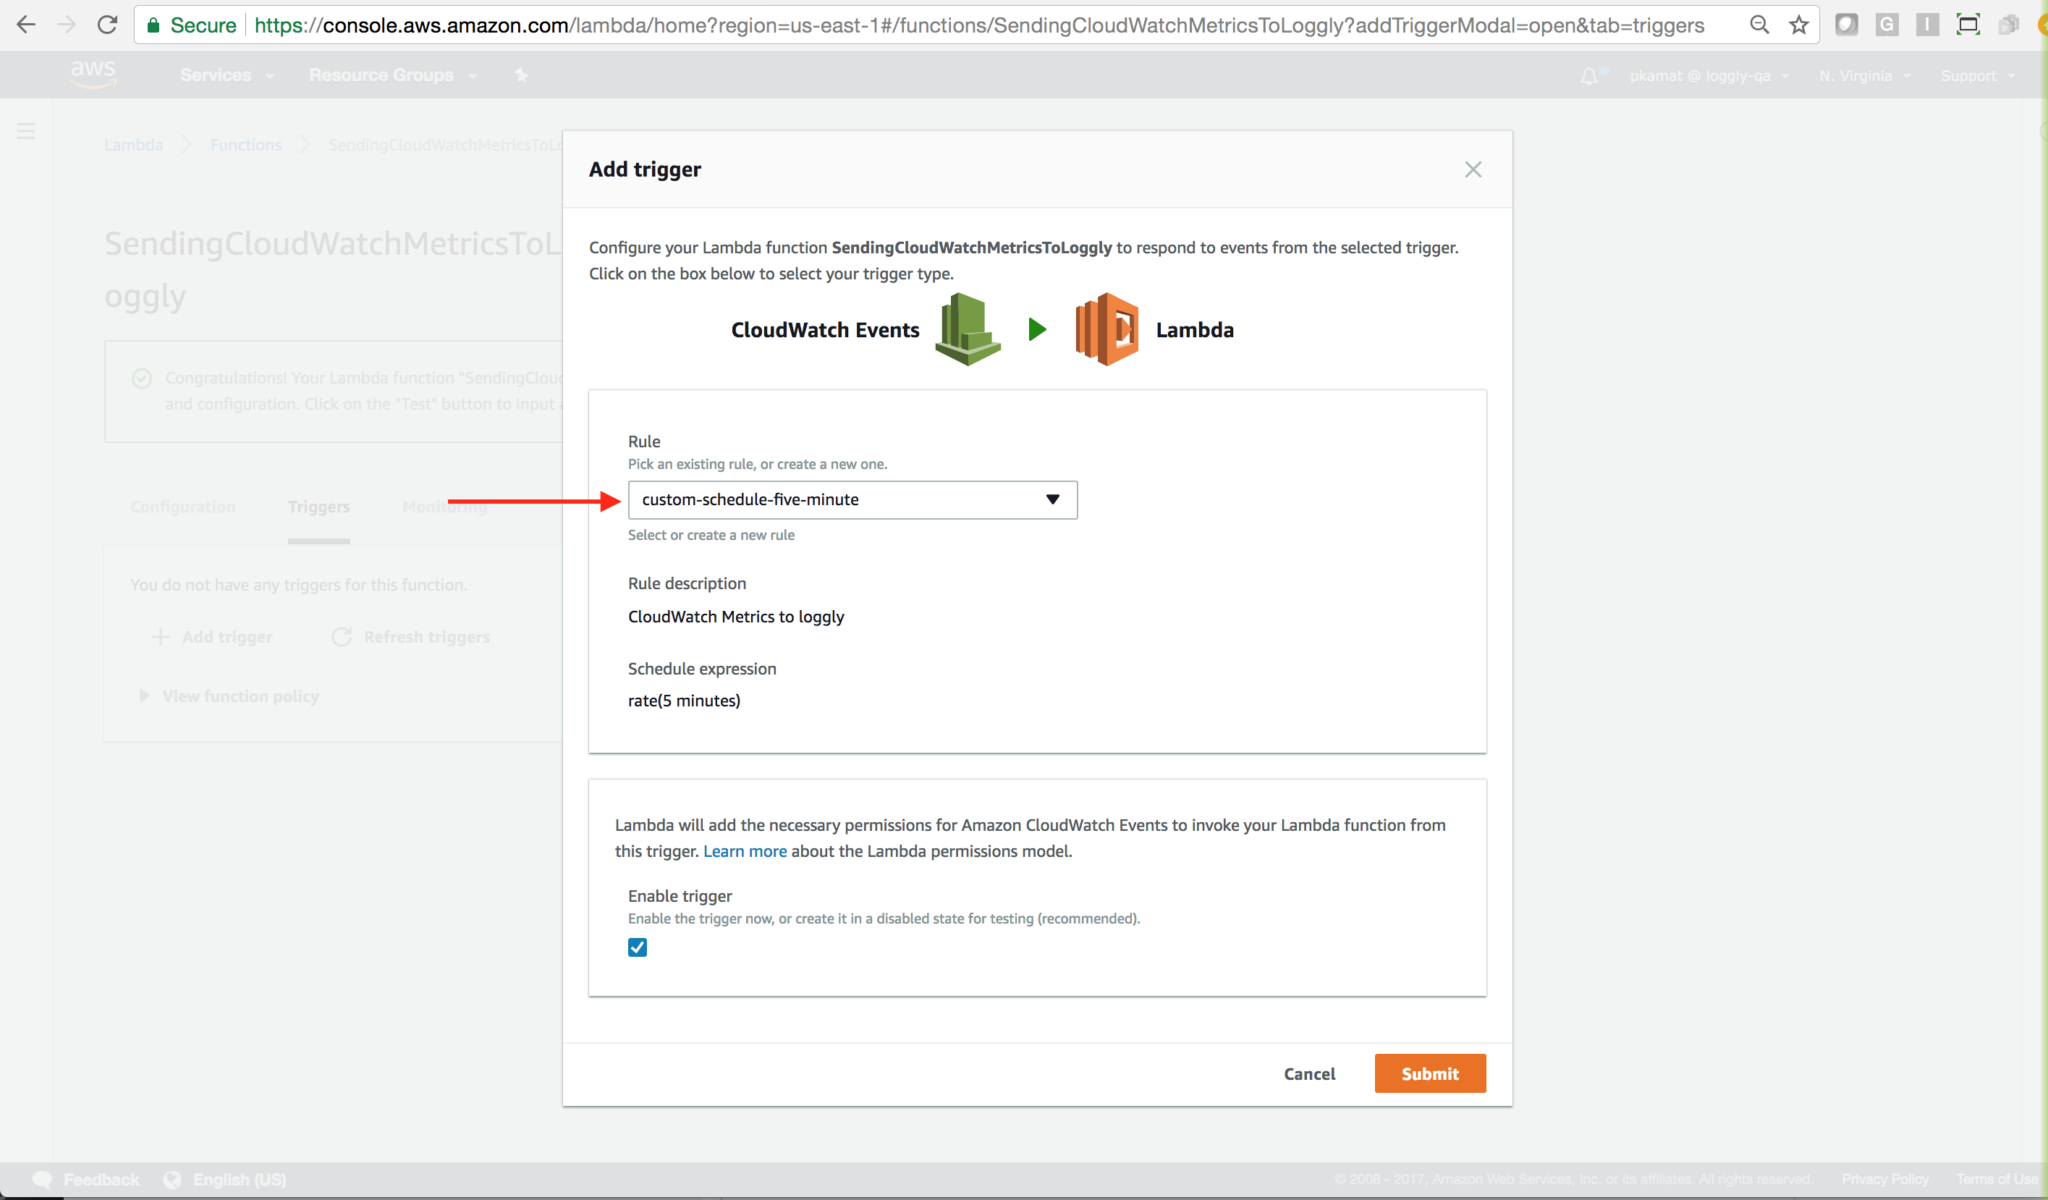
Event Source: Configure the Event Source to call Cloudwatch-metrics-to-loggly. Go to the AWS Lambda Console. Make sure the Cloudwatch-metrics-to-loggly lambda function is selected, then go to Triggers tab and click Add trigger.

Fill the following details:
Event source type: CloudWatch Events – Schedule
Name: Name for event, for example, (custom-schedule-five-minute – rate(5 minutes))

Description: Description for events.
Schedule expression: Select rate(5 minutes).
Enable event source: select Enable Now. Click submit button.
4. Add CloudWatchFullAccess to the list of IAM users and roles who can use the key:
You need to add CloudWatchFullAccess to the list of IAM users and roles who can use this key to encrypt and decrypt data from within the applications and when using AWS services integrated with KMS. Go to the IAM and add the CloudWatchFullAccess policy as shown below.
If you miss this step you will not be able to successfully send Cloudwatch metrics to Loggly.

5. Verify Events
Search Loggly events with the tag CloudwatchMetrics over the past 30 minutes. It may take few minutes to index the events. If this doesn’t work, see Troubleshooting.
tag:CloudwatchMetrics

Advanced AWS CloudWatch Options
- Amazon Cloudwatch Logs – Sending Cloudwatch Logs to Loggly.
Troubleshooting
If you don’t see any data appear in the verification step, then check for these common problems.
- Make sure you’ve included your own customer token.
- You can use multiple ways to create roles in an AWS Service.
- Make sure you have configured the same roles as mentioned above.
- Make sure you are using the latest version of AWS CLI.
- Check the Cloudwatch Logs for the log group of your script to see if it’s running and if there are any errors.
- Search or post your own Amazon CloudWatch Metrics logging questions in the community forum.
The scripts are not supported under any SolarWinds support program or service. The scripts are provided AS IS without warranty of any kind. SolarWinds further disclaims all warranties including, without limitation, any implied warranties of merchantability or of fitness for a particular purpose. The risk arising out of the use or performance of the scripts and documentation stays with you. In no event shall SolarWinds or anyone else involved in the creation, production, or delivery of the scripts be liable for any damages whatsoever (including, without limitation, damages for loss of business profits, business interruption, loss of business information, or other pecuniary loss) arising out of the use of or inability to use the scripts or documentation.
