Service Portal for single-tenant ITSM customers
On this page
Introduction
Your SolarWinds Service Desk (SWSD) service portal is a one-stop shop designed to provide your end users with valuable information and resources to help find answers and resolve issues. Users can view knowledge articles (solutions), submit incidents and service requests, and track the status of previously submitted tickets.
You can fully customize your service portal to provide a look and feel that meets the needs or your organization so your employees know they have reached the correct resource. You can upload your own logo, change titles and messages displayed across the portal, and enable certain fields on the new incident or service request form. You can also provide your users with special instructions.
Navigation
Setup > Global Settings > Service Portal.
Grant access to the portal
Administrators can grant users access to the portal using one of these methods:
-
Create your users in advance and grant them the Requester role, which allows them to use the Service Portal. They will receive an email with activation instructions.
See Users for instructions on how administrators can create users. See Roles and Permissions for instructions creating roles and granting permissions.
-
Ask your users to join the portal by clicking the Join the portal link on your account's home page.
-
Create users via email. When your users communicate with the service desk via email, a portal user id is automatically created for them. To retrieve their password, they can click No password? on your account's home page.
- Via single-sign-on. If your account is configured for SSO, you can select to have your user accounts automatically created in your service portal when they log in via SSO.
Setup options
By navigating to Setup > Global Settings > Service Portal, you can see your organization's service portal URL and all service portal settings.
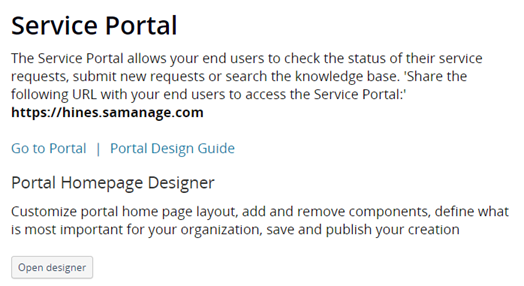
You can also click a link to go directly to the portal or open the Portal Design Guide (this documentation).
Portal Homepage Designer
You can customize the portal home page layout, add and remove components, define what is most important for your organization, save, and publish your creation.
Click the Open designer button, which takes you to the tool you use to design your service portal. From there you can also click aPortal Homepage Designer to return to the Global Settings > Service Portal page.
When the Portal Homepage Designer opens, you can edit as needed. Everything that displays on the page is a widget.

Edit and customize widgets
You can hover over any widget to display the pencil (edit) and ellipsis (remove widget) icons.

-
The ellipsis lets you remove the widget.
-
The pencil lets you edit it. If you click the pencil The Edit Widget panel pops up on the left. From there you can edit the widget design. The options available for editing depend on the selected widget.
- When you press and hold a mouse click over a widget, you can drag and drop that widget to a different location.
You can create a custom message widget to call attention to something you want everyone to see when they enter your portal. For example, you can alert to them known issues and updates to known issues. And to ensure they see it you can place the new widget directly under the Welcome widget and use color to call attention to the text.
Widgets for highlighted services and popular articles
You can offer your users quick access to previously successful solutions and services by displaying widgets on your portal home page.
-
Highlighted: Can display up to 5 solutions that are marked as highlighted. See Make a Solution visible in your Service Portal and highlight it for more information.
-
Popular: Displays the top 5 solutions and/or services based on the number of views, votes, and requests. See Portal Designer for more information.
Logo
Your organization's logo displays in several places throughout your service portal. You can see details about the image, for example, pixel reduction and maximum file size. There you can also upload your image.
After you upload an image, it is reduced to two different sizes: 200x100 and 200x40 (pixels). The maximum file size for a logo image is 4MB.
After you select an image, you can remove and/or change it as desired.
Favicon
The organization's favicon icon displays on the tab in your browser. You can see maximum file size information and upload your favicon image.
After you select an image, you can remove and/or change it as desired.
Colors
You can set your organization's color scheme to match your company's branding. Set the primary color, which will display on the navigation bar. The secondary color will display on the search bar; it is automatically based on the primary color that you choose. If you want to choose a different secondary color, deselect the option.
Be sure to click Preview to be sure you like the colors on your service portal.
Using a color box with scroll bar option on the right and a selection dot on the left, you can set your:
- Header background
- Navigation background
- Navigation icons
- New ticket background Color
- New ticket text color
- Sign in text color

After you make your selection, you can reset to default, preview, and update.
Announcement Message
You can use an announcement message to provide users with special informational updates. For example, you can call attention to an issue that could affect all staff.
-
Type the announcement text directly into the text box.
-
Select the checkbox below the text area to Publish to Service Portal.
-
Click Update.
When the checkbox is selected the Announcement Message show it is Active. When it is deselected, it shows as Not Active.

|

|
You can update the message a frequently as you like. Updates are effective immediately.
Allowed Domains
To manage the creation of accounts in your service portal, you can enter specific domain names. This will prohibit anyone with a foreign domain from creating an account within your service portal. Users can sign up with their email address, but that address must contain a domain name in the allowed domains list for sign-up to be successful. See also Allow non-domain users to create a service portal account.
- If this field is not defined, any user will be able to create an account (not recommended).
- If you would like to list multiple domains, separate each with a comma.
Menu Navigation
The table below assists in setup of visible and non-visible fields. You can create relevant menu labels (or reset to default) and select visibility and the order in which you would like the information to display.
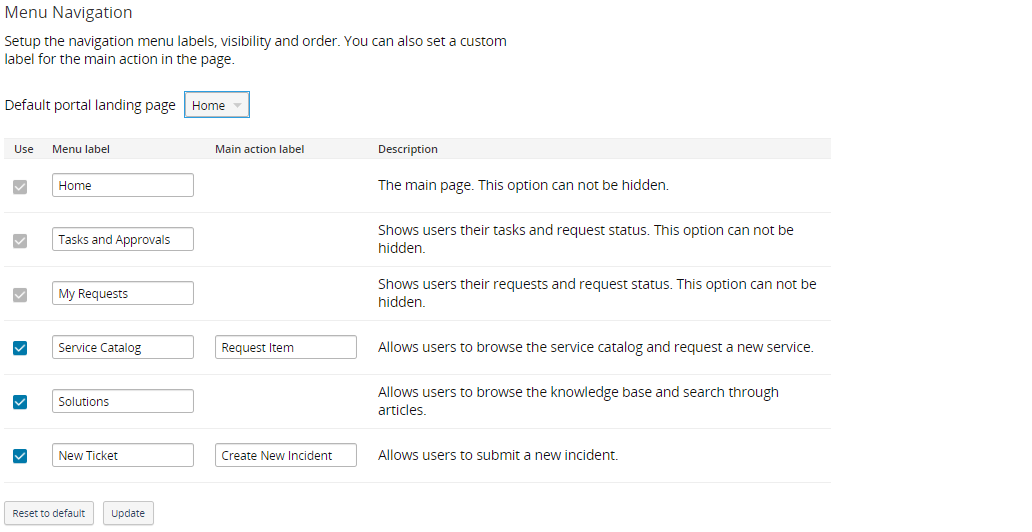
The first column labeled Use reflects whether a field is visible. The first three rows are greyed out; these three pages cannot be hidden. The bottom three rows are optional and can be hidden by deselecting them. Make these decisions based on your utilization of solutions content and service requests. If you make any changes to the fields or their order, click Update to save any changes made or Reset to default.
Functionality
Additional features in the Menu Navigation section relate to the way your employees interact with your service portal. You have various options for customizing the functionality that your employees are given. For example, you can hide or unhide selections like category, priority, and due date or give employees the ability to mark their own requests as resolved.
Signup Message
You can create a custom message that displays on your portal signup page. Just type the message into the text field, and then click Update.
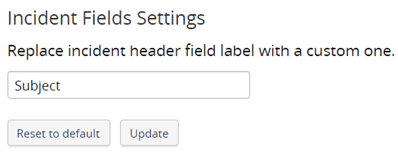
Incident Fields Settings
In the New Incident page, you can create a custom incident header field label. For example, you define the title.
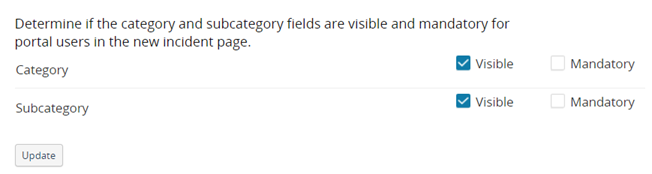
Notice the Category and Subcategory sections. It is important to select a category. At times the end user may not understand which subcategory is most relevant. The category and subcategory sections are independent of one another, which allows an agent to review the details of an incident prior to determining the subcategory.
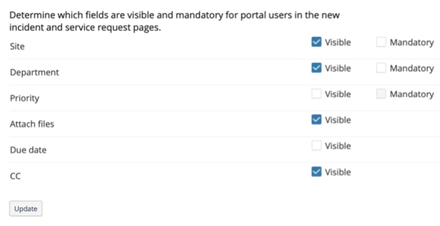
For new incidents and new service request pages, there are a number of fields you for which you should set visibility and/or identify whether the field should be mandatory.
The fields are:
- Site
- Department
- Priority
- Attach files (attachment file size is limited to 25MB, and all file types are acceptable, including audio files)
- Due date
- CC
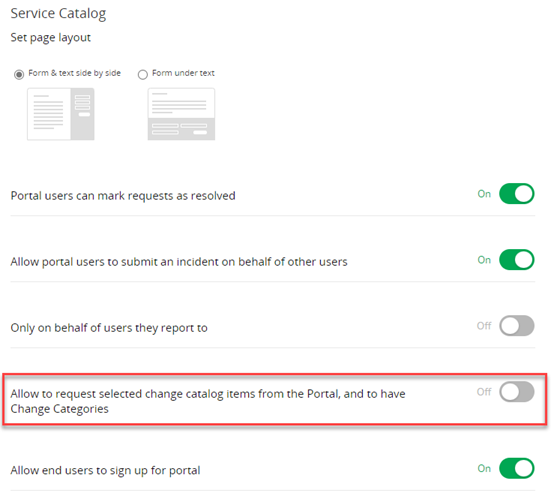
Service Catalog
Select the page layout for your Service Catalog.

Review every section in the Setup of your Service Portal to ensure you have customized the best look and feel for your organization.
Notice the toggle pills at the bottom. Select On to trigger one or all of the options such as:
- Portal users can mark requests as resolved.
-
Allow portal users to submit an incident on behalf of other users. See also Create an incident on behalf of another user.
-
Only on behalf of users they report to.
-
Allow to request selected change catalog items from the Portal, and to have Change Categories.
If you determine it is best for your organization to use this feature, see Allow users to request selected change catalog items from the Portal.... for instructions. -
Allow end users to sign up for portal.
While some customers use the service portal solely to assist and engage with their employees, many customers utilize it to engage with external customers as well. Admins may want only employees to have access to the portal. This is achieved by opening an account for each user during their onboarding process. You can also decide to all end users to pen their own account through the portal’s login page. Users can sign up with their email address, but that address must contain a domain name in the Allowed Domains List for sign-up to be successful.
As the needs of customers and internal employees vary, requesters are not always aware that they have an existing account. This can result in them inadvertently creating additional accounts.
When the toggle is turned off, the link to create a new portal user on the login page will not display. This ensures no end user can create a new user utilizing an email address not managed by your administrators.
Allow users to request selected change catalog items from the Portal, and to have Change Categories.
Only CCIs in an Approved state can display in the portal.
Step 1: Turn on option.
-
Navigate to Setup > Global Settings > Service Portal.
-
Toggle the Allow to request of selected change catalog items from the Portal... to On.
Step 2 (Optional): Configure Custom Fields.
If you would like selected custom fields to be shown in the portal, mark the Show on portal checkbox.
-
Navigate to Setup > Service Desk > Custom Forms.
-
Enable the checkbox to Show on Portal.
Step 3: Set Permissions.
In order for the Requester and/or Service Task User roles to have access to select CCIs in the portal, you must enable the proper permissions.
-
Navigate to Setup > Account > Roles & Permissions.
-
Enable the permissions as shown below for both the Requester and Service Task User roles.
- Subject: Change Catalog
- Action: Read
- Scope:
- State: Approved
- Site and/or Department and/or Category and Subcategory
After these permissions are granted, requesters and service task users can see and request the relevant CCI directly from the portal.
Step 4: Set visibility.
-
Navigate to Service Desk > Change Catalog.
-
From the Change Catalog All Items index page, click the approved change catalog item (CCI) you want users to be able to request from the portal.
-
In the upper right corner, toggle Show in Portal
 to On.
 -
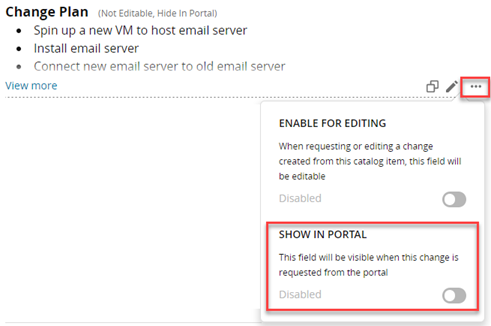
Determine whether you want the three phases of the plan (change plan, rollback plan, and test plan) to be visible in the portal.
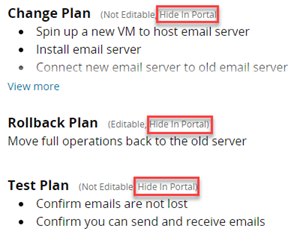
If yes, hover over a plan, select the ellipsis icon, and toggle Show in Portal to Enabled.
-
Scroll down under Test Plan and hover over Highlighted Service until the Edit (pencil) icon displays.

-
Select the icon, and then check the box. The CCI will display in the portal home page under the Highlight Service section.
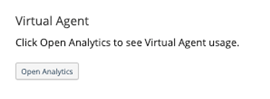
Virtual Agent
In the Virtual Agent section, you can:
-
Open Analytics
-
Enable/disable:
-
Direct communication between Virtual Agent chatbot and requesters via the portal.
-
Direct communication between live agent and requesters via the portal.

-
-
Enable the landing page for your IT service provider's portal and your organization.

-
Make the Virtual Agent visible in all ESM service providers (excludes the IT service provider).

-
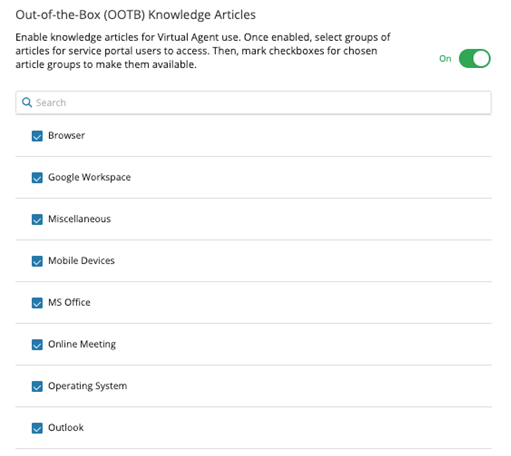
Enable use of out-of-the-box knowledge articles and review the groups of articles available, then select those groups you want to make available to users.
Custom Google Analytics
Track your portal adoption by adding a Google Analytics Identifier G-*.