How to set up an uptime (HTTP) check
This nice little video explains how to do it quickly. Further below you have a more detailed video and text instructions, the analyzer mentioned in the video is unfortunately no longer available.

This is going to assume that you are already logged in to My Pingdom at https://my.pingdom.com
There are two places where you can add an Uptime check:
- Clicking the Add uptime check button directly on the dashboard.
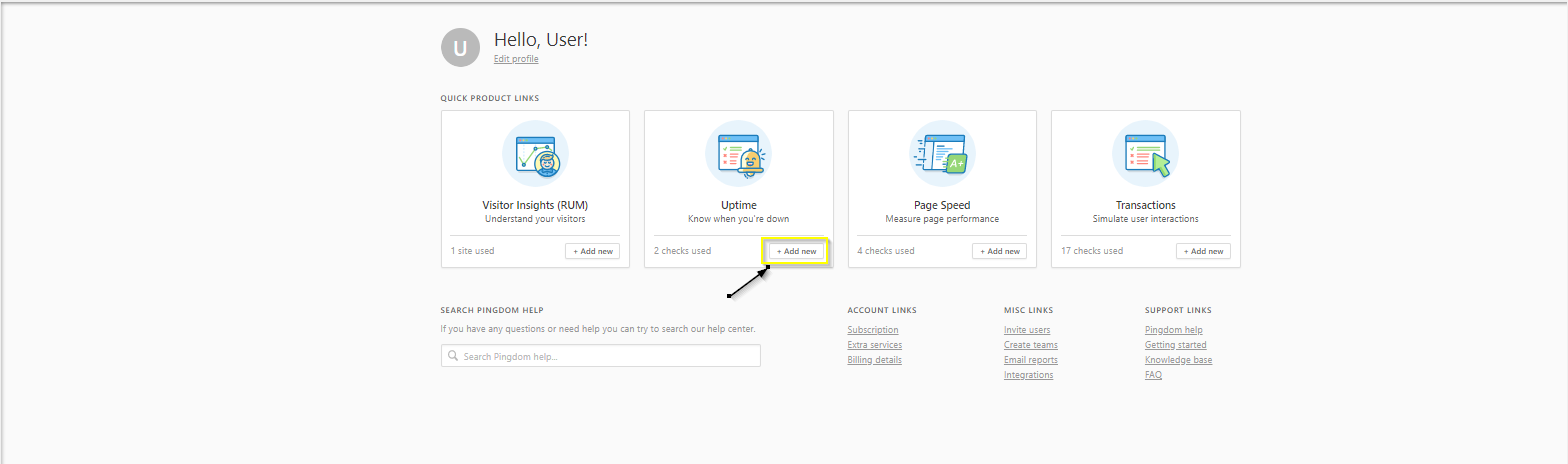
- Navigate to Monitoring > Uptime in the menu on the left inside the account and click Add new up in the right corner

Either way, you go, a modal window will open up to give you some options for your new check! Now, let's set one up:
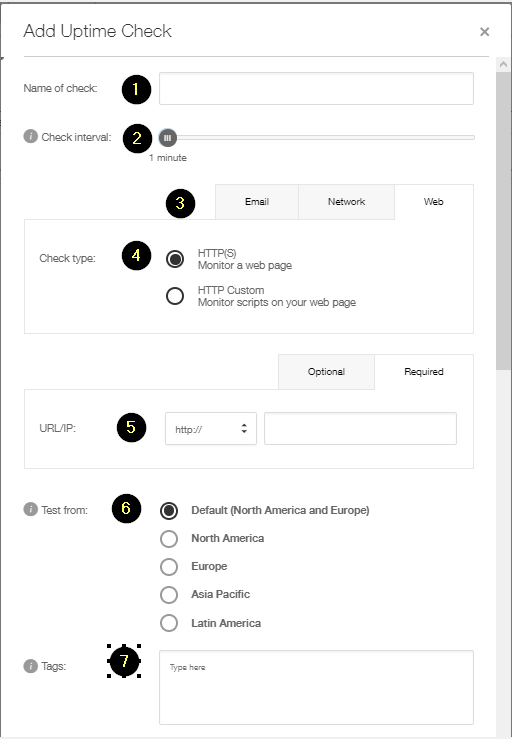
- We begin by naming this new check, the first field should contain a descriptive name.
- After this comes a slider for the Check interval which sets how often our probe servers will make their requests to your URL. We recommend 1 minute to get as detailed and accurate as possible in our reports and notifications.
- The three tabs labeled Email, Network and Web are where you will find the different checks we provide.
- For now we will be looking at the most common check type, HTTP, as the specific settings for the other are described in their respective sections. Make sure the Web tab is selected and that HTTP(S) is selected correctly.
- First the required tab, for this type of check only a URL is required to make it work. You can select whether you want to check via plain HTTP or via HTTPS also. Selecting between these will change the port under the Optional tab automatically.
- Now you choose which Probe server region you want your site to be tested from. The Default is North America and Europe.
- Tags are used to give a hint as to what your check is set up for, and gives you the ability to filter by tags on the Uptime list page.
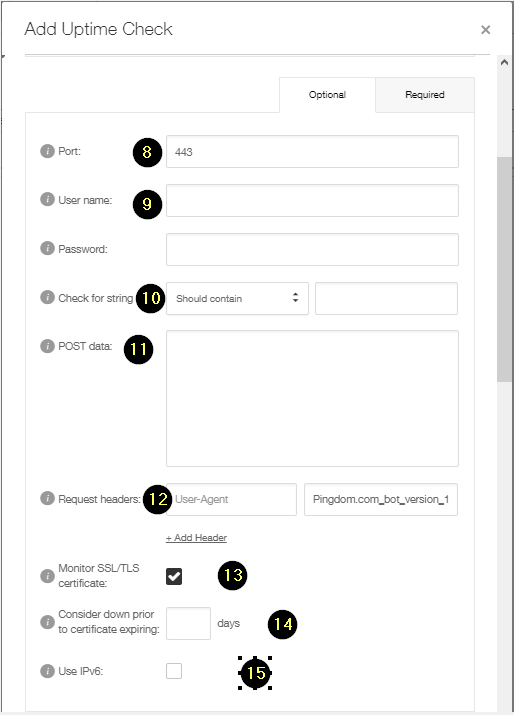
- Secondly the Optional tab. First up is the port setting, this is most commonly set to 80 for HTTP and 443 for HTTPS.
- The Username and Password fields are for Basic Auth only, the check can not log in via any kind of form-based web page. Basic Auth is a simple authentication mechanism used by some web services.
- The check for string field has two parameters, one is a drop-down where you can select whether the following string should be found or not. The string that is being looked up can exist anywhere in the HTML of your site. It is not case sensitive. If this string is not found, or found if that is what you prefer, the check is considered down.
- The POST data is a field you can use to send a POST request, instead of a GET, with POST data to your URL. This should be formatted as your server expects the data. The header Content-Type: application/x-www-form-urlencoded is sent along with the request.
- Add and change request headers, such as cookies or user-agents, which are sent with each request.
Monitor the validity of your SSL/TLS certificate. With this enabled Uptime, checks will be considered DOWN when the certificate becomes invalid or expires. SSL/TLS certificate monitoring is available for HTTPS checks.
- Configure the number of days before the expiring you want to receive an alert. When the expiration day is reached the check will be marked as DOWN and an alert will be sent.
- If you want to monitor your IPv6 enabled sites, ticket this box. Article on this type of monitoring here.
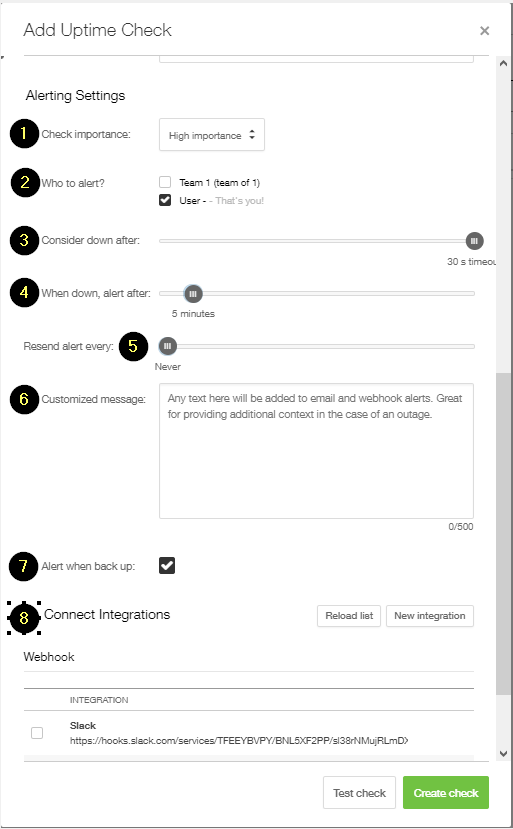
After you have filled out all the fields, ticked all the boxes and dropped all the menus it's time to set up alerting for your check!
- Allows users to control how they receive alerts for outages (by email, text message or push notification), based on the set importance level of the check.
- Select which user, contact or team that should be alerted if the check is considered down.
- By lowering this value you set a threshold for your response time. We will alert you when the selected value has been exceeded.
- Determines how soon an alert is sent once a check is considered down.
- The number of down cycles before we resend another alert.
- Any text here will be added to the email and webhook alerts. Great for providing additional context in the case of an outage.
- Decide if you want to be alerted when a check is confirmed to be back up again.
- Use webhooks to send alerts to third party systems.