Azure Active Directory (Entra ID) SSO
Incident Response supports SAML 2.0-based Single Sign-On (SSO) login for Azure Active Directory (Entra ID) users. You can integrate your Incident Response Organization with your Azure Active Directory (Entra ID) SSO by following this integration guide.
Pre-requisites
-
Account Owner / Administrator account in Incident Response
Point to Note:
-
Only an Administrator / Account owner can enable and configure Azure Active Directory SSO for an Organisation in Incident Response.
-
Once enabled, only the Account Owner can use email-password-based login by default although, it can be configured to enable email-password-based login for Administrators as well.
Setup Guide
-
Login to
app.squadcast.comand navigate to Settings > Extensions. Click the Configure button under SSO -
In the opened modal, select the Custom SAML 2.0 tab and click Show configuration guide for Custom SAML 2.0
-
Then, go to your Azure Active Directory (Entra ID) dashboard and click on Enterprise applications from the left navigation
-
Click on Create your own application to create an application for Incident Response
-
In the side panel, give a name for the application (such as Incident Response), select Non-gallery Application, and click on Create.
-
For the newly created app, in the left pane under Manage, select Users and groups
-
Find and add the users you want to, along with the appropriate Role
-
In the left pane under Manage, click Single sign-on and select SAML
-
Edit the Basic SAML Configuration section
-
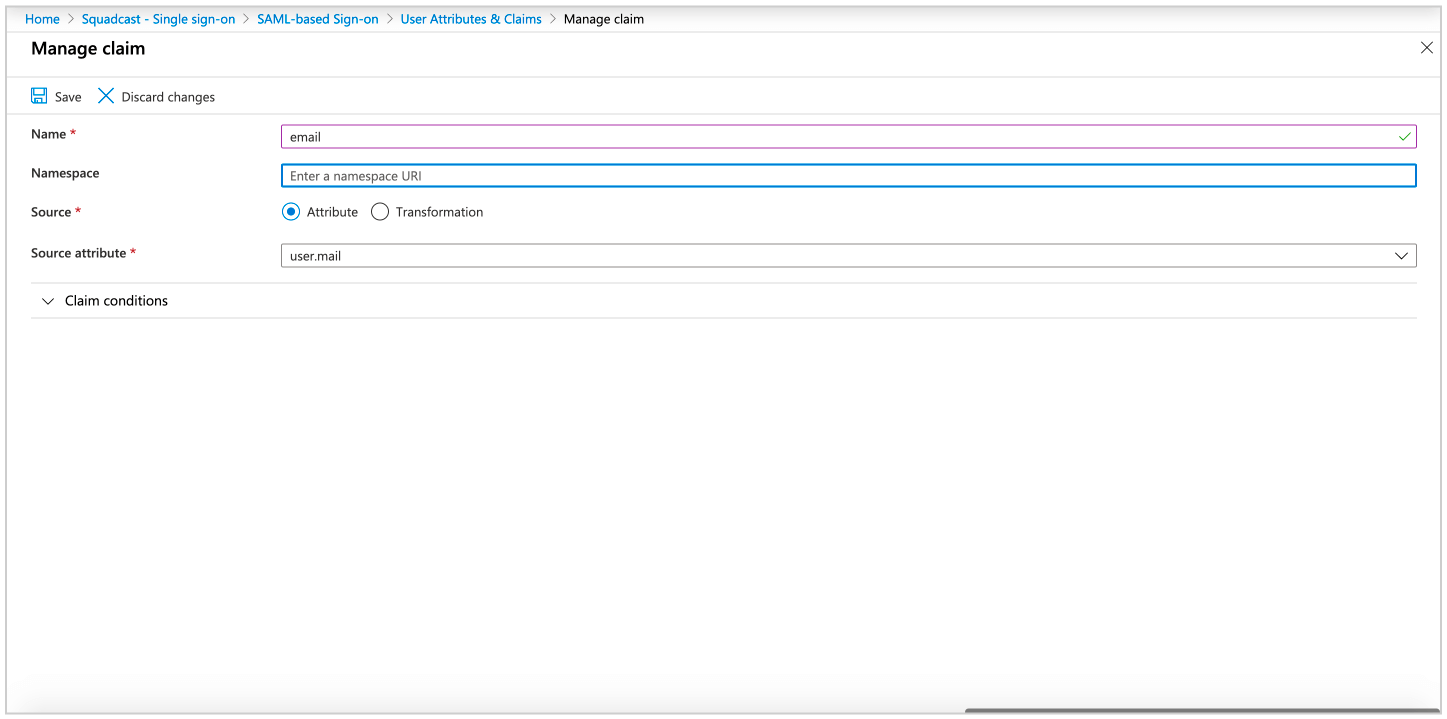
Next, edit the User and Attributes Claims section


As given in the displayed guide, copy the ACS URL shown in point 1


Now, click on Add user


In both, the Identifier (Entity ID) and Reply URL (Assertion Consumer Service URL) placeholders, paste the ACS URL you copied previously from Incident Response here


Remove the namespace and use:
-
first_namefor source attributeuser.givenname -
emailforuser.mail -
last_nameforuser.surname


-
Click on the Edit icon in the SAML Signing Certificate section
-
From under the Setup Incident Response section, copy the Login URL
-
Back in Incident Response, in the previously opened modal:

Here, download the PEM certificate


-
Paste the copied Login URL in the placeholder for SAML 2.0 Endpoint
-
Copy the contents of the PEM Certificate in the placeholder for X.509 Certificate
-
Enter the domain name of your Organization
Make sure to add the Domain Name of your Organization, for SSO login to work
-
Provisioning new users can default to a particular
User Rolefrom the drop-down -
You can allow the
Account Ownerto also log in using their email credentials in addition to SSO. This can be done by checking the boxes for those options -
You can simply provision new users on their first log in by enabling the checkbox for the same
Once all of this has been configured based on your requirements, click on Save
-
That’s it, your configuration is now complete!
-
Activate this SSO integration by enabling the toggle
For testing this SSO integration and if it's working as expected, go back to the Azure Active Directory SSO portal, and click on Test
Then, click Sign in as a current user to verify your login to Incident Response!


If you want to sync user removal between Azure AD (Entra ID) and your Incident Response organisation, you need to enable this checkbox. Whenver a user is removed in Azure AD (Entra ID), that user will be removed removed from Incident Response as well.
If you want Incident Response to only consider a certain Group in Azure AD (Entra ID), then add the specific Group ID. If this is not entered, and the checkbox is enabled, all users in Azure AD (Entra ID) will be checked for syncing and removal.
Important: This will also require the Microsoft Teams bot to have Admin permissions.
-
To login to Incident Response via Azure Active Directory SSO from here on, within your Office 365 account, click on App Launcher, click on All Apps and you will be able to see Incident Response there. Unless you have enabled email-password-based login for your User Role, you will not be able to login to Incident Response using email-password from our web applogin page.
Logging in from the Incident Response mobile app when Azure AD SSO is enabled:
The user needs to first access and log in to myapplications.microsoft.com in the mobile browser. Here, they will be able to see the configured SSO (for Incident Response, as shown in the screenshot below). They can simply click on the icon to log in.
-
We do not support the provisioning and syncing of Groups from Azure AD (Entra ID) SSO into Incident Response. We support this only for Users.
-
To login to the Incident Response web app when Azure AD SSO is enabled, users can use My Apps Secure Sign-in Extension for easy login.