ServiceNow Extension
Prerequisites:
-
Active subscriptions for both ServiceNow and Incident Response, with the Incident Response subscription being in the Enterprise plan.
-
Full administrative permissions within Incident Response, equivalent to those of the account owner, are required to configure this extension integration effectively.
Capabilities of this ServiceNow Extension:
-
Facilitates the creation of Incident Response Incidents for ServiceNow Incidents, and vice versa, either manually or automatically.
-
Ensures synchronization of Incident statuses between the two platforms.
-
Enables the synchronization of notes and attachments between ServiceNow and Incident Response.
-
Synchronizes communication channels between the two tools.
-
Provides the ability to map users seamlessly between ServiceNow and Incident Response.
-
Allows mapping of Incident Response Squads and Escalation Policies with ServiceNow Assignment Groups.
-
Offers the capability to map Incident Response Services with ServiceNow Configuration Items.
Step1 : Installing the Incident Response app in ServiceNow Marketplace
-
Install the Incident Response application from the ServiceNow marketplace.
-
Access the application and open the API Config Page.
Step2: Setting Up Integration User
Integration User in Incident Response
-
To set up the extension in Incident Response, the first step is to generate an API token for a user. This user is called an “Integration user” for this extension.
-
This user should have all the Incident Response org-level permissions and should have “Manage Team” and “Admin” access to the teams that should be accessed by this extension integration.
-
You can create a new “Integration User” for this extension or you can utilize an existing user as an “Integration User”.
-
We suggest you to create a new user account in Incident Response for this “Integration User”.
-
Once the user is created and all the necessary permissions are updated, generate an API token for this user.
Generating an API token
-
To generate an API token, navigate to Settings > API Token > Assign New Token > Select the integration user > click on Generate Token.

Please make sure that this API token is not updated/deleted going forward.
-
The extension uses this user API token to create and manage entities in ServiceNow like users, squads, escalation policies, services, webhooks, teams, and communication channels.
-
Copy this “API token” and store it on the clipboard/somewhere.
Integration User in ServiceNow
-
Create a user account in ServiceNow to access this extension integration in ServiceNow.
-
This user’s credentials are used to validate and connect both tools.
-
Have the “username” and “password” of this user handy.
Step3: Setting up Incident Response
Navigate to Settings > Extensions > ServiceNow > click on “Integrate”

-
Enter the ServiceNow domain name. Example: instance_name.servicenow.com.
-
Enter the ServiceNow “username” and “password”.
- Select how you would like to create ServiceNow Incidents for Incident Response Incidents
- Automatically - This will automatically create ServiceNow Incidents for all Incident Response Incidents of selected teams.
Manually - From the Incident Details page, create ServiceNow Incidents for each Incident Response Incident manually. To create ServiceNow Incidents for each Incident Response Incident manually, navigate to an Incident Details page > Actions > ServiceNow > Create ServiceNow Incident.
-
Once all the details are entered, click on “Test Connection”. If all the entered ServiceNow details are correct and verified, you will see a success message else you will see an error message.
-
Once the test connection is successful, copy the “Integration Key” and store it on the clipboard/somewhere.

Step4: Setting up ServiceNow
Incident Response Details
-
In the API config page, enter the “API token” of the Incident Response user and the user’s name. This user’s name entered on ServiceNow is for your reference to know which user’s API token is used for this extension integration.
-
Enter the “Integration Key” copied from Incident Response and click on “Test Connection”. If the entered Incident Response details are correct and verified, you will see a success message else you will see an error message.

Retrieving Incident Response information and storing it in ServiceNow
-
Retrieve Teams - This option will retrieve all the Incident Response Teams and store them in ServiceNow.
- Mark Required Teams - Use this option to mark the teams that can access this extension integration. All Incident Response information retrieved and Incidents sync will only happen for the active teams.
- Making a team active for this integration can be done in two ways:
- On the team list page, select the teams, click on “Actions on Selected rows” and click “Make Teams active”.
On the team details page, enable the Active checkbox.
- Making a team active for this integration can be done in two ways:

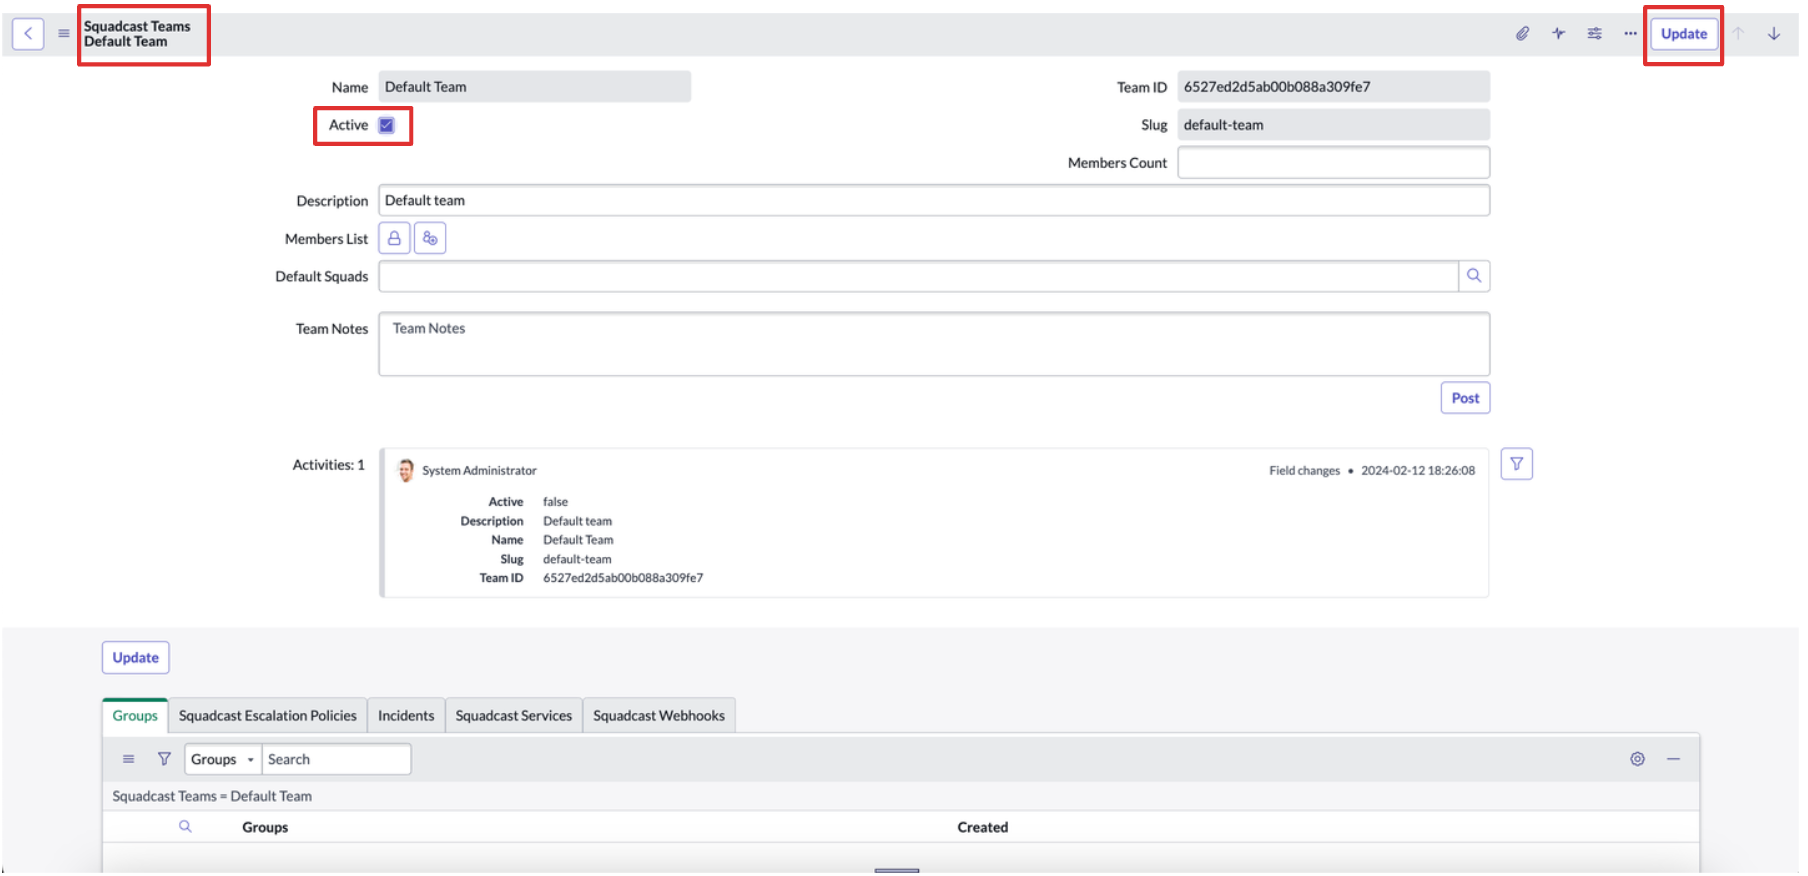
Note: To remove a team from the extension integration, uncheck the active checkbox for that team.
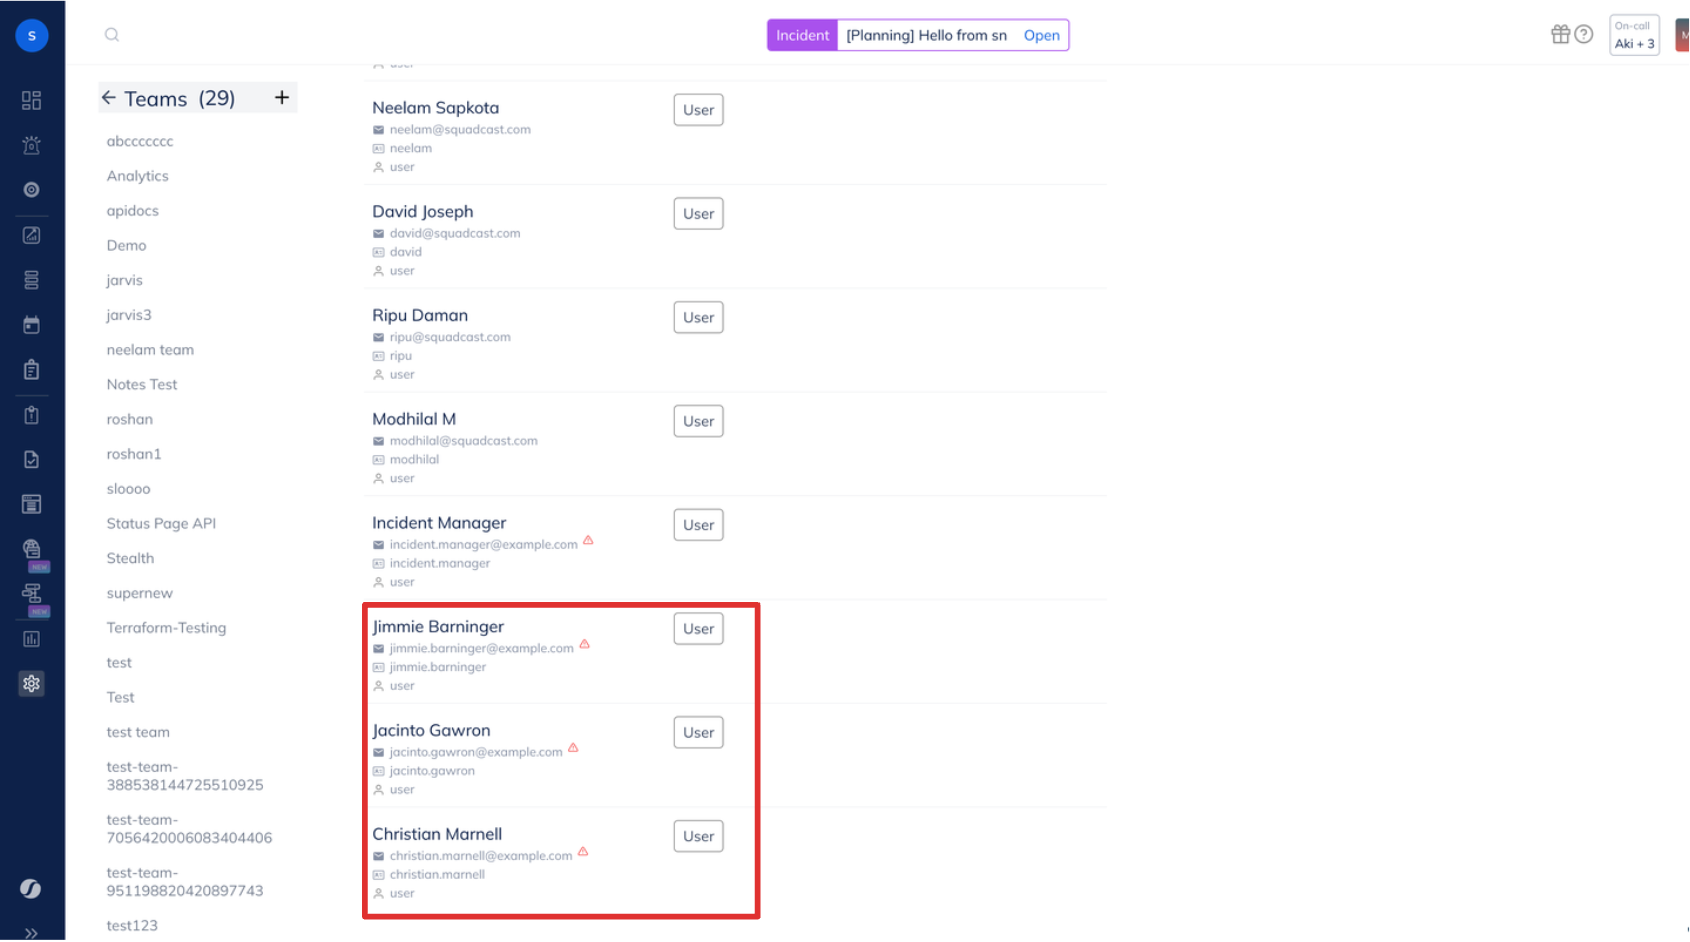
Retrieve Users - This will retrieve all Squadcst users and validate the users with email addresses, if the email ID of the retrieved user is present in ServiceNow, Incident Response ID, and team information will be generated for the user and if the email address of the retrieved user is not present in ServiceNow, no new user account will be created in ServiceNow.
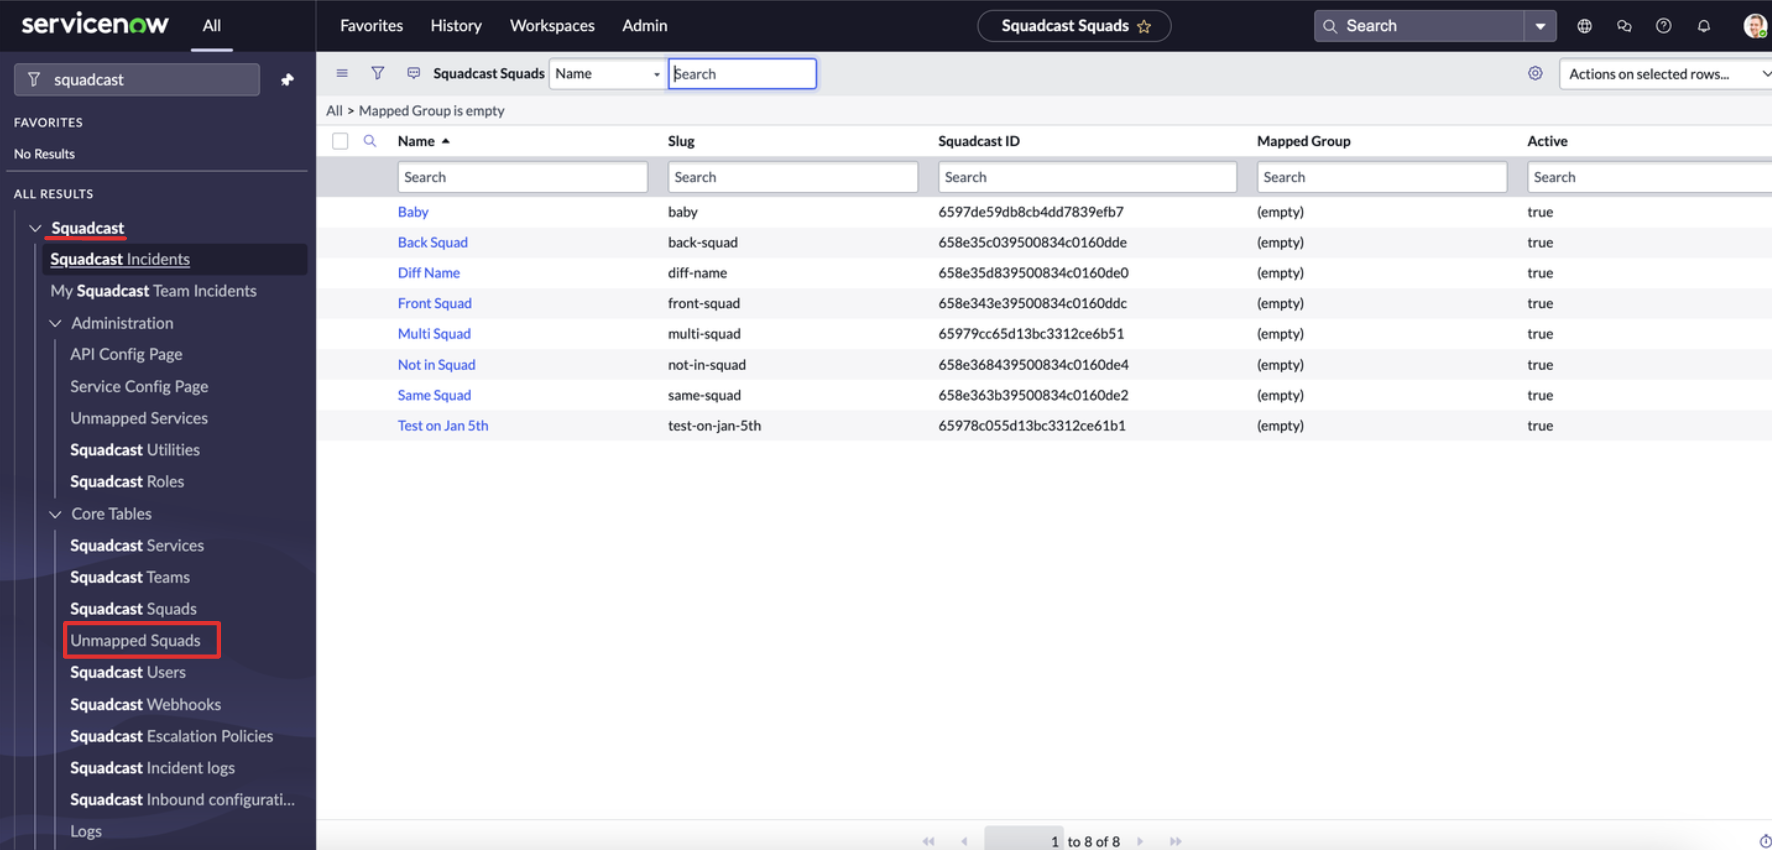
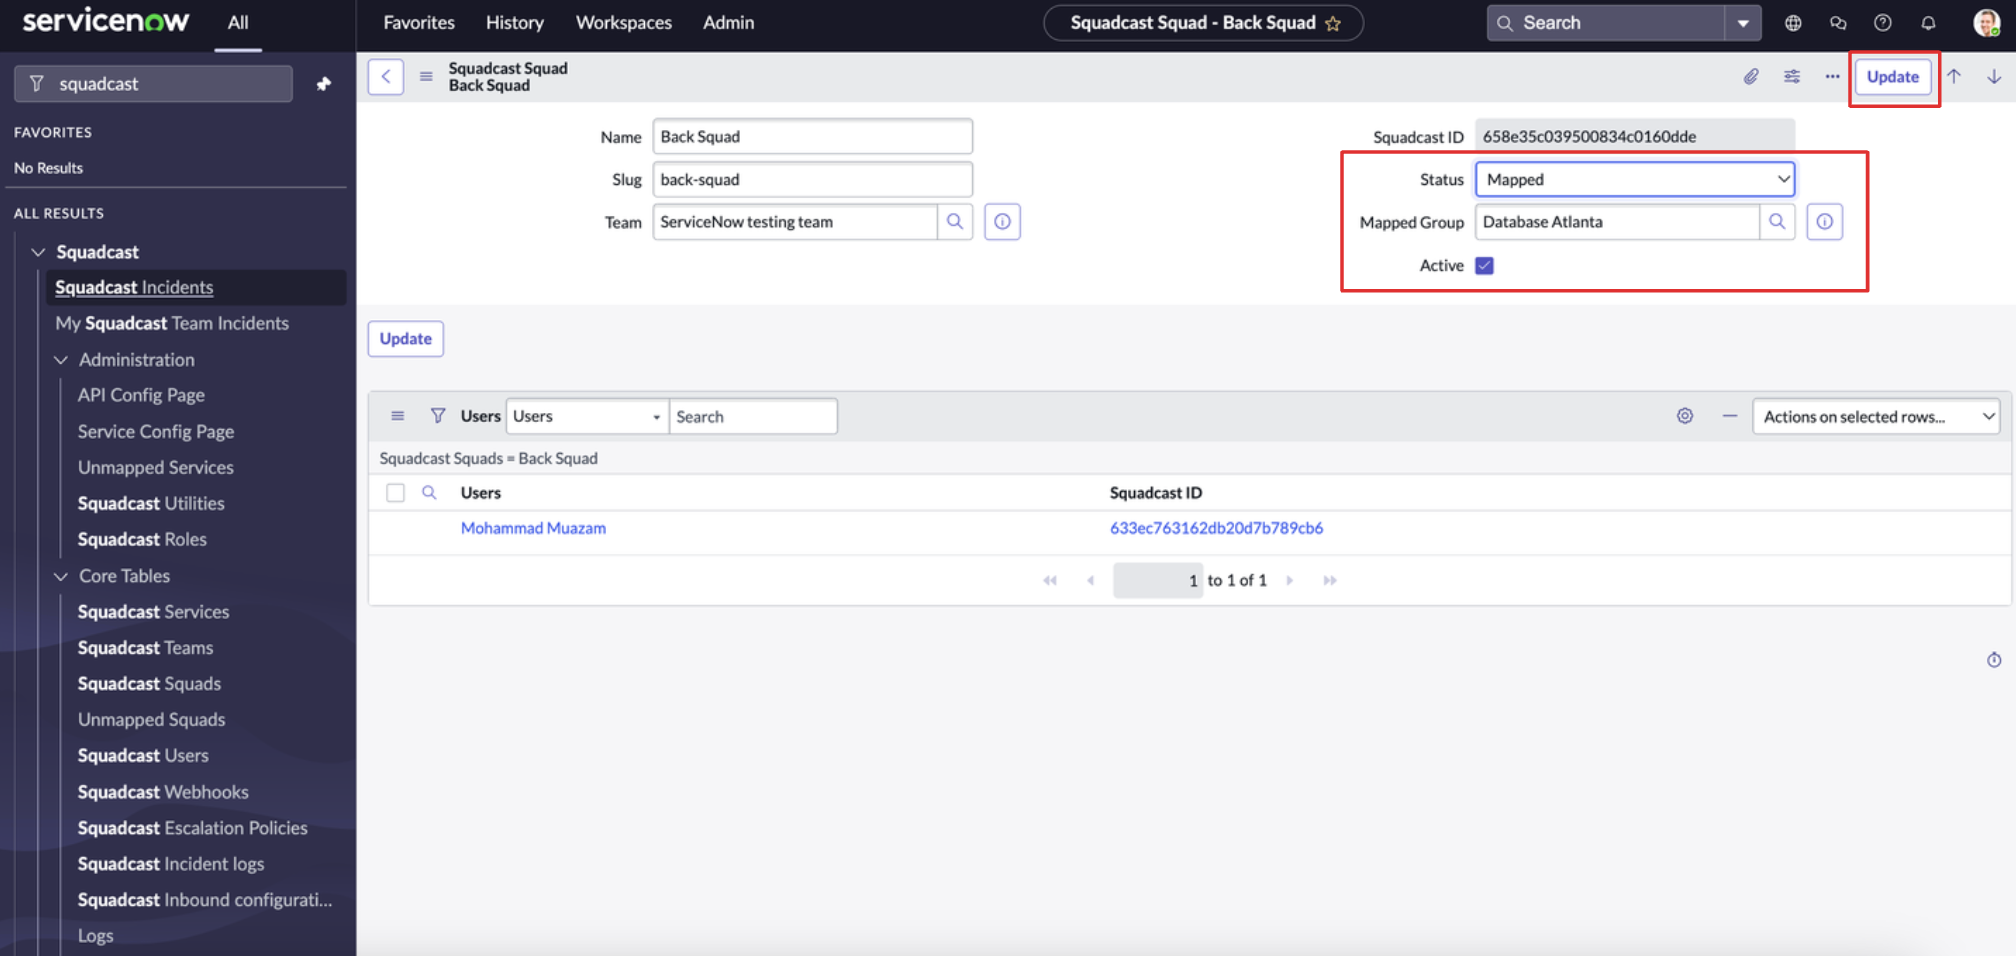
Retrieve Squads - This will retrieve all Squadcst Squads of the selected teams and store them in the ServiceNow. All the squads from Incident Response will be retrieved and if “Allow Incident Response Squads to be auto-mapped to SN-group” field on API config page is enabled, the name of the Incident Response Squad and ServiceNow Assignment Group matches the Squad and the Assignment Group will be mapped automatically and if the Squad name and Assignment Group name do not match, these Squads will go to the “Unmapped Squad” table in ServiceNow and you can map each Incident Response Squad to a ServiceNow Assignment Group from the Squad details page.
Under “Incident Response Squads” table, all the retrieved Squads will be listed.
To map a Incident Response Squad with an Assignment Group, navigate to Incident Response Squad details page > under “Mapped Group”, select the Assignment Group > change the “Status” to “Mapped” and click on “Update”
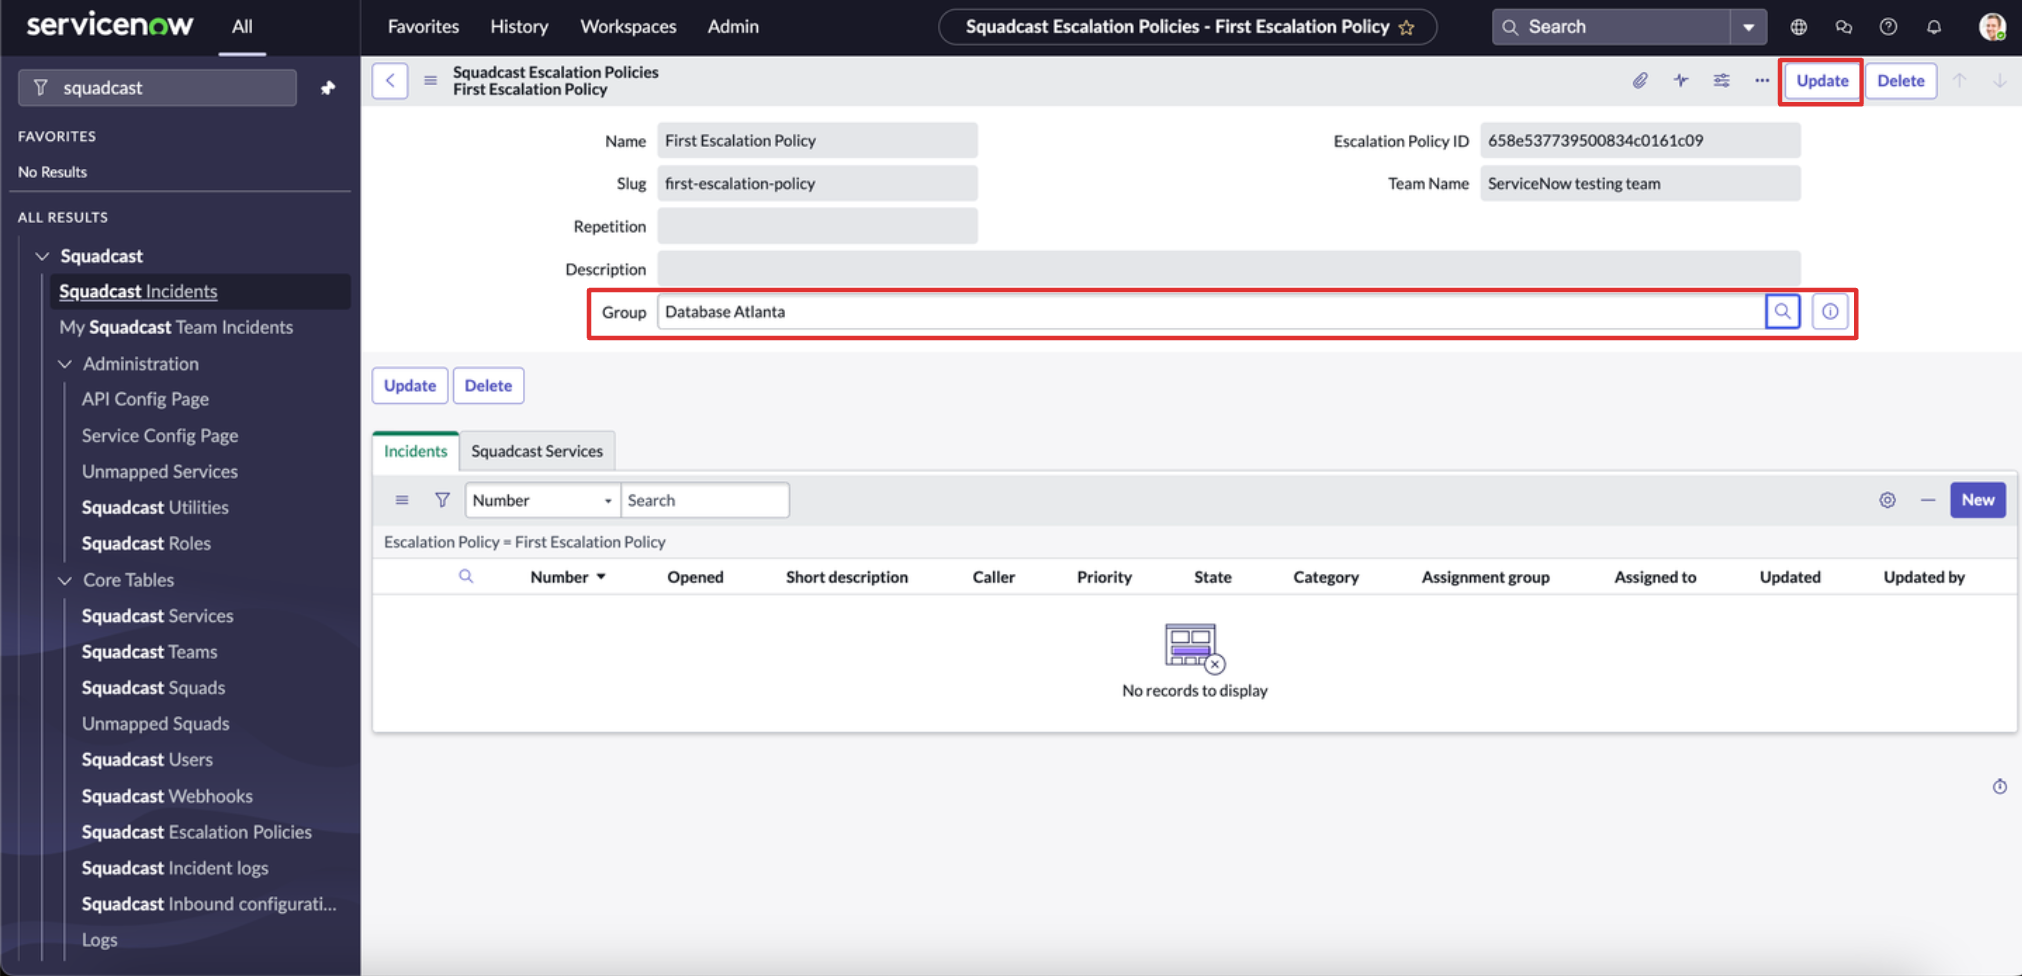
- Retrieve Escalation Policies - This will retrieve all Incident Response Escalation Policies of the selected teams and store them in ServiceNow. Each Incident Response Escalation Policy can be mapped to a ServiceNow Assignment Group.
- To map a Incident Response Escalation Policy with an Assignment Group, navigate to Escalation Policy details page > under “Group”, select the Assignment Group and click on “Update”.
Retrieve Webhooks - This will retrieve all Incident Response Webhooks of the selected teams and store them in ServiceNow.
Pushing ServiceNow entities to Incident Response
- On the API Config page, Would you like to push users from ServiceNow to Incident Response?
- If this is enabled, you can push ServiceNow users to Incident Response.
Navigate to the Users list page, check you are in Incident Response View
Select the users you would like to push to Incident Response
Click on “Push Users to Incident Response” on the top right of the screen
Note: These users are pushed to Incident Response without any permissions and added to the default team with the default user access.

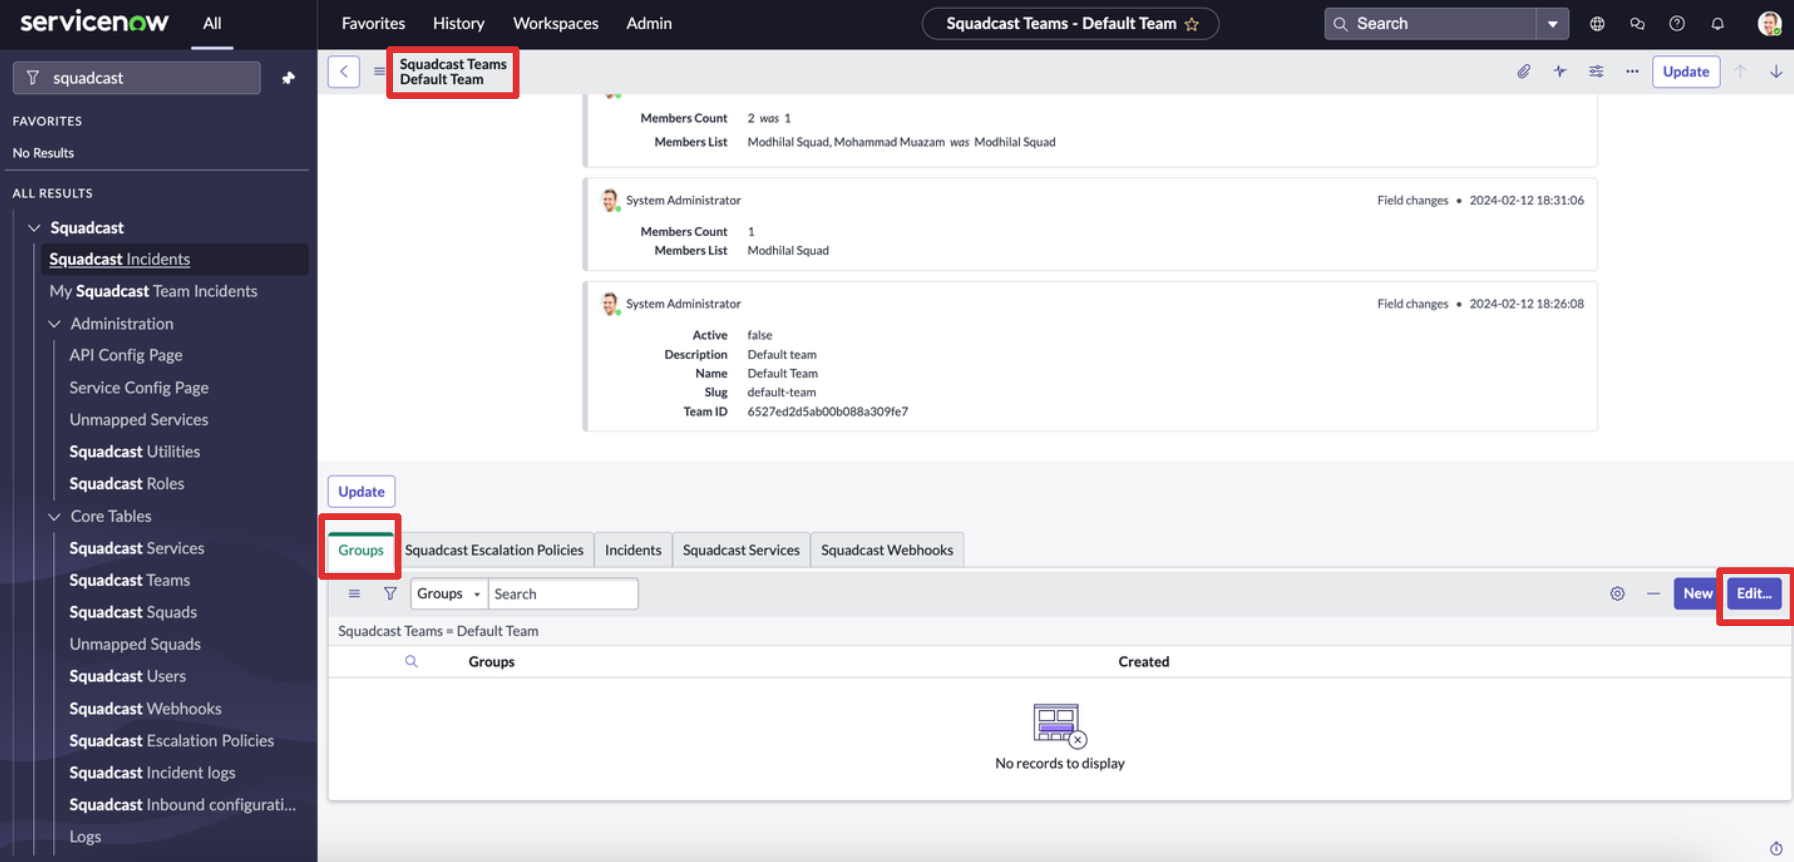
- On the API config page, Would you like to push groups from ServiceNow to Incident Response?
- If this is enabled, you can push ServiceNow Groups to Incident Response.
Navigate to the Incident Response Team details page.
Select the Groups tabs at the bottom and click on edit.
Select the groups you would like to push to Incident Response
Click on “Save” on the bottom right of the screen
ServiceNow Incident Template
Select the ServiceNow incident template when the incident is created from Incident Response from the dropdown. Incident in ServiceNow will be created based on the template provided here.
Incident State Mappings
Incidents across tools will be synced based on this state mapping
Map the ServiceNow states against each Incident Response States
Each Incident Response State should at least be mapped to one ServiceNow State.
Each Incident Response State can be mapped to multiple ServiceNow States.
Other Configuration Details
- Select the default resolution code when the incident is resolved from Incident Response from the dropdown.
- In Incident Response, Incidents can be resolved without any resolution codes. Selecting this will automatically update the resolution code when the incidents are resolved from Incident Response
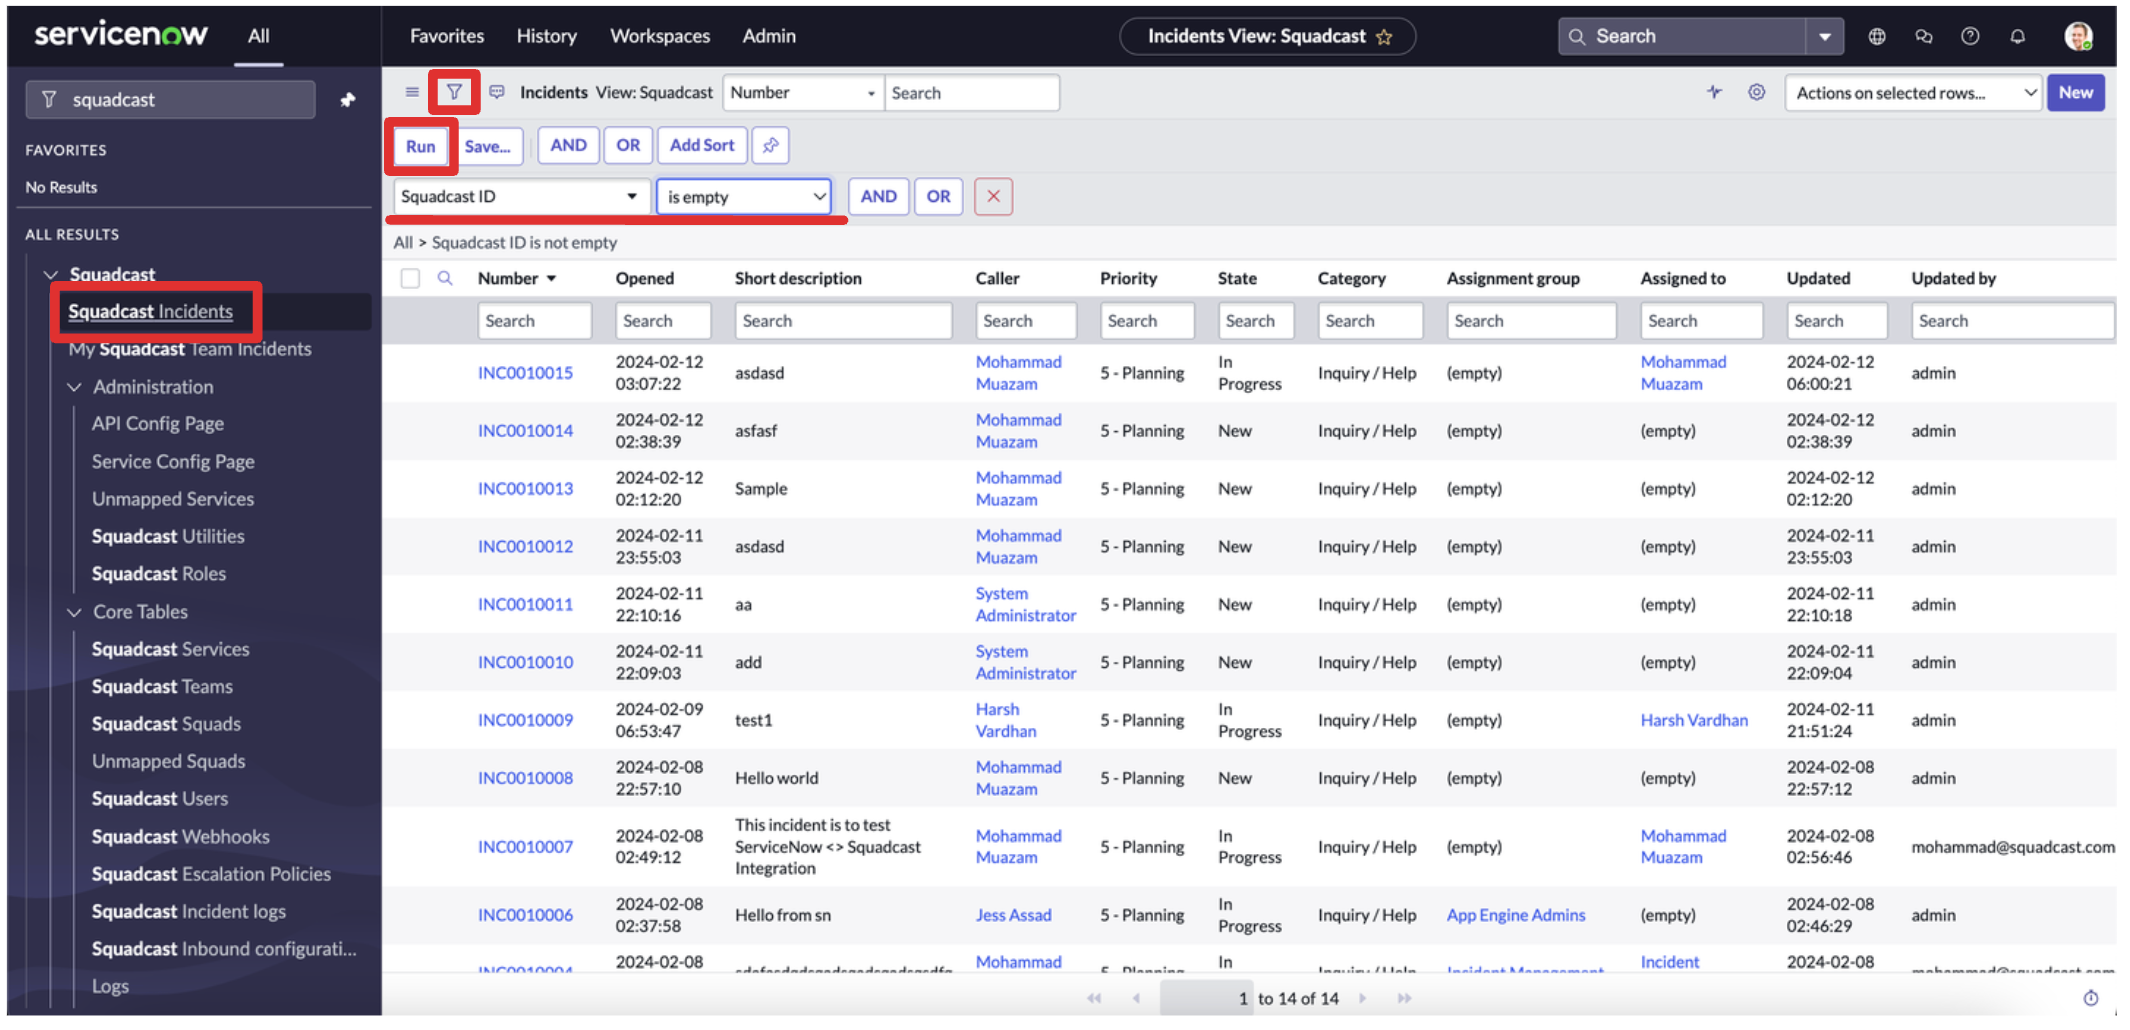
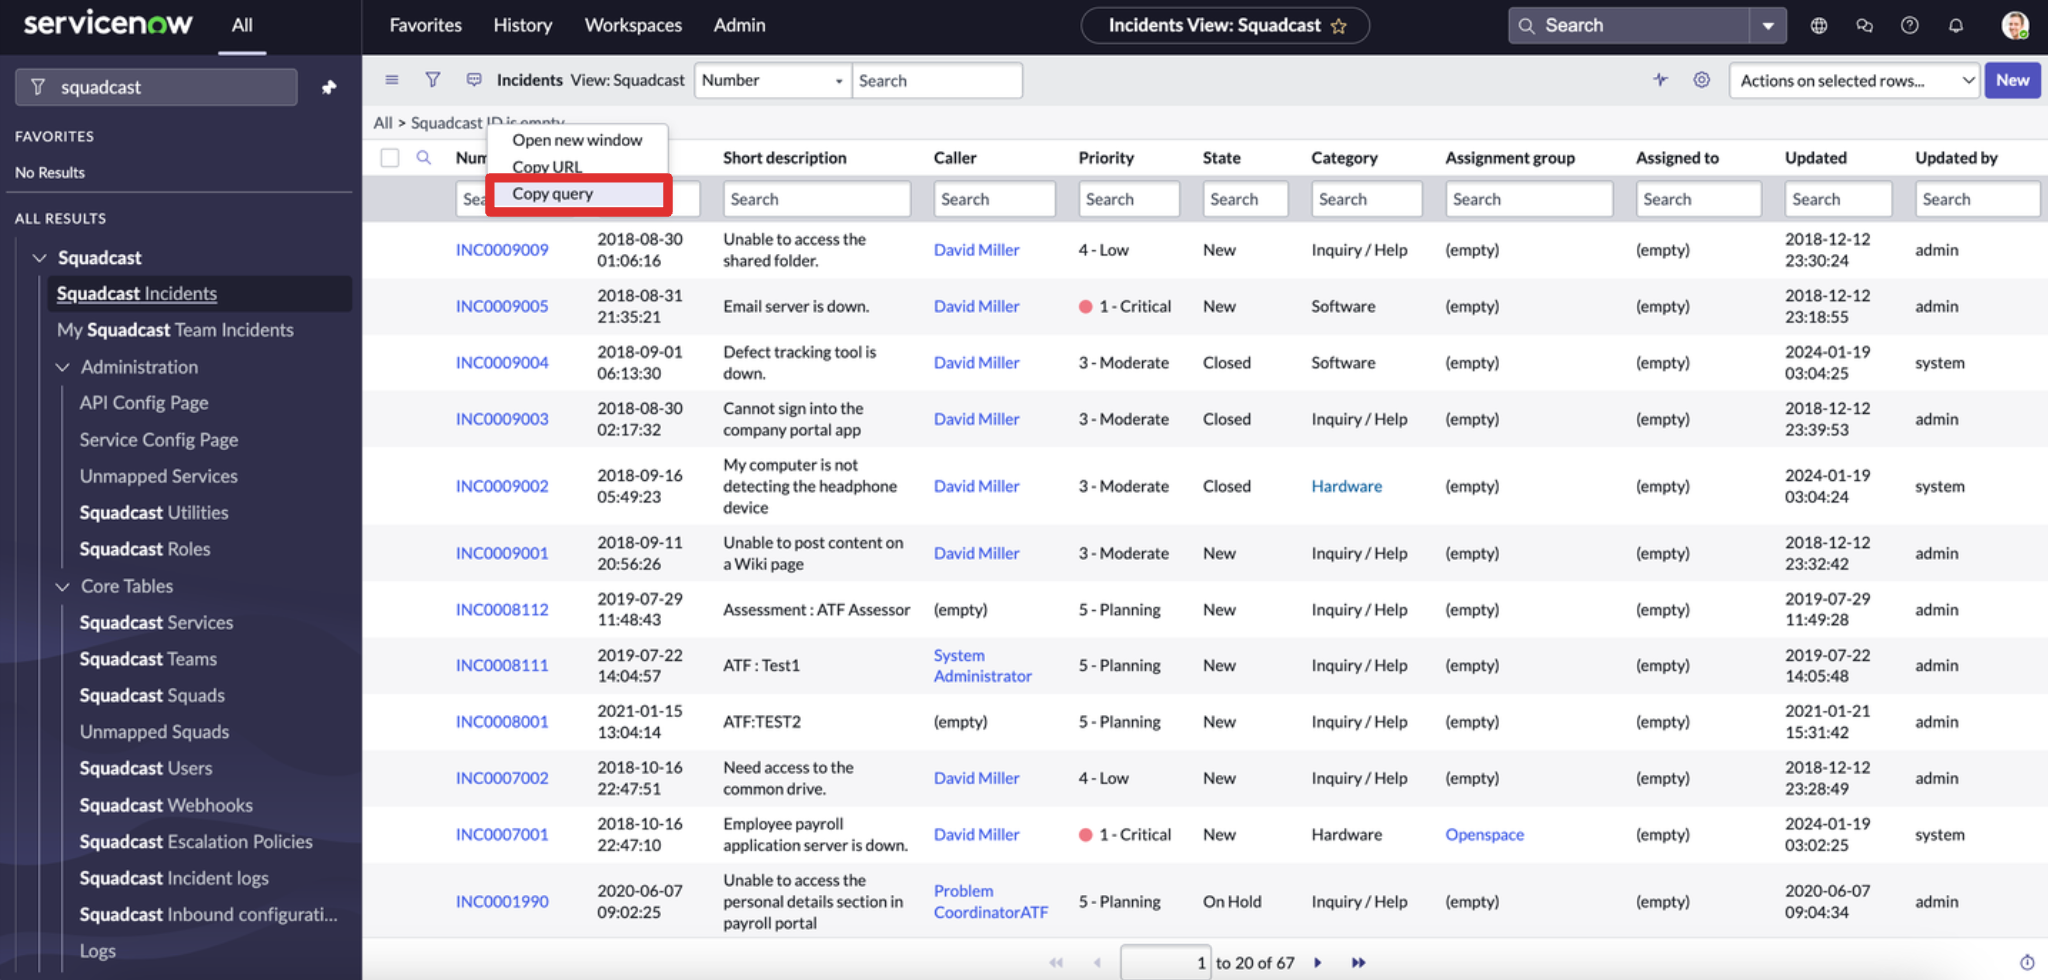
- Enter the query for automatic incident creation in Incident Response for ServiceNow Incidents.
- Provide the query for automatic Incident Response incident creation for ServiceNow incidents
Whenever this query matches the ServiceNow incident a Incident Response incident will be created
To generate a query, navigate to the Incidents/Incident Response Incidents page > Use the filter option and apply the right filters > click on “Run” filter > Right-click on the filter and click on “Copy query”. Generate and use this query according to your use case
- Select the default user.
- If any non-Incident Response or non-ServiceNow user takes any incident action, the action on the other tool will be taken by this user.
- Would you like to create a new user in Incident Response if the incident in ServiceNow is assigned to a non-Incident Response user?
- If this is enabled, and if the incident in ServiceNow is assigned to any non-Incident Response user, a new user account will be created in Incident Response.
Note: The new user will only be added to the Default Team in Incident Response.
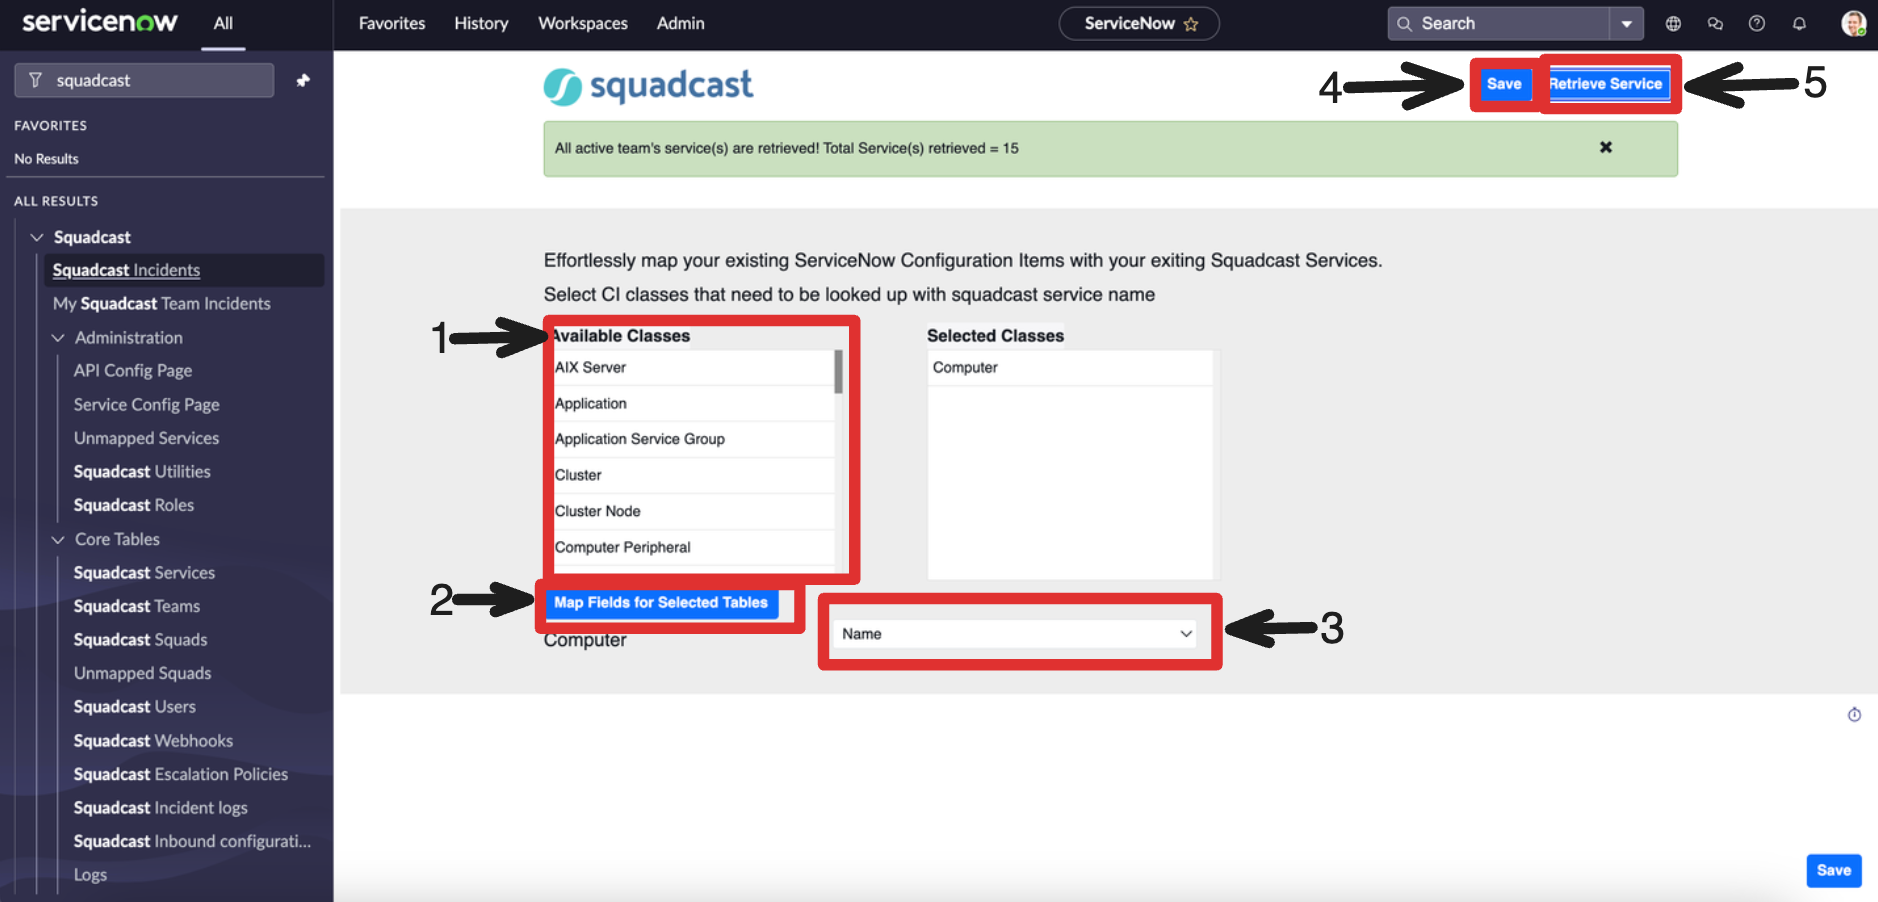
Service Config Page
Navigate to “Service Config Page” to retrieve Incident Response Services and to map Incident Response Services with ServiceNow Configuration Items.
Open the “Service Config Page” and follow the steps
Select the “Classes” that need to be looked up with the Incident Response Service name.
Once the classes are selected, click on “Map Fields for Selected Tables”
- For each selected table, select the column that needs to be checked
- If the column value and the Incident Response Service name match upon Services retrieval, Incident Response Service will be automatically mapped to that Configuration Item.
You can also manually map the Configuration Item with Incident Response Services later on once the retrieval of Services is done
Once the column name is selected, click on “Save”
Click on “Retrieve Services”
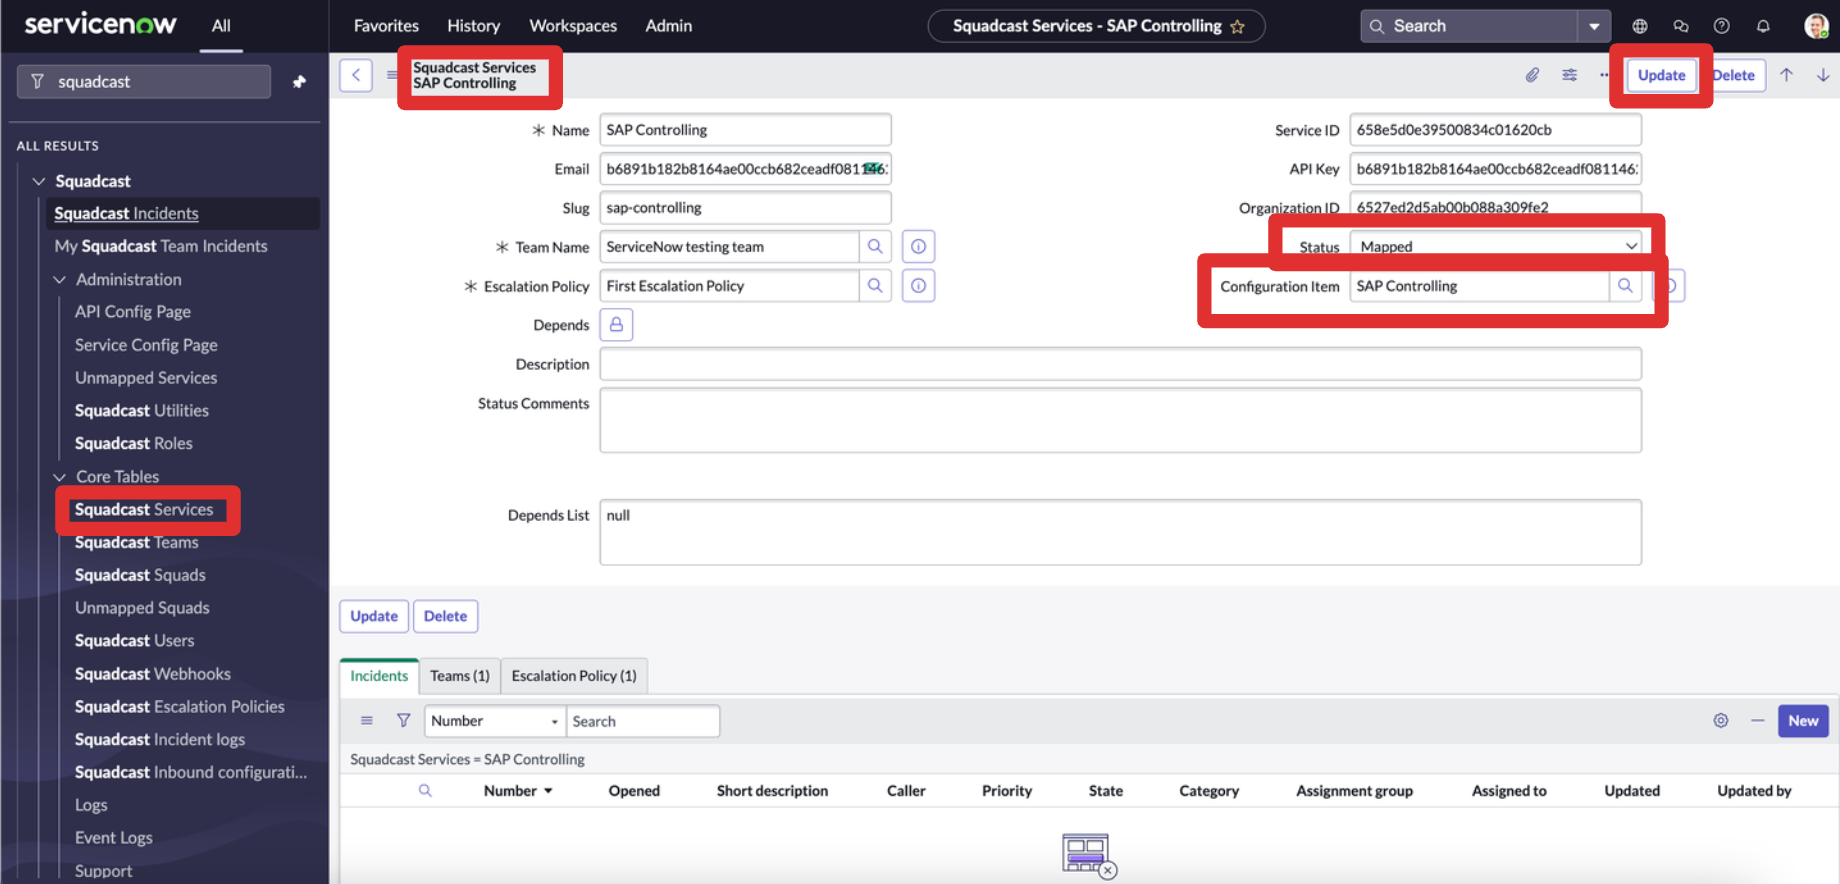
Mapping ServiceNow Configuration Item with Incident Response Service Manually
To map a ServiceNow Configuration Item with Incident Response Service,
Navigate to the “Incident Response Services” page
Open a Incident Response Service record
Manually enter the “Configuration Item”
And the status to “Mapped”
Show Incident Response notes in ServiceNow
To show Incident Response notes in ServiceNow,
Navigate to any one of the ServiceNow Incident
Under "Activities" Click on the filter icon near the work notes
Click on “Configure available fields”
And enable “Incident Response Notes”
Incident Assignment, when a ServiceNow Group has both Incident Response Escalation Policy and Incident Response Squad, mapped to it
If the ServiceNow Assignment Group has both Incident Response Escalation Policy and Incident Response Squad mapped to it and when it is assigned to an Incident in ServiceNow, in Squadcsast, the Incident will be assigned to the Escalation Policy mapped to it. The Escalation Policy will take precedence over the Squad.
And if the ServiceNow Assignment Group doesn’t have Incident Response Escalation Policy mapped and only Incident Response Squad mapped to it and when it is assigned to an Incident in ServiceNow, in Squadcsast, the Incident will be assigned to the Squad mapped to it.
Assign roles to Users in ServiceNow to access the Incident Response Application and Incidents
Below are the roles required for users to access the Incident Response Application and Incidents in ServiceNow.
Incident Response Inbound Configuration Rules
Incident Response Inbound Configuration Rules will help you to update a ServiceNow Incident field record with a preset value or from a Incident Response payload. Create rules to dynamically attach values from Incident Response Payload to ServiceNow Incident fields.
Before creating the rules, let’s understand how you can get the payload.
Navigate to any Incident Response Incident record page in ServiceNow
Scroll to the bottom and click “Incident Response Incident logs”
There you can find payloads for Incident creation and updation
Creating Inbound Configuration Rules
Navigate to “Incident Response Inbound Configurations”
Click on New to create a new record
Select the “ServiceNow Incident Field” that you would like to update
- Select the “Status” on when you would like this rule to execute
- You can select from these three options
- Triggered
Acknowledged
Resolved
When any of these actions take place on Incident Response, the rules will be triggered
- You can select from these three options
- Select the “Type”
- Set Default Value
- You can set a default value and whenever this rule is executed, this default value is added to the incident field.
- Set from Incident Response Payload.
- Use this to set a value dynamically based on the Incident Response payload.
- Set Default Value
Provide “Order” and “Description”. Mark this rule “Active”.
If you want this rule to restrict to a specific Incident Response Service, you can select a “Incident Response Service”/
- If you have selected, Set value from Incident Response Payload, In “Incident Response Payload”, provide the path of the variable
- Example:
- Consider this as a payload
- Example:
{
"alert_source": "Squadcast UI",
"assignee": {
"id": "6527ed2d5ab00b088a309fe9",
"type": "escalationpolicy"
},
"caller": "654b6ab662aed395203266b1",
"close_notes": "",
"communication_channel": [],
"description": "",
"notes": [],
"payload": {
"alertsourceid": "6077f7225fdc7075e371685f",
"assignedto": {
"id": "6527ed2d5ab00b088a309fe9",
"type": "escalationpolicy"
},
"attachments": [],
"createdby": "6459d6d161a3f1060175a042",
"description": "",
"message": "test incident",
"organizationid": "6527ed2d5ab00b088a309fe2",
"owner": {
"id": "6527ed2d5ab00b088a309fe7",
"type": "team"
},
"priority": null,
"serviceid": "658eae7339500834c0164b92",
"tags": {}
},
"short_description": "test incident",
"squadcast_id": "6593a2a0ace6e17cfd9dca59",
"squadcast_services_id": "658eae7339500834c0164b92",
"status": "triggered",
"tags": {},
"team": "6527ed2d5ab00b088a309fe7"
}
And if you want the Assignee ID to be added to a ServiceNow Incident field, you can write this assignee.id.
If you want to run a lookup script, you can also provide the script.
Click on “Save”.
Validating the Incident Response Payload Path
To validate the Incident Response Payload Path that you have provided in the inbound configuration
Navigate to the Incident Response Inbound Configuration rule.
Click “Validate Payload”.
- A modal will open, provide the “Path” and the “Incident Response Payload”.
- The Incident Response Payload varies for your use case and Incidents.
- To get a Incident Response Payload for your Incidents.
- Navigate to one of your Incident Response Incidents in Service and open the record.
You can see the payload of the Incident under “Activities”.
Copy the payload and paste the payload in the modal under “Incident Response Payload”.
Click “Test”.
Under “Evaluate Incident Response Payload” you can see the results. This result is applied to the ServiceNow Incident Field.
That’s it. Now that all the configuration is done. You can now start using this extension.
Enabling and Disabling ServiceNow Extension Integration
When Enabled: Incident synchronization occurs seamlessly.
When Disabled: Incident synchronization is halted, preventing the creation or mapping of incidents in both systems.
Disabling the integration preserves all entered information in Incident Response; only incident synchronization ceases.