Amazon S3 Ingestion (Manual Setup)
Loggly provides the infrastructure to aggregate and normalize log events so they are available to explore interactively, build visualizations, or create threshold-based alerting. In general, any method to send logs from a system or application to an external source can be adapted to send logs to Loggly. The following instructions provide one scenario for sending logs to Loggly.
Loggly can automatically retrieve new log files added to your S3 bucket(s). The Loggly service supports logs from ELB, ALB, and Cloudfront, and any uncompressed line-separated text files. Loggly provides a script to configure your account for S3 ingestion using the Amazon SQS service automatically. The instructions in this guide are for people who prefer to manually configure their Amazon account themselves. It takes a little bit more work to set up, but you can review and control each step yourself.
Loggly works by listening for Amazon events identifying a new object has been created in your bucket. To make the process of sending events reliable, Loggly sends them through Amazon’s Simple Queue Service (SQS), which saves the event until it can be retrieved. When Loggly receives a notification, the log file is downloaded and ingested into Loggly.
S3 Ingestion has a limit of 1GB max S3 file size. If a file exceeds 1GB, Loggly skips it.
Supported file formats: .txt, .gz, .json.gz, .zip, .log.
Overview of Amazon SQS and Loggly Integration
Amazon Simple Queue Service (SQS) is a fast, reliable, scalable, fully managed message queuing service. SQS makes it simple and cost-effective to decouple the components of a cloud application. You can use SQS to transmit any volume of data, at any level of throughput, without losing messages or requiring other services to be always available.
Whenever a new object is created in S3 buckets, S3 fires ObjectCreated events to the SQS queue. Loggly then retrieves that notification from the queue, which contains the key and bucket of the S3 object. It then downloads that object from S3 using an access key and secret access key that you provide.
Objects added to an S3 bucket prior to inegration of a new AWS source in Loggly are not sent to the SQS queue.
Adding a new AWS source
-
In Loggly, go to Source Setup > S3 Sources, and then click Add New.
-
Select the Manual tab to see and complete the form with the instructions provided. You need to allow Loggly to read from your chosen S3 bucket. Loggly is notified of new objects created in that bucket.
-
Create an SQS queue by going to the AWS console > Services > SQS.
-
Create a New Queue or select an existing queue that is dedicated to Loggly.

-
Look at the default region selected by Loggly. The SQS queue and the S3 bucket need to be in the same region. You can check the S3 bucket region in bucket properties as shown below:

-
If needed, you can change the region of the SQS queue from the drop down menu located to the right of the toolbar.

-
Add permissions to the SQS queue by selecting it from the table, then selecting the Permissions tab, and clicking Edit Policy Document.

- When the editor window opens, paste the the JSON below:
{ "Version": "2008-10-17", "Id": "PolicyExample", "Statement": [ { "Sid": "example-statement-ID", "Effect": "Allow", "Principal": { "AWS": "*" }, "Action": "SQS:SendMessage", "Resource": "<SQS ARN>", "Condition": { "ArnLike": { "aws:SourceArn":"arn:aws:s3:*:*:<S3 bucket name>" } } }, { "Sid": "Sid1458662829373", "Effect": "Allow", "Principal": { "AWS":"arn:aws:iam::<Your account number>:root" }, "Action": "SQS:*", "Resource": "<SQS ARN>" } ] } - In the code, replace:
<Your account number> with your AWS account number.
<S3 bucket name> with your S3 bucket name.
<SQS ARN> with the ARN number (which appears twice in the code) found under the details tab, after you have highlighted the SQS queue.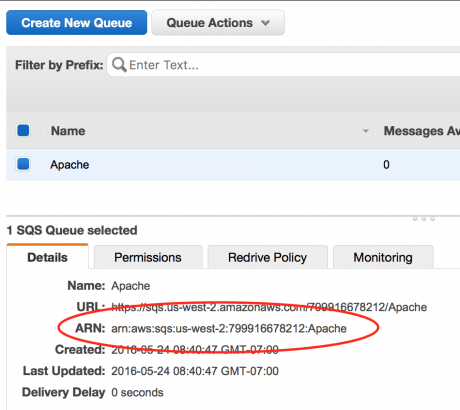
-
If you want to use multiple buckets, the Condition block should look like the following, but edit the code to replace <First S3 bucket name>, <Second S3 bucket name> and so on with your S3 bucket names:
If you want to use multiple buckets, the Condition block should look like the following: "Condition": { "ArnLike": { "aws:SourceArn": [ "arn:aws:s3:*:*:<First S3 bucket name>", "arn:aws:s3:*:*:<Second S3 bucket name>", "arn:aws:s3:*:*:<Third S3 bucket name>" ] } } -
Configure your S3 bucket to send ObjectCreated events to SQS queue, by going to the AWS console > Services > S3.
-
Select the bucket you previously put in the SQS policy, and then right-click and select Properties.

-
Expand the Events section and under Events. Select ObjectCreated (All), and then select the SQS queue you just created.

-
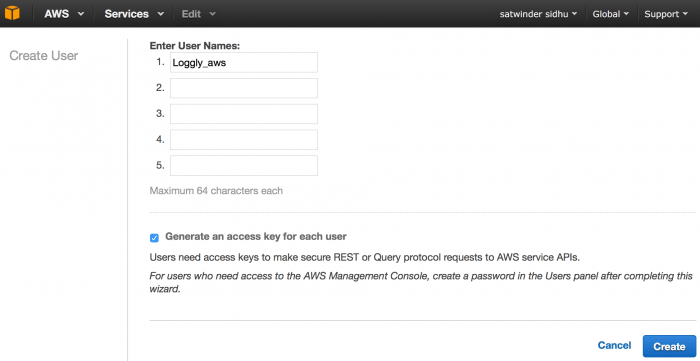
In AWS, create a new IAM user. Grant permissions for Loggly to read from your S3 bucket by creating a new IAM user on AWS your account. The new user only has permission to read from the S3 bucket.
From your AWS dashboard, go to Security, Identity & Compliance > IAM

-
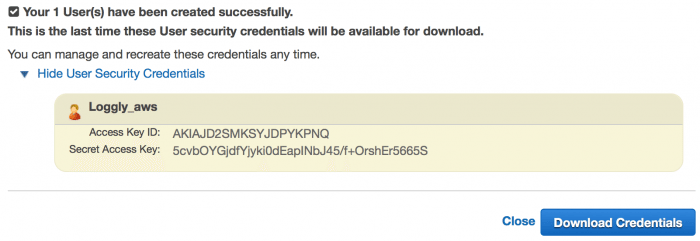
From your IAM dashboard, select Users from the left menu. Then, create a new user and make sure to download the credentials, which you need to provide to Loggly in a later step:
-
After the user is created, select the user from your user list. Under the Permissions tab, click Inline Policies, and then select click here:

-
In order to configure the permissions for the new user, select Custom Policy. Loggly needs access to list the contents of the bucket, get bucket location, and get objects from within the bucket:

-
In the editor window, provide a name for your custom policy and paste the following:
{ "Version": "2012-10-17", "Statement": [{ "Sid": "Sidtest", "Effect": "Allow", "Action": [ "sqs:*" ], "Resource": [ "<SQS ARN>" ] }, { "Effect": "Allow", "Action": [ "s3:ListBucket", "s3:GetObject", "s3:GetBucketLocation" ], "Resource": [ "arn:aws:s3:::<S3 bucket name>/*", "arn:aws:s3:::<S3 bucket name>" ] }] } -
In the code, replace:
<S3 bucket name> with your S3 bucket name.
<SQS ARN> with the ARN number found under the details tab, after you have highlighted the SQS queue. - If you want to use multiple buckets, the Resource block would look like the following, but replace replace <First S3 bucket name>, <Second S3 bucket name> and so on with your S3 bucket names.
"Resource": [ "arn:aws:s3:::<First S3 bucket name>/*", "arn:aws:s3:::<First S3 bucket name>", "arn:aws:s3:::<Second S3 bucket name>/*", "arn:aws:s3:::<Second S3 bucket name>", "arn:aws:s3:::<Third S3 bucket name>/*", "arn:aws:s3:::<Third S3 bucket name>" ] -
Double check that you’ve added the necessary permissions, then click Continue.

-
Name the policy (example: loggly-aws-policy), and then click Apply Policy.

-
Enter the access credentials for the user you just created, including the AWS access key and secret keys:

-
Enter the AWS account number:

-
Choose the customer token you would like to use to send the logs to Loggly. If you have multiple active tokens, then choose the customer token you would like to use to send the logs to. For example, select the appropriate token from the drop-down field. If you have only one active token, that token is used as default. This step is not presented on the page if you have one active token.

-
Enter the name of your SQS queue if you would like Loggly to receive notifications of new objects added to the bucket.

- Enter the S3 bucket name. As an option you can provide a prefix. A prefix operates similarly to a folder. If you add a prefix here then only keys (or files) that are in that folder are ingested by Loggly. The prefix can also contain multiple folders separated by slashes, for example: loggly/2017/01.
-

One prefix per bucket is allowed, if you change the prefix then the keys with the new prefix is ingested.You may optionally provide one or more comma-separated tags that describe your data and make it easier to search in Loggly.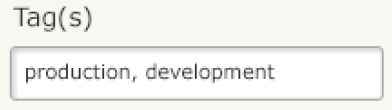
-
Click Save after you have entered the information. You then return to the AWS Sources page and see a green checkmark under the status column if the configuration was successful.
Troubleshooting S3 Ingestion (Manual Setup)
If you don’t see any data show up in the search tab, check for these common problems.
- Wait a few minutes in case indexing needs to catch up.
- Try Loggly's script if the manual method doesn’t help.
- Confirm the AWS source is enabled under the AWS Sources tab.
- Check the log files to make sure they exist and you have the right path.
- Check the Account overview page to see if you are exceeding the data volume limit as per your plan.
- Check for errors on the page and correct them.
Still Not Working?
- Search or post your own Amazon S3 Ingestion (Manual Setup) questions in the community forum.
The scripts are not supported under any SolarWinds support program or service. The scripts are provided AS IS without warranty of any kind. SolarWinds further disclaims all warranties including, without limitation, any implied warranties of merchantability or of fitness for a particular purpose. The risk arising out of the use or performance of the scripts and documentation stays with you. In no event shall SolarWinds or anyone else involved in the creation, production, or delivery of the scripts be liable for any damages whatsoever (including, without limitation, damages for loss of business profits, business interruption, loss of business information, or other pecuniary loss) arising out of the use of or inability to use the scripts or documentation.