Integrate WHD in an SolarWinds Platform deployment
This section describes how to install WHD in an SolarWinds Platform deployment.
For advanced configuration requirements and details on how to install WHD with Federal Information Processing Standard (FIPS) 140-2 compliant cryptography, see the WHD Administrator Guide.
-
Install WHD on a dedicated server by completing the procedures for installing WHD in a stand-alone deployment. When the installation is completed, you will integrate WHD into the SolarWinds Platform.
- Activate the license.
- Enable the SolarWinds Platform to share alerts with WHD. To complete this task, configure the SolarWinds Platform to generate alerts triggered in SolarWinds Network Performance Monitor (NPM), Network Configuration Manager (NCM), and Server & Application Monitor (SAM) when a network event occurs—for example, when a node fails for any reason. When specific alerts are shared with WHD, the application automatically generates a ticket based on the alert.
- Log in to the SolarWinds Web Console.
- Create a new alert or open an existing alert.
On the alert Summary page, expand Alert Integration.
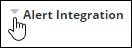
Select the Integrate alert with other SolarWinds Products and subscribers check box.

Enter an alert subject.
You can use this name in the Alert subject field for the alert.
Click the Severity drop-down menu and select an alert severity.
This information is used to determine how WHD processes a shared alert.
- Click Insert Variable and select any additional alert properties.
- Click Insert Variable to save the additional properties.
- Click Submit.
-
Prepare the request types for alert-based tickets.
A request type determines how alerts are routed to the appropriate tech for problem resolution. When you create your SolarWinds connection, select the request type that closely matches the connection.
You can select one request type for one SolarWinds connection.
- Ensure that you are logged in to the WHD Administrator Console as an administrator.
-
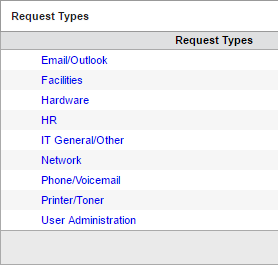
In the toolbar, click Setup > Tickets > Request Types.
The Request Types window displays the current default request types.
- Click New.
-
Enter a name to identify this request type.
For example, you can enter SolarWinds SAM alerts.

-
To create a nested request type, select the parent type (for example, Network). Optionally, click
 to copy values for the remaining fields from the parent type.
To create a top-level request type, leave this field blank.
- Select the tech group that will address this type of request.

If the tech group has not been defined, leave this field blank. You can map the request type to a tech group when you define the tech group.
-
Specify the default priority and whether fields are hidden or required.
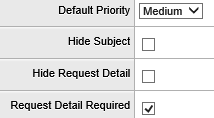
The Default Priority level is the level that tickets are assigned based on the corresponding request type.
- In the Detailed Instructions field, enter additional information to be displayed on the ticket. The text will display as a blue Instructions sticky note above the ticket Request Detail field.

For example, you can provide specific instructions for creating this type of ticket, or explain the request type's purpose so a client can choose the correct type. You can apply BBCode formatting to format lists, add emphasis, or include links to supporting information.
-
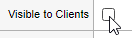
Clear the Visible to Clients check box so this type is selected only by techs.
-
Specify whether the tech will be prompted to select an asset or model when they create this type of ticket.

-
(Optional) Restrict this ticket type to specific companies, locations, or departments. Only clients or techs associated with your selections will see this request type.

-
If an approval process should be automatically initiated when a ticket is saved with this request type, select the approval process. Otherwise, accept the default selection.

Alternatively, you can associate a request type with an approval process when you create the approval process.
-
To include custom fields on this type of ticket, specify which fields to include.

- Specify whether clients can attach files to this type of ticket, and whether this request type is available as a category when techs create an FAQ.
The Attachments Enabled option does not affect whether techs can attach files.

-
Identify the tech who will receive the highest-level escalation (after the tech group manager).

-
In the Survey field, select None to disable surveys for this ticket type.

-
Click Save.
In this example, the request type is nested in the Network request type.

- Repeat step c through step q to create request types for SolarWinds NCM and NPM alerts (if applicable).
-
Create a SolarWinds server link to the monitored source.
This process creates a communications link between the WHD server and the monitored source (such as SolarWinds SAM). When an event occurs, WHD generates a ticket from the alert and forwards the ticket to the assigned tech group and tech for troubleshooting and resolution.
When you upgrade your SolarWinds Platform server software, verify the server link to the monitored source. In some cases, the server link can break during the upgrade procedure.
- Log in to the WHD Admin Console as an administrator.
- Click Setup in the toolbar and select SolarWinds Integration > SolarWinds Connection.
-
Click Add new SolarWinds Source in the SolarWinds Connection screen.

- Enter the connection source name in the Source Name field.
-
Click the WHD Request Type drop-down menu and select a request type.
For example, SolarWinds SAM alerts.
- Enter the SolarWinds Server IP Address or Fully Qualified Domain Name (FQDN).
-
Enter the SolarWinds administrator user name and password.
To ensure WHD can access the required SolarWinds alerts, enter administrator-level SolarWinds account and credentials data into WHD.
-
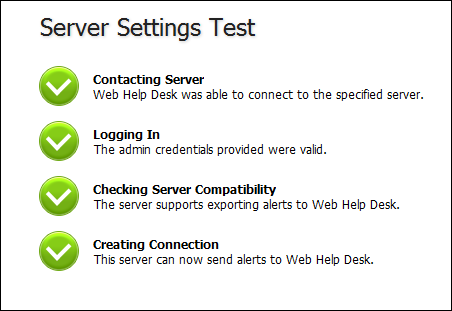
Click Test.
When WHD creates a connection with a SolarWinds Platform alert source, the checked areas in the window contain green check marks.
- Click Next to continue.
- Configure an alert filter to recognize a specific issue in the SolarWinds Platform and create a help desk ticket based on that issue.
-
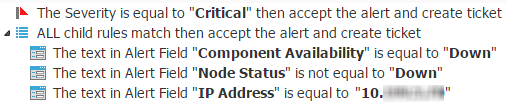
Configure and test the alert filtering rules to ensure they are filtering the properties correctly. The test should include the severity and any alert fields that are configured in the filter rule.
-
Verify that the alert filtering rule is configured correctly.
The following example shows a test for a filter rule.
- Click Test.
- Select a severity.
- Click Add New Property, select an alert field, and then enter the value.
-
Add all alert properties defined in the filter rule, and click Test.
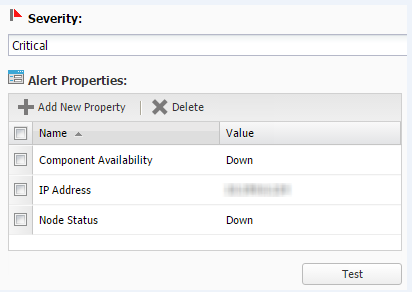
If the rules are configured correctly, a message states that the filter rules match and the alert is accepted in the Test Results pane. Click Done.
-