Configure the ticket status types
The ticket status identifies the ticket's current stage of completion and indicates whether action is needed.
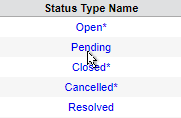
By default, Web Help Desk includes the following status types. You can modify all preconfigured status types and create additional status types.
| Status | Description |
|---|---|
| Open | This issue requires a resolution. This is the default status of a ticket when it is created. |
| Pending | The ticket was received, but is currently on hold. For example, this status could be used to indicate that a feature request was received, but management has not decided if the request will be granted. |
| Closed | The client confirmed that the issue was resolved. You can also configure Web Help Desk to automatically close a ticket if the client does not respond to the confirmation request within the specified time period. |
| Canceled | The client is no longer experiencing the problem, or no longer needs the service requested in the ticket. |
| Resolved | The tech believes that a solution was provided, and is waiting for the client to confirm the resolution. |
You can modify all preconfigured status types and create additional status types. For example, you could create a status type called On Hold (similar to Pending) to indicate when an employee or student is not available due to a planned vacation or semester break. In this example, deselect the Count Time checkbox so the time away does not impact the due date.
Modify a preconfigured status type
By default, setting a ticket status to Resolved sends an email asking the client to confirm the resolution. The following example configures the Resolved status to automatically close the ticket if the client does not respond within three weeks.
- On the toolbar, click Setup > Tickets > Status Types.
-
In the list of status types, click Resolved.
By default, the Resolved status type is configured to send an email prompting clients to confirm that their issue was resolved.

-
Set Automatically Close Ticket After to 3 Week(s).
If a client does not respond to the confirmation email within three weeks, the ticket status is automatically set to Closed.

- Click Save.
Create a new status type
This example creates a new status type called Waiting on Client Response.
- On the toolbar, click Setup > Tickets > Status Types.
- Click New.
-
Enter a Name and Description.

-
Change the Display Order so that tickets with this status are displayed above Closed, Canceled, or Resolved tickets.

-
Clear the Count Time check box.
The time spent in this status is not included in the ticket's total open time, and the ticket's due date is extended by the amount of time spent in this status.

-
Click Save.
The new status type is displayed in the list.
You must click Save on the Status Types tab before you click the Options tab. If you do not click Save, the information you entered on the Status Types tab is lost.
- In the list of status types, click Waiting on Client Response.
- Click Options.
-
In the Client Update Sets Status To field, select Open.
When the client updates the ticket, the status automatically changes to Open. This indicates that information has been added to the ticket and the tech can resume work on it.

- Click Save.
Apply a new status type to an existing ticket
After you create a new status type, you can apply the status to an existing ticket.
-
Locate and open a ticket that requires a new status type.
-
Scroll down to Status & Schedule.
-
Click the Status drop-down menu and select the new status type.
-
Click Save.
Create a custom status type that automatically closes a ticket
This example creates a new status type that automatically changes the ticket status to Closed on a specific day or time, or when the client selects an option in the ticket email.
- On the toolbar, click Setup > Tickets > Status Types.
- Select the Status Types tab.
-
In the Status Type Name column, click a status type.
For example, Resolved.
-
Choose and enable a status to automatically close the ticket.
To automatically close tickets after a specific point in time, configure the drop-down menu options for the Automatically Close Ticket After option.

To close tickets based on the client response in the ticket email, select the Prompt Client to Confirm Ticket Resolution checkbox.

When the client clicks Yes in the email, the ticket is automatically set to Closed status. When the client clicks No in the email, the ticket is set to Open status and is returned to the ticket queue.
Configure both options to ensure that all tickets are closed based on a point in time or the customer response. When you configure both options, Web Help Desk automatically closes the ticket after the selected point in time without the client's response.
- Click Save.
Set up an automated reminder for ticket status
You can set up automated email reminders to clients about ticket status and priority. To begin, enable the client reminder functionality in the console. When you are finished, set up the client reminder interval settings.
Enable the client reminder
- Click Setup > Tickets > Status Type.
-
Click a status type for the reminder.
For example, Pending.
-
In the Status Types tab, select the Client Reminders checkbox.
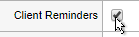
- Click Save.
- Repeat step 1 through step 4 to set up client reminders for the remaining, required status types.
Set up the client reminder interval
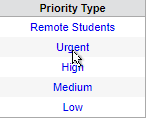
- Click Setup > Tickets > Priority Types & Alerts.
-
In the Priority Types column, click a priority type that requires a reminder email.
For example, Urgent.
-
In the Priority Types Details page, select the Client Reminder Interval checkbox and select the targeted interval for the reminder email.
For example, once every business day.

- Click Save.
- Repeat step 1 through step 4 to set client reminders for the remaining required priority types.
Select the email recipients for auto-close tickets
You can configure Web Help Desk to respond differently when a ticket auto-closes. For this situation, you can enable the application to send email to the recipients set in the ticket or reset the ticket recipients to Tech, Client, or Cc.
- Log in to Web Help Desk as an administrator.
- Click Setup > Tickets > Status Types.
- In the Status Type Name column, click Closed.
- Click the Options tab.
-
Select the individuals who receive mail when the ticket automatically closes.

Select Use Ticket Settings to send email to the recipients set in the ticket.
Select Override and then select Tech, Client, or the Cc field.
- Click Save.