Automate parent/child ticket creation
You can automate the creation of related tickets by configuring tasks that initiate by action rules.
- Configure a task with elements. Create a task with one or more related task elements with the Link to Parent check box selected in each task element.
- Configure an action rule that executes the task. Create an action rule that runs these tasks and elements when a new ticket is created or modified.
- Create parent/child tickets. Create child tickets automatically when a ticket matches the criteria in an action rule.
When a tech creates a new ticket or edits an existing ticket, a child ticket represented by the task element is created and linked to the new ticket.
Configure a task with elements
Configure a new task that automates your ticket creation process. For example, if you are working with your HR department to on-board an employee, you can create a task called New Employee and attach the following task elements to the task.
| Task elements | Request type |
|---|---|
| Configure a new computer system | IT/General |
| Set up an employee phone and phone number | Phone/Voicemail |
| Configure a new employee workspace | Facilities |
When you create each task element, ensure that the Link to Parent check box is selected. When completed, the task elements display in the Task Elements tab for the task, as shown below.

If you select Link to Parent in the Task Elements tab window, your selected task elements are inherited from the parent ticket (for example, location, room, or tech) and Inherit displays in the Request Type and Request Detail columns. If the inherited elements include a location, room, or tech, Inherit displays in the Location, Room, and Tech columns, depending on the elements you choose to inherit from the parent ticket.
The Generate Next column displays when each task element is triggered. When you arrange your task elements in a specific order, you can control when the next element is triggered. The On Creation status is selected by default in the Task Elements tab window, which immediately triggers the next element after the previous element is triggered. If you select another status in the Generate Next Element row of the Task Elements tab window (such as Open, Pending, Closed, Canceled, or Resolved), your selected status displays in the Generate Next column for your task element.
The following illustration shows a list of task elements that inherit all tasks from the parent ticket. Each task triggers at a separate stage, depending on the options you select in the Task Elements tab window.

When you configure your task elements, the following rules apply:
- Each task you configure at Setup > Tickets > Tasks can include multiple task elements.
- The Link to Parent check box must be selected in a task element that triggers the execution of the next task element.
- A linked child ticket with a task element set to Generate Next Element: When Status Equals must match the status setting (such as Closed or Resolved) to trigger the next task element.
- The parent ticket cannot be changed until the linked task elements are completed.
Link a child ticket to the parent
When you click a request type link in the Request Detail column, the Task Elements tab window displays. Selecting the Link To Parent check box displays the Inherited column in the tab window. Using this column, you can select the field data you want to inherit from the parent ticket.
Web Help Desk only creates one level of child tickets.
The following screen provides an example of a child ticket displaying the Inherited column.
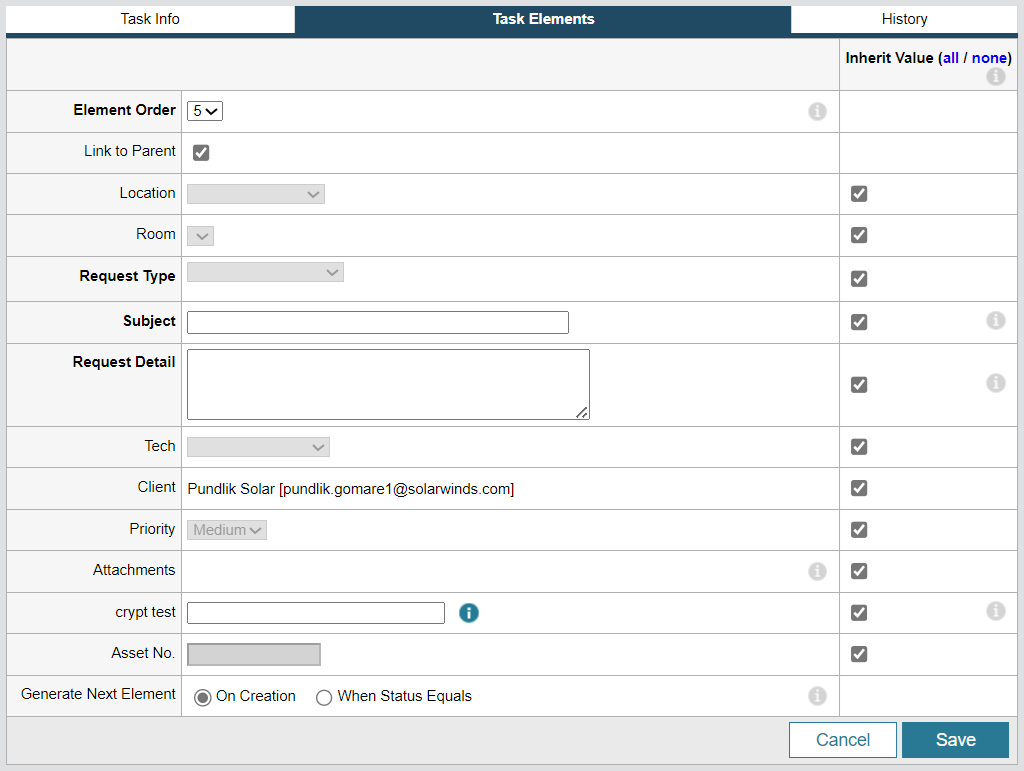
You can use the Inherited column to select the field data you want to inherit from the parent ticket. If you deselect Link to Parent, all previous selections are removed, and you can edit the child ticket fields as needed. If you select Link to Parent again, the Inherited check boxes are cleared, and you must select your options. The Subject and Request Detail fields are combined with the parent ticket and appended with a space between both field values.
After you select the Inherited column check boxes, perform the following steps:
- In the Generate Next Element row, select when your task element is triggered.
- Click the Element Order drop-down menu and select when this task is triggered in comparison with your existing task elements.
- Click Save to save your changes.
- Navigate to the Task Elements tab window and ensure all tasks are listed in the proper order and generate the next element when each task equals a specific status.
Some fields include specific logic used to inherit selected field data from the parent ticket. The following table describes the inherited field logic for specific fields in the child ticket.
| Field | Inherited field logic |
|---|---|
|
Subject Request Detail Custom Text |
When you select one of these fields, the field is appended to the value of the parent ticket. If any of these fields are empty, the child ticket inherits the corresponding field value of the parent ticket. |
|
Tech Request Type Asset No. All non-text custom fields |
When you select this field, the child ticket inherits the value of the parent ticket, and the Tech drop-down menu is disabled. When you clear this check box, the drop-down menu returns to its preselected value. |
| Client | When you select this field, the child ticket inherits client info from the parent tickets. |
| Attachments |
When you select this field, the child ticket inherits all attachments from the parent ticket. |
Configure an action rule
After you create your New Employee task and the associated task elements, create a new action rule that executes the task when a tech creates a ticket that matches the action rule criteria in a ticket.
For example, to execute the New Employee task, you can create a new rule with the following elements:
- Action Rule Info: Create a rule named On-board New Employee and select the Enabled check box.
- Criteria tab: Under Tickets matching ALL of these conditions, you can select Subject | Contains | New Hire.
- In the Actions tab drop-down menus, select Run Task | New Employee.
Only shared tasks display in the drop-down menu.
After you click Save, the new On-board New Employee rule displays in the Action Rules tab.

Create parent/child tickets
When a ticket matches the criteria in an action rule, the action rule executes the task you selected to run.
For example, the On-board New Employee action rule executes the New Employee task and associated elements when the Subject field in the ticket contains New Hire. When a tech creates and saves a ticket that matches the action rule criteria, Web Help Desk executes the On-board New Employee action rule, triggering the New Employee task and associated task elements. When completed, all four tickets are created. See Action rules and Create tasks for more information.