Add Cisco CallManager devices to SolarWinds VNQM
The following procedure adds a Cisco® CallManager device to SolarWinds VoIP and Network Quality Manager.
Avaya™ Call Managers can also be monitored with SolarWinds VoIP and Network Quality Manager. For more information about monitoring Avaya Call Managers, see Manage Avaya Call Managers.
Call managers from manufacturers other than Cisco and Avaya can be monitored with SolarWinds VoIP and Network Quality Manager if you use a custom management information base (MIB) poller specifically configured for your call manager from other manufacturers. You cannot monitor call manager specific data, such as VoIP phones, region information, or call data. For more information, see Add Call Manager Devices from Other Manufacturers.
To add a Cisco CallManager device to SolarWinds VoIP and Network Quality Manager:
- Log in to the SolarWinds Platform Web Console as an administrator.
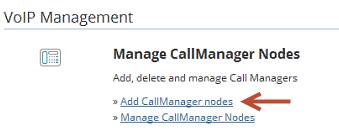
- Click Settings > All Settings.
- Under Product Specific Settings, click VoIP & Network Quality (VNQM) Settings.
- Click Add CallManager nodes.
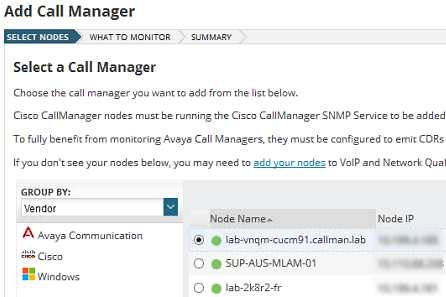
- Select a vendor and call manager device, and click Next.
If you do not see an expected call manager device, use the Web Console to add it. You may need to enable SNMP on the call manager device.
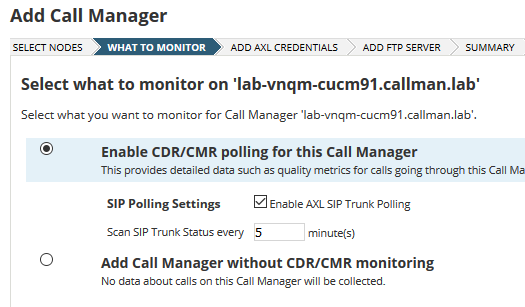
- Select Enable CDR/CQR polling for this call manager, and click Next.
- To enable SIP Trunk monitoring on the CallManager, select Enable AXL SIP Trunk Polling, and enter the polling frequency for SIP Trunk Status scanning.
If you select Add Call Manager without CDR/CQR monitoring, SolarWinds VNQM provides call manager statistics, but does not provide information about calls or call quality.
- Click Next.
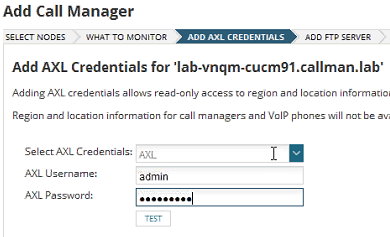
- Select or enter the AXL credentials that SolarWinds VNQM uses to collect region and location information for call managers and phones.
Enter AXL credentials for both publisher and subscriber call managers.
-
Make sure the VNQM AXL Application User has the following roles:
-
Standard AXL API Access
-
Standard CCM Admin Users
-
Standard SERVICEABILITY Administration
By default, only the Standard CCM Super Users Access Control Group has the Standard SERVICEABILITY Administration role. If you don't want the users to have that much access to your Cisco CallManager, you have to create a new Access Control Group in CUCM with only the roles that the SolarWinds VNQM user actually needs. For more details, see Manage User Access in CUCM (© 2018 Cisco, available at https://www.cisco.com/, obtained on October 1, 2018).
-
- Click Test to test the credentials.
If the AXL test fails:
- Update the hosts file located in
C:\Windows\System32\drivers\etc\hostswith the CallManager's IP address and domain name. Go to the Advanced Configuration page > find
SolarWinds.Orion.RemoteCertificateValidation.- If all three options under
SolarWinds.Orion.RemoteCertificateValidationare selected, install the Cisco CallManager security certificate on the SolarWinds Platform server through Start > Manage computer certificates > Action > All Tasks... > Import. - Click Test to test AXL credentials.
The AXL test is successful.
For more information, see Troubleshoot Failed AXL Credentials.
- Update the hosts file located in
- Click Next.
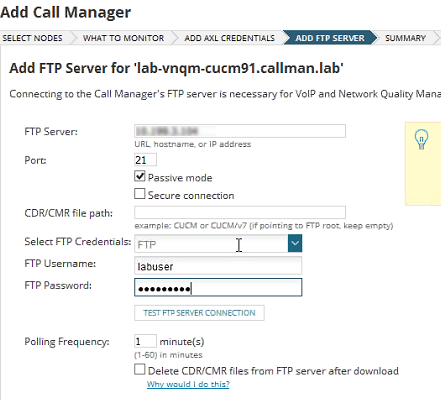
- Define the FTP server details.
- Enter the FTP server IP address or host name where your CDR/CMR data is stored. For more information about FTP configuration, see Configure Cisco CallManagers for FTP.
- Enter the FTP port number.
- Select Passive mode to connect to the FTP server in passive mode.
- If you connect to an SFTP site, select Secure connection.
- Enter the CDR/CMR file path, if applicable.
- Enter the FTP credentials.
- Enter a number in Polling Frequency between 1 and 60 to configure how frequently you want to poll the FTP server in minutes.
- If you want to remove the files from the FTP server, select Delete CDR/CMR files from FTP server after download.
Deleting CDR/CMR files from the FTP server may cause serious data loss. Ensure that your backups are running successfully before selecting this option.
Removing the files from the FTP server prevents the device from filling up with log files, and helps speed up data collection from the FTP server. - Click Test FTP Server Connection to test the connection.
- Click Next.
- On the Summary panel, review the information you entered, and click Add Call Manager.
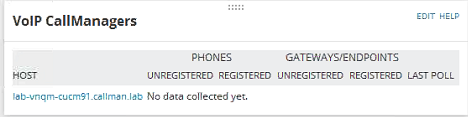
After SolarWinds VNQM adds the call manager, the call manager is displayed on the VoIP CallManagers resource.
- After you have added the device, you can configure it to send data.