Serv-U Server Details: IP Access
The IP Access tab shows the IP access rules set up for the server, domain, group or individual user, and allows you to add, import, edit, export and delete these rules.
Rules set at the server level are inherited by all domains, groups and user unless overridden.
IP access rules enable you to specify IP addresses, or ranges of IP addresses to which access is allowed or denied. These rules are applied as soon as a physical connection is established. Rules are applied in the order displayed. In this way, specific rules can be placed at the top to allow or deny access before a more general rule is applied later on in the list. Use the arrows on the right side of the list to change the position of an individual rule in the list.
Display the IP access list
-
- Click the IP Access tab.
The list of IP addresses set up at this level is displayed.
Use the arrows on the right side of the list to change the position of an individual rule in the list.
Check the Enable sort mode box to sort the IP access list numerically rather than in the processing order. Displaying the IP access list in sort mode does not change the order in which rules are processed. To view rule precedence, disable this option.
Viewing the IP access list in numerical order can be useful when you review long lists of access rules to determine if an entry already exists.
Add an IP access rule
-
From the IP tab, click Add.
The IP Access Rule window is displayed.
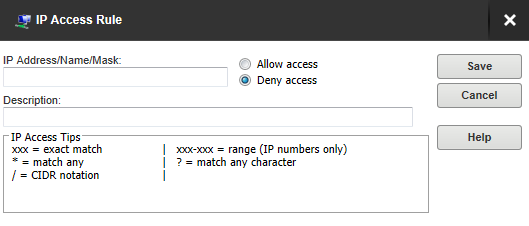
- Enter the IP Address, name or mask using the following conventions.
Value or wildcard Explanation
xxx Stands for an exact match, such as 192.0.2.0 (IPv4), fe80:0:0:0:a450:9a2e:ff9d:a915 (IPv6, long form) or fe80::a450:9a2e:ff9d:a915 (IPv6, shorthand). xxx-xxx Stands for a range of IP addresses, such as 192.0.2.0-19 (IPv4), fe80:0:0:0:a450:9a2e:ff9d:a915-a9aa (IPv6, long form), or fe80::a450:9a2e:ff9d:a915-a9aa (IPv6, shorthand). * Stands for any valid IP address value, such as 192.0.2.*, which is analogous to 192.0.2.0-255, or fe80::a450:9a2e:ff9d:*, which is analogous to fe80::a450:9a2e:ff9d:0-ffff. ? Stands for any valid character when specifying a reverse DNS name, such as server?.example.com.
/ Specifies the use of CIDR notation to specify which IP addresses should be allowed or blocked. Common CIDR blocks are /8 (for 1.*.*.*), /16 (for 1.2.*.*) and /24 (for 1.2.3.*). CIDR notation also works with IPv6 addresses, such as 2001:db8::/32.
- Enter a description.
- Select Allow or Deny access.
- Click Save.
Edit an IP access rule
- From the IP tab, click Edit.
- Amend the rule information as required..
- Click Save.
Delete an IP access rule
- From the IP tab, select the IP rule or rules to delete.
- Click Delete and confirm.
Import and export global IP address rules
You can speed up the creation of IP address rules by creating a text file of addresses, descriptions and access permissions.
- Create a text file using Notepad or similar text editor.
- On the first line enter "IP","Description","Allow".
- Enter the details of each IP access rule:
IP The IP address, IP range, CIDR block, or domain name for which the rule applies. Description A text description of the rule for reference purposes.
Allow Set this value to 0 for Deny, or 1 for Allow. For example:
"IP","Description","Allow"
"172.16.0.1", "Flange Software", "1"
"172.16.0.*", "Do not allow","0"
"2001:db8::/32", "New test site", "1" - From the IP tab, click Import.
- Navigate to the file you created, and click Select.
Similarly, the list of existing IP address rules can be exported to a text file by clicking Export.
For examples of IP address rules and IP address caveats see Examples of IP address rules and caveats.