Mass deploy an agent on Windows
This topic applies only to the following SolarWinds Platform products:
Hybrid Cloud Observability Essentials — Hybrid Cloud Observability Advanced
LA — NAM — NPM — SAM — SCM — SRM — VMAN*
If you are already using a mass-deployment technology, this deployment method is an easy way to get agents on a large number of computers.
What is an MST file?
A Microsoft Transform (MST) file is a collection of specified changes applied to a base Windows Installer package file at the time of deployment. It is an overlay on top of an existing MSI file that defines what specific components or features of an application get installed. The MST file modifies the Microsoft Installer package.
After the software you want to install is packaged in the Windows Installer package format, you can use MST files to customize the software for your organization, such as installing only specific features. The modular design of Windows Installer packages simplifies deployment. When you apply transforms to an MSI file, Windows Installer can dynamically add or modify data in the installation database to customize the installation of the application. Additional information on creating MST files can be found on technet.microsoft.com.
Mass deploy SolarWinds Platform Agents using a package deployment tool
When using package software deployment tools, such as SCM or Ivanti, you can use MSI + MST installation to automatically install SolarWinds Platform Agent. You can use the following command.
msiexec /i "SolarWinds-Agent.msi" TRANSFORMS="SolarWinds-Agent.mst" /qnIn the command, use TRANSFORMS. Do not use the /t parameter because it works differently.
Disclaimer: Please note, any content posted herein is provided as a suggestion or recommendation to you for your internal use. This is not part of the SolarWinds software or documentation that you purchased from SolarWinds, and the information set forth herein may come from third parties. Your organization should internally review and assess to what extent, if any, such custom scripts or recommendations will be incorporated into your environment. You elect to use third-party content at your own risk, and you will be solely responsible for the incorporation of the same, if any.
Mass deploy SolarWinds Platform Agents using a MSI file and a group policy
Polling engine selection is important. When you download the MST file, the file includes the polling engine IP address and other vital information. When you deploy the agent using the MSI file, along with the MST file on the managed node, the agent is installed and pointed to the polling engine selected.
Step 1: Generate and download the MST file
-
Click Settings > All Settings in the menu bar.
-
Under Product Specific Settings, click Agent & Remote Collector. Then, on the Agent Management view, click Download Agent Software.
In Orion Platform 2020.2 and earlier, click Agent Settings to get to the Agent Management view with the Download Agent Software link.
-
Click Windows, and click Next.
-
Click Mass Deploy to Multiple Machines, and click Next.
-
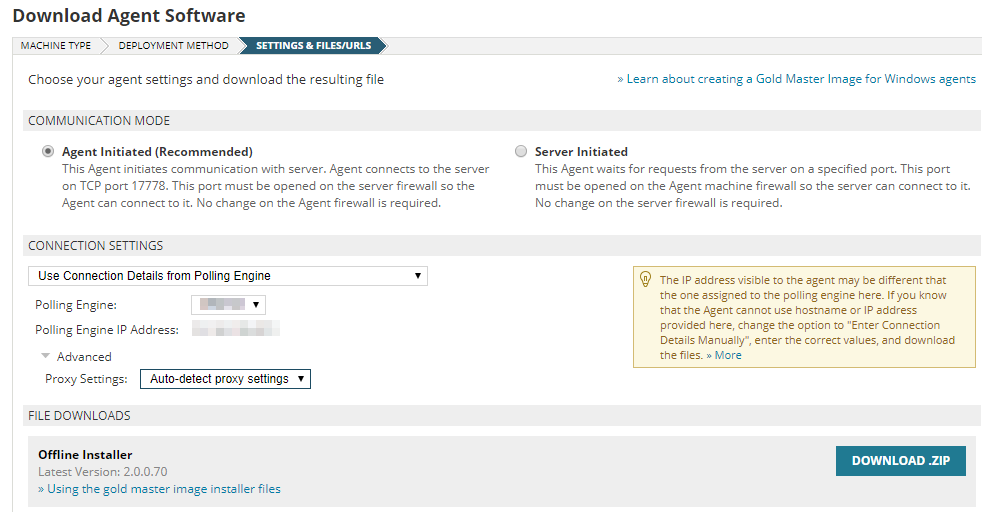
Select the agent communication mode.
-
For agent-initiated communication, enter the polling engine you want the agent to use. You may need to manually enter the polling engine information if the IP address is different from what the SolarWinds Platform server reports. This happens when the monitored host is behind a NAT or proxy device. In these cases, enter the IP address of the SolarWinds Platform server or the additional polling engine as it is accessible from the host where the agent will be installed.
-
To use an existing polling engine, select Use Connection Details from Polling Engine, and then select a polling engine from the list.
-
To manually enter the polling engine IP address, select Enter Connection Details Manually, and then enter the host name and IP address. The IP address is required. Use the host name and IP address of the polling engine that you can access from the client.
-
If a proxy is required, expand Advanced, and specify the proxy settings.
-
For server-initiated communications, enter your agent communication port number. The default port is 17790.
-
-
Click Download .MSI, and save the file.
-
Click Download .MST, and save the file.
Step 2: Add the MST and MSI files to a Group Policy
- Share a folder containing the MST and MSI files.
- In Active Directory, locate the container where you want to advertise the application, and then access the container properties.
A container is a site, domain, or organizational unit (OU).
- Create a Group Policy object.
- In Advanced Options, add the Software installation policy. Select the network path for the agent MSI and MST files.
Step 3: Connecting passive agents to the SolarWinds Platform server
- In the SolarWinds Platform Web Console click Settings > All Settings > Node & Group Management > Manage Agents > Add Agent > Connect to a previously installed agent > Next.
- Enter the name, IP address, and port number for the agent and click Server-initiated communication.
The agent is deployed at login and is registered by the SolarWinds Platform server (if auto-registration is enabled).
When the installation is successful and communication between the agent and the SolarWinds Platform server is successful, the agent is listed on the Manage Agents page.