Use the SolarWinds SFTP & SCP server for NCM config transfers
When you install NCM, the SolarWinds SFTP & SCP server is automatically installed on the SolarWinds Platform server and on any additional polling engines (APEs). If NCM uses SCP (Secure Copy Protocol) to transfer configuration files, you can use the SolarWinds SFTP & SCP server or you can use a third-party SCP server.
-
A device's connection profile specifies what protocol NCM uses to transfer configs to and from a device. For more information about the protocols NCM can use, see Protocols NCM uses to transfer configurations.
-
Use the Transfer Status page to view the status of the most recent config transfer.
Verify the SCP server status and configure settings
The SFTP & SCP Server runs as a service. You can open the SFTP & SCP Server application to verify that the service is running, view recent messages, and, if necessary, configure settings to meet your organization's needs. In many cases, organizations can use the default settings.
An SFTP & SCP Server is not an FTP server. You cannot connect to an SFTP & SCP server with an FTP client.
-
On the SolarWinds Platform server, start the SolarWinds SFTP & SCP Server. To do so:
- Expand the Windows System Tray.
-
Right-click the SolarWinds SFTP/SCP Server icon
 .
.If the icon is not in the System Tray, open the
<SolarWinds PlatformInstallionDir>\SFTP & SCP Serverfolder, and then run theScpServerTray.exeapplication. The default location is:C:\Program Files (x86)\SolarWinds\SFTP & SCP Server\ScpServerTray.exe - Select Open SolarWinds SFTP/SCP Server.
The SFTP/SCP Server Settings dialog box opens.
In earlier versions, the SFTP & SCP Server displayed a list of messages when it opened. If you have an earlier version, click File > Configure to open the SFTP/SCP Server Settings dialog box.
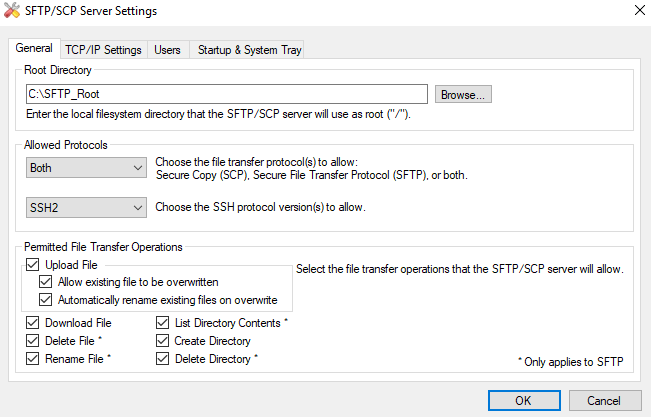
The Root Directory box displays the default root directory, which was created during installation. In most cases, there is no need to change the root directory. However, if you do need to change it, you must also change the SCP settings in NCM.
- Select the protocols you want the server to support from the Allowed Protocols list.
- Select options you want to enable in the Permitted File Transfer Operations section.
- Click the TCP/IP Settings tab, and then specify the port number you want to use in the TCP Port field.
- If you want to specify the IP address configuration, select Use Custom IP Address Binding, and select the IP address you want to use.
- If you want to enable user authentication on the server, complete the following:
- Click the Users tab.
- Click New User.
- Type the user name and password, and click Apply Changes.
- If you want to remove a user, select the user, and click Remove.
- On the Startup & System Tray tab:
If you want the SFTP & SCP Server application window to open automatically, select Automatically run this application when I log on to Windows.
The SFTP &SCP Server service can still run in the background even if the application window is closed.
- Select what you want the application to do when you close the application window.
- Click OK.
View or change the SCP server IP address and storage directory in NCM
When you install NCM, the SolarWinds SCP server is automatically installed on the SolarWinds Platform server and on any APEs. The SCP server on each APE is used to transfer configs to and from devices controlled by that APE. The default config transfer directory is set up automatically on each server.
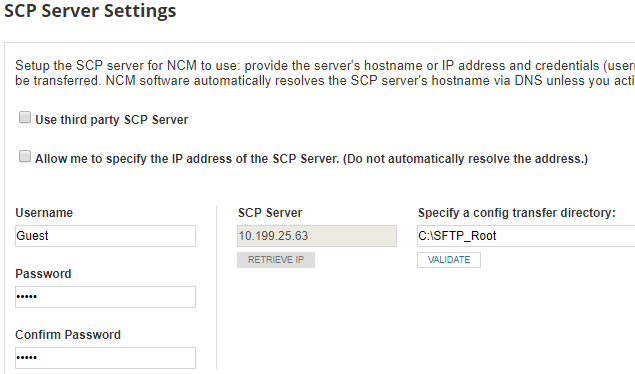
The SCP Server Settings page displays these default values. You can modify these values if needed.
- Click Settings > All Settings.
- Under Product Specific Settings, click NCM Settings.
-
Under Network, click SCP Server.
The SCP Server Settings page shows the default settings for the SolarWinds SFTP & SCP server installed on your SolarWinds Platform server and any additional polling engines (APEs).
-
To manually enter each IP address, select Allow Me to Specify the IP Address of the SCP Server. Then enter the IP address for the SolarWinds Platform server and each APE.
By default, NCM attempts to automatically resolve each IP address via DNS. You might need to enter the IP address, for example, if a device has multiple network interfaces and the IP address cannot be automatically detected.
-
If you want to change the default values, enter the Username and Password that NCM will use to access the SCP server.
NCM cannot use public key authentication to access the SolarWinds SCP server.
-
Under Specify a config transfer directory, specify the location where configurations are temporarily stored during transfer.
When you install NCM, the default config transfer directory is created automatically. If you change the default location, click Validate to verify that NCM can access the new location.
To specify a shared directory, enter the network path and make sure that NCM has access to the directory.
- Click Submit to save the settings.