Update and resolve tickets
This section describes how to update ticket information, perform actions on multiple tickets, and resolve tickets. Use this material as it is, or copy and revise it to reflect your organization's practices and Web Help Desk configuration.
Ticket information
Each Web Help Desk ticket includes tabs that provide information about clients, assets, tickets, and parts and billing. The following table provides details about each tab.
| Tab | Description |
|---|---|
| Client Info | Identifies the client who requested support. This information is automatically populated from the client account. |
| Asset Info | Identifies assets (such as PCs and servers) associated with the client or support request. |
| Ticket Details | Contains specific information about this request, incident, or problem. |
| Parts and Billing | Identifies parts ordered to complete this request and information about parts billing. |
Edit a ticket from the Web Console
As you work to resolve a ticket, update the ticket frequently so your activity can be tracked. For example, add notes to record activities, track progress, and document the resolution.
- Search for the ticket you want to edit, or locate it in your ticket queue.
-
Click the ticket number to open the ticket and display the Ticket Details tab. .
-
Select a ticket type.

A service request is a planned request for a new or modified service. When you hire a new employee, you can create service requests for setting up a workspace, purchasing a laptop computer, and assigning a telephone number.
An incident is an unplanned event that causes an interruption or reduction in service. If the new employee receives a laptop computer and cannot connect to the corporate network, you create a service request ticket that a tech can later classify as an incident. If you encounter two or more similar incidents, you can link the incident tickets to a problem ticket.
A problem identifies the root cause of one or more incidents. If the new employee and several other employees cannot log in to the corporate network, you can create a service request ticket that a tech can later classify as a problem. The tech can then link all incident tickets as supporting incidents (or children) to the problem ticket.
-
Under Details, click the Request Type drop-down menu and select the request type that accurately reflects the type of ticket.

The ticket is transferred to the tech group that services the request type you selected. Add a note to explain the reason you changed the request type.
-
Under Status & Schedule, click the Status drop-down menu and select the ticket status.
A Pending status can impact a ticket due date based on the Count Time setting. If the Count Time checkbox is not selected for this status, the time the ticket is in Pending status is not counted towards the due time. If the Count Time checkbox is selected, the time a ticket is in Pending status is counted towards the due time. As a result, the ticket can be either on time or past due. See Configure Status Types for details.
-
Under Status & Schedule, click the Priority drop-down menu and select the priority.

The priority determines the ticket's due date, and should reflect the severity of the issue and the people or affected business functions. Select one of the following:
-
Urgent (8 hours): a failure that severely impacts critical operations.
-
High (16 hours): an issue that degrades response times or affects normal operations.
-
Medium (24 hours): an issue that affects a small number of users or an individual user. A work-around is available.
-
Low (No due date): questions or requests for information.
-
-
Under Recipients, select the recipients who will receive an email notification for this ticket.
If you send an email that includes unauthorized techs and clients in the Cc and Bcc fields, these users cannot open an attachment included in the email. This rule applies to Web Help Desk 12.7.6 and later.Click Save to save the ticket or Save & Email to save the ticket and send an email to the specified recipients.
If you click Save and email and an error message displays indicating that Transport Layer Security (TLS) 1.0 and 1.1 are not supported, upgrade your deployment to Web Help Desk 12.7.7 or later. This version supports the newer TLS 1.2 protocol. Microsoft deprecated TLS 1.0 and 1.1 beginning in October 2020. See the Microsoft Docs website for details.
To return to the ticket queue, click the arrow icon in the upper-left corner.
Update tickets using email
When a ticket is assigned to you, Web Help Desk sends you an email. Respond to the email to update the ticket.
- In the Notes section, select the action you want to perform. You can add a note, add a hidden note, or delete the ticket.
-
Hold down the Control key and click the ticket number.
Web Help Desk creates an email similar to the following example. In this example, the tech chose to add a note that is visible to the client.
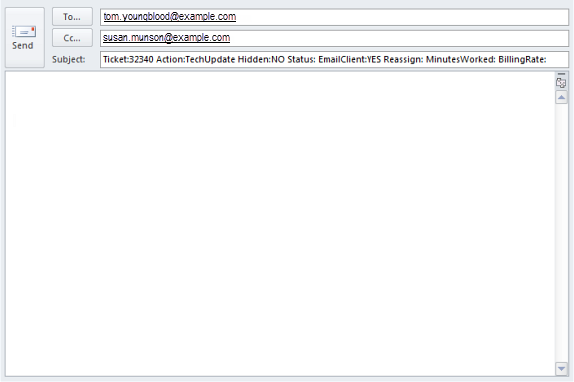
- Verify the options listed in the subject line.
- The Action is based on the action you selected. For example, if you select Add Note, the action in the Subject is Tech Update.
- The Email Client option defaults to YES. Enter NO if you do not want to email the client. (This option is not case-sensitive.)
- Enter your note as the body of the email and send the email.
Perform actions on multiple tickets
Use bulk actions to apply a set of changes to multiple tickets at once. For example, you can use a bulk action to escalate all open, unassigned, urgent priority IT requests for laptop repairs.
Create a new bulk action
Before you can apply a bulk action, you must create the bulk action that defines what change will be made to the ticket. After you create a bulk action, you can apply it at any time. You can also share the bulk action so that other techs can apply it.
- In the toolbar, click Tickets.
-
In the menu bar, select a ticket screen.

-
Scroll to the bottom of the screen and locate the Bulk Action box.

-
Click [+] next to Bulk Action.
- In the Bulk Action Details screen, specify values in the fields that you want the bulk action to change. Leave all other fields blank.
-
In the Save Bulk Action as field, enter a name for this bulk action.

- (Optional) Select the Shared checkbox to share this bulk action with other users.
-
Click Save.
The saved bulk action will be listed in the Bulk Action drop-down menu in the Tickets screen.
Apply a bulk action to a group of tickets
After you create a bulk action, you can apply it to a selected a group of tickets.
- In the toolbar, click Tickets.
- In the menu bar, select a ticket screen, or select Search Tickets and search for the tickets you want to change.
-
Select the tickets for bulk action.
- To select all tickets on the page, select the check box above the first column.
- To select individual tickets, select the check box in the first column of each ticket row.
- Below the list of tickets, select an option from the Bulk Action drop-down menu.
-
Click the Run button to apply the bulk action.
A message summarizes the changes that are applied to the selected tickets.
-
Click OK.
A message confirms that the changes were applied.
Resolve a ticket
When you have completed all activities required to resolve an issue, edit the ticket:
- Add a note to describe the resolution. Select the Solution check box because this helps other techs when they search for solutions to similar issues.
- If this resolution would be helpful for other Web Help Desk users, click Create FAQ to create an FAQ based on the ticket note.
- Change the Status to Resolved.
When you change the status to Resolved, Web Help Desk sends an email to the client asking them to confirm that the issue is resolved.
- If the client clicks Yes, Web Help Desk changes the Status to Closed.
- If the client clicks No, Web Help Desk reopens the ticket and notifies you.
- If the client does not respond within the specified number of days, Web Help Desk changes the Status to Closed.