Create new status types
When you define an approval process, you can create new status types to track a ticket as it is routed through each stage of the process. These status types will be assigned to tickets that must be reviewed and approved.
The following sections describe how to create new status types and then determine when a status type is applied to a ticket.
Prerequisites
This is the third task in the approval process example scenario. Before you start, you must complete the previous tasks:
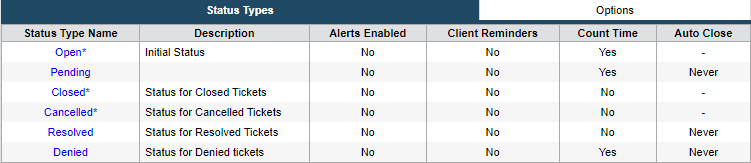
Create a status type
This example uses three new status types:
- Request In Process
- Request Approved
- Request Denied
Complete the following steps to create these types.
- Click Setup > Tickets > Status Types.
- In the Status Types tab, click New.
-
In the Name field, enter a status name. For example, Denied.

-
In the Description field enter a description of the status type.

-
Click the drop-down menu and select the status type display order. This setting determines where the status type displays in the Status Type Name Column at the bottom of the tab window.

For example, if you select 6, the status type displays as the sixth status type in the Status Types tab.
-
Select a color to display for the label background. Select White for no label color.

-
Select the checkbox to include the filter in the Group Tickets list located at Tickets > My Tickets and Tickets > Group Tickets. Otherwise, leave the checkbox unchecked.

-
Select the checkbox if the status type is used to determine the load balance ticket total for a tech. Otherwise, leave this checkbox blank.

Web Help Desk uses load balancing when automatically assigning tickets in a tech group level.
-
Select the checkbox if alerts are enabled for this status type. Otherwise, leave this checkbox unchecked.
 You can define alerts for each priority type.
 -
Select the checkbox to indicate that the ticket time with this status type is included in the ticket's total open time. Deselect this checkbox to extend the default ticket due date.
 Open time is the difference between the time the ticket was open and the time it was closed.
 -
Select the checkbox to send email reminders to clients for tickets with this status type. Otherwise, leave this checkbox unchecked.
 Web Help Desk sends emails only if the ticket status type has reminders enabled and the ticket priority type has a client reminder interval.
 -
Select the checkbox to display ticket due dates for this status type in the calendar view. Otherwise, leave this check box unchecked.

-
Click the drop-down menus and select the amount of time when tickets are automatically changed to the Closed status type. Otherwise, the ticket status type will not change automatically.

-
Select the checkbox to enable the client to confirm the ticket resolution in emails and the Ticket Detail view. Select this option for your Request In Process status type. Otherwise, leave this checkbox unchecked.

When selected, enter a confirmation message.

-
Choose whether the custom fields display when this status type is selected for a ticket.

If you select specific, select the targeted custom fields to display.

- Click Save.
-
Repeat step 2 through step 16 to add any remaining status types.
Determine when a status type is applied to a ticket
After you create a status type, use the Options tab to select the condition under which the status is applied to a ticket. For example, when a ticket is reopened, Web Help Desk automatically changes the status to Open by default.
In the example below, the following status types are applied to tickets if the ticket's request type requires approval.
- When the ticket is submitted by a client, the system assigns the status type Request in process.
- If the ticket is approved, the system assigns the status type Request Approved.
- If the ticket is denied, the system assigns the status type Request Denied.
To determine when a status type is applied:
- After you create a status type, click Options.
-
In the Needs Approval Status Type field, select Request In Process.

-
In the Approved Status Type field, select Request Approved.

-
In the Approval Denied Status Type field, select Request Denied.

- Click Save.
Next task: Configure an approval process