Prepare for the database migration
After you enable FIPS 140-2 cryptography and complete the steps in the Getting Started Wizard, schedule and implement the appropriate procedures in your organization to prepare all stakeholders for the database migration.
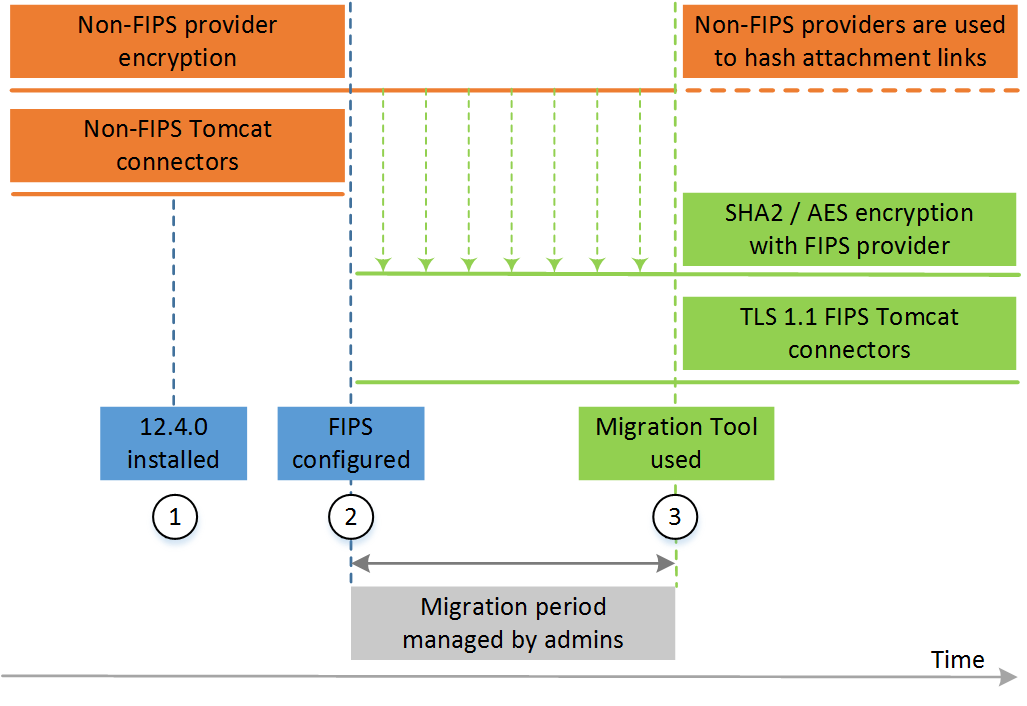
The following illustration provides an overview of the database migration milestones using the Password Security Migration Tool.
Install Web Help Desk 12.4.0 or later.
| Milestone | Completed Tasks |
|---|---|
| 1 |
Web Help Desk 12.4.0 or later is installed in your deployment. You scheduled a date to invalidate all tech and client passwords in your current Web Help Desk database stored with weaker cryptography and a date to verify system status using the Audit Tool. |
| 2 |
You configured a FIPS 140-2 cryptography provider in your Web Help Desk deployment. Web Help Desk begins using FIPS 140-2 cryptography for user passwords and a non-FIPS provider for hash attachment links and third-party connection passwords. All techs and clients are notified to log in to Web Help Desk before your scheduled date. |
| 3 |
The Web Help Desk Admin runs the Password Security Migration Tool. All non-migrated clients and techs using the non-FIPS provider are invalidated. These users are forced to change their password before they can log in and access the application. All third-party connection passwords are re-encrypted to AES with the FIPS provider. |
To prepare for the database migration:
-
Schedule the migration.
Select a date to invalidate all passwords stored in your current Web Help Desk database stored with weaker cryptography and a date to verify your system status.
-
Notify all techs and clients to log in to Web Help Desk.
Ensure that all clients and techs receive confirmation about the planned migration. Provide a deadline date and ample time for all users to proactively log in to Web Help Desk.
If your clients and techs do not log in to Web Help Desk by the deadline date, they will be forced to change their password after the migration before they can log in and access Web Help Desk.
-
Record your existing SolarWinds Integration configuration settings.
If you are connected to an external SolarWinds product (such as SolarWinds Network Performance Monitor [NPM], SolarWinds Server and Application Monitor [SAM], or SolarWinds Network Configuration Monitor [NCM] ), record your current configuration settings. All external SolarWinds integration passwords will be updated to FIPS 140-2 cryptography during the database migration.
-
Log in to Web Help Desk as an administrator.
- Click Setup and select SolarWinds Integration > SolarWinds Connection. A list of SolarWinds connections display.
- Double-click a connection.
- Record the connection information listed in the screen.
- Click Next.
- Record the filter settings listed on the screen.
- In the SolarWinds Integration menu, click SolarWinds Connection.
- Record the connection settings for any remaining connections.
-