Enable hardware health monitoring for SRM
When you add a storage array for which hardware health monitoring is supported, monitoring is automatically enabled. You can disable or enable an array or individual sensors, and set the critical and warning thresholds for each sensor where appropriate.
Enable or disable hardware health monitoring for an array
- Navigate to the array details page for the required array.
- Click Edit Array in the Array Management widget.
- Scroll down to the Hardware Health Polling checkbox and select or clear.
- Click Submit.
Enable or disable individual hardware health sensors
- Go to Settings > All Settings.
- Click Manage Hardware Sensors in the Node & Group Management panel.
- Use the Group By drop-down to display the sensors. For example, select Parent to list sensors by parent array.
- Select the sensors to be enabled or disabled, then click the Enable or Disable icon.
Use custom thresholds for hardware health
You can set custom thresholds to override default sensor rules for sensors that return values (such as fan speed and temperature sensors on Dell Equilogic arrays).
- Go to Settings > All Settings.
- Click Manage Hardware Sensors in the Node & Group Management panel.
- Use the Group By drop-down to display the sensors you require.
- Select a sensor, and click the Edit Thresholds icon.
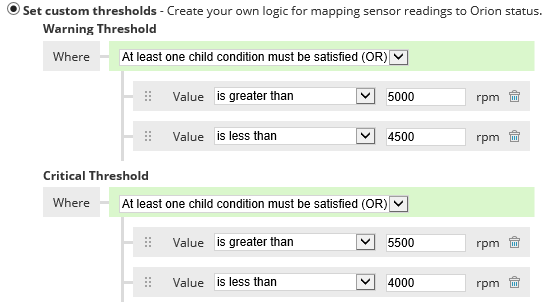
- Select Set Custom Thresholds.
This opens the Warning Threshold and Critical Threshold settings for the selected device.
Select Force to Up to permanently set a sensor status as UP. This option ignores data from the sensor.
- For each threshold, set the condition and value.
For example, for fan sensors you might want to be warned if the fan is spinning faster than 5000 rpm or slower than 4500 rpm, and given a critical warning if it rises above 5500 rpm or falls below 4000 rpm, so you would set up the following conditions.