Set up transaction monitoring
Many of the website applications you create and rely on today involve several steps or scripts working together to form a transaction, which must produce a certain output. This could be, for example, a user registering a new account, or a customer putting something in the shopping cart and checking out, etc.
Such a transaction may contain multiple steps and scripts, and span several pages on your site, and it is crucial that all of these steps work without problems.
Transaction monitoring provides a way to automatically test these site interaction synthetically so that these steps keep on working, by reproducing them at set intervals. If something fails in the transaction, you can receive an alert.
Curious to what this can do for you? Let’s look at a simple example, checking that a search term on Wikipedia yields the correct result. To get started:
-
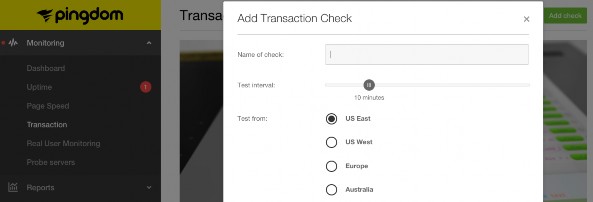
Click on Transaction under the Monitoring tab in the left-hand menu, then click Add check.
-
Now give your check a name and select how often you’d like this check to be performed. We recommend every 10 minutes, which is the default setting but you can perform the test as often as every 5 minutes, and as seldom as every 24 hours.
-
Select the test region you would like to perform the transaction monitor from. There are 4 available regions: US East, US West, Europe and Australia.
-
Once you click into the Check editor you are assisted by the autosuggestion wizard. See Transaction Check Tips & Tricks for further assistance what you can do.
Okay, now let’s try out this text together:
-
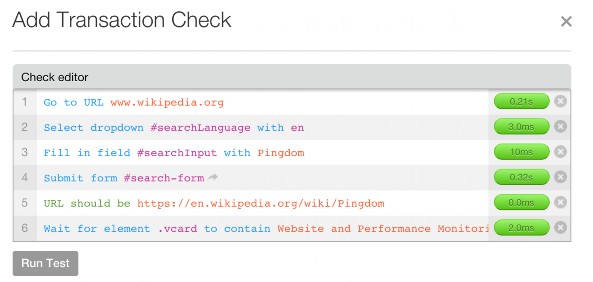
Click in the empty space for line 1 in the Check Editor – and magic ensues. First command is always one of the two displayed now. Double click the line Go to URL in the drop down menu. You can also just press enter. “Go to URL” now appears on line 1.
-
Now type in the URL you want the check to go to. In this example it’s www.wikipedia.org. Hit Enter and the Editor will automatically move down a line.
-
In the drop down menu that is displayed, choose ‘Select dropdown’ as the command, enter ‘#searchLanguage’ and type ‘en’ in the element portion of the command and hit Enter. This will save this line to the Editor and move to the blank line below. If the site has a dropdown menu like wikipedia does, the transaction monitor can open it and select an option, in this case the option is English, in the code of the site the CSS selector is named en so that’s what’ll show in the script.
-
Now select the command ‘Fill in Field’ and type
#searchInputas the element. Then typePingdomas the search term. -
On the next line, select ‘Submit form’ as the command and enter
#search-form. Instead of clicking the search button we use the Submit form functionality to submit the search, either will do really but we want to demonstrate capabilities here. -
Now we’ll add a validation check to make sure that the above command gives the appropriate result. To do this, select the ‘URL should be’ command and enter
https://en.wikipedia.org/wiki/Pingdom. -
Now we’ll select the ‘Wait for element’ command and make the element ‘.vcard’, which we want to contain the phrase ‘Website and Performance Monitoring Company’. This is the interesting part of verification, what we’ve done here is found the part of the Pingdom article on Wikipedia that has some company information, found the CSS selector, and verified that it contains the correct text.
-
Finally click Run Test to set it in motion!
Just as with the HTTP check you can turn on notifications, so if anything fail in your transaction you will be alerted.
Navigation Notice: When the APM Integrated Experience is enabled, Pingdom shares a common navigation and enhanced feature set with other integrated experience products. How you navigate Pingdom and access its features may vary from these instructions.