Push the updates with PowerShell scripts
After you create your PowerShell scripts, you can push the scripts to your managed systems using one of the following methods:
- Push PowerShell scripts with updates using Update Management
- Push PowerShell scripts without updates using Update Management Wizard
- Push PowerShell scripts with updates using the Update Management Wizard
Push PowerShell scripts with updates using Update Management Wizard
Use this installation method to push PowerShell scripts with specific updates to your managed systems.
- Create a new Windows PowerShell script and save the file in PS1 format.
- Log in to the Patch Manager Administrator Console as an administrator.
-
In the navigation pane, select an installation method.
To install the script with your software updates, expand Enterprise > Update Services > your_WSUS_server > Updates and select the updates in the center pane that you want to include with the script.
To install the script without your software updates, select one or more computers or computer groups in Microsoft Windows Network or Managed Computers that require the script.
- In the Actions pane, click Update Management.
-
In the Pre-Update Management Reboot Options box, select the options you want to execute before the updates are installed on the managed computers.
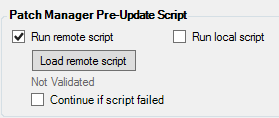
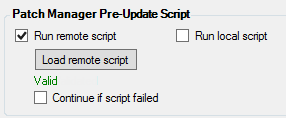
You can select remote or local scripts. Remote scripts are executed on each client machine listed in the target scope using PowerShell Remote. These scripts use the client machine credentials from the Credential Ring. Local scripts are executed on the Application Server.
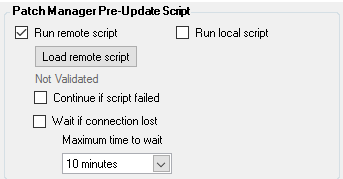
To run a PowerShell script before Patch Manager installs the updates:
-
Select a remote or local script to run.
For example, select Run remote script.
-
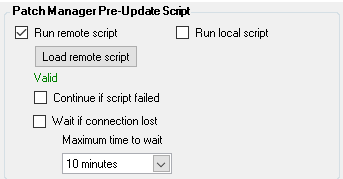
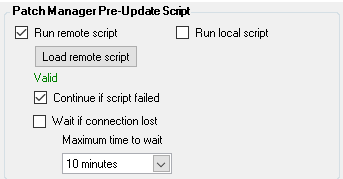
Click Load remote script, select the targeted PowerShell script, and then click Validate.
Patch Manager checks and validates the script. If the script code is correct, Valid displays in the window. If the script code is not valid, Not Valid displays in the window.
-
(Optional) Select Continue if script failed to continue the update procedure if the PowerShell script fails.
-
(Optional) Select Wait if connect lost if PowerShell commands exist in the script that can temporarily break the connect between Patch Manager and the client. If you select this option, select a maximum time to wait before Patch Manager reconnects to the client.
For example, if you select Always reboot in the Pre-Update Management Options, select Wait if connection lost and select an appropriate wait time just in case the reboot requires an extended amount of time.
If you do not select this option and a reboot command exists, the task may fail.
This option assists with executing a script and a reboot command. For example, if you select Always reboot and select Wait if connection lost, the reboot may require an extended amount of time to execute.
-
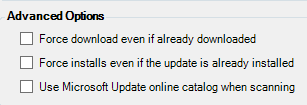
(Optional) Select any advanced options.
-
-
Select the options you want to execute before the updates are installed on the managed computers.
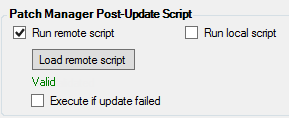
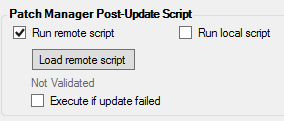
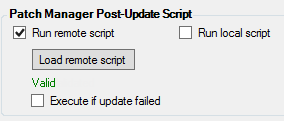
To run a PowerShell script after Patch Manager installs the updates:
-
Select Run remote script or Run local script.
For example, select Run remote script.
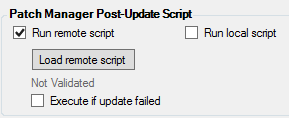
-
Click Load remote script, select the targeted PowerShell script, and then click Validate.
Patch Manager checks and validates the script. If the script code is correct, Validate displays in the window. If the script code is not valid, Not Valid displays in the window.
-
(Optional) Select Execute if update failed.
-
- Click OK.
- In the Task Options Wizard, locate and add the targeted computers, and click Next.
- Complete the wizard to push the scripts and updates to the managed computers.
Push PowerShell scripts without updates using the Update Management Wizard
Use this installation method when you want to push your PowerShell scripts without a fixed list of updates to your managed systems.
- Create a new script using Windows PowerScript ISE and save the file in PS1 format.
- Log in to the Patch Manager Administrator Console as an administrator.
-
In the navigation pane, select an installation method.
To install the script without your software updates, select one or more computers or computer groups in Microsoft Windows Network or Managed Computers that require the script.
- In the Actions pane, click Update Management Wizard.
-
Select Create custom dynamic update management rules, and click Next.

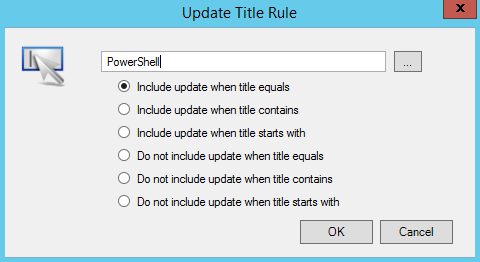
- In the Update Management Wizard, click Add Rule > Update Title Rule.
-
In the field, enter PowerShell and select Include update when title equals, and then click OK.
-
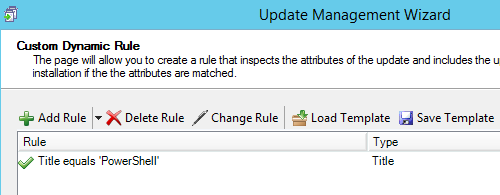
Click Add Rule.
The rule is added to the window.
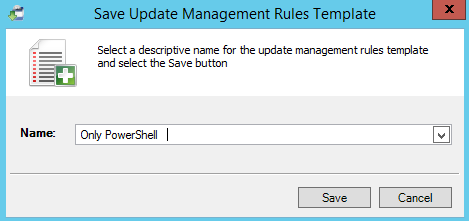
- Click Save Template.
-
Add a descriptive template name, and then click Save.
The template is saved for future use.
- Click Next in the Update Management Wizard window.
-
Select the Pre-Update and Post-Update Management reboot options that apply to the update.
If a reboot before or after the update is not required, select Do not reboot for both options.
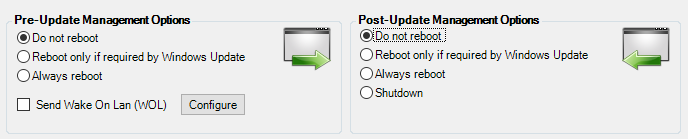
If a reboot before or after the update is required, select the pre- and post-reboot options.
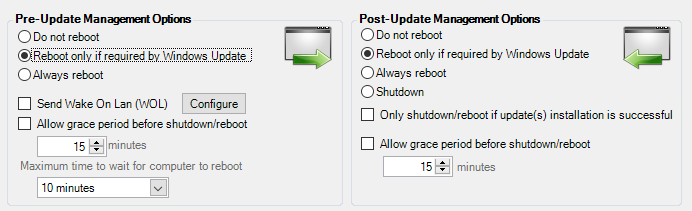 The maximum grace period is 1440 seconds (24 hours). Be sure to provide ample time for all users to complete their critical tasks and log off before their computers automatically reboot.
 -
If you selected pre- or post-update reboot options, enter an end user message that displays on the targeted computers. Be sure to include the grace period time setting in the message.
For example:

-
Click Finish to complete the wizard and push the scripts to the managed computers.
Push additional scripts
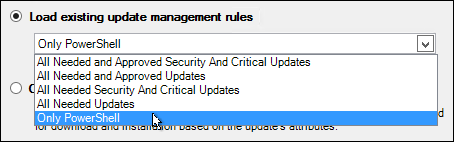
When you need to push another PowerShell script to a managed computer, open the Update Management Wizard, select Load existing update management rules, and complete the wizard.
Push PowerShell scripts with updates using the Update Management Wizard
Use this installation method when you want to push PowerShell scripts with a fixed list of updates based on specific criteria. For example, downloading and installing all needed and approved security and critical updates.
- Create a new script using Windows PowerScript ISE and save the file in PS1 format.
- Log in to the Patch Manager Administrator Console as an administrator.
-
In the navigation pane, select an installation method.
To install the script with your software updates, expand Enterprise > Update Services > your_WSUS_server > Updates and select the updates in the center pane that you want to include with the script.
- In the Actions pane, click Update Management Wizard.
- Select a fixed list of updates or a dynamic list of updates based on specific criteria, and click Next.
-
Add a custom dynamic rule that includes updates based on selected criteria.
Otherwise, accept the selected rules, and click Next.
-
Select the options you want to execute before the updates are installed on the managed computers.
You can select remote or local scripts. Remote scripts are executed on each client machine listed in the target scope using PowerShell Remote. These scripts use the client machine credentials from the Credential Ring. Local scripts are executed on the Application Server.
To run a PowerShell script before Patch Manager installs the updates:
-
Select the Pre-Update and Post-Update Management reboot options that apply to the update.
If a reboot is not required before or after the update, select Do not reboot for both options.
If a reboot is required before or after the update, select the pre- and post-reboot options.
The maximum grace period is 1440 seconds (24 hours). Be sure to provide ample time for all users to complete their critical tasks and log off before their computers automatically reboot. -
Select Run remote script or Run local script.
For example, select Run remote script.
-
Click Load remote script, select the targeted PowerShell script, and then click Validate.
Patch Manager checks and validates the script. If the script code is correct, Valid displays in the window. If the script code is not valid, Not Valid displays in the window.
-
(Optional) Select Execute if update failed.
-
Select the approval options as required.

-
Select any advanced options as required. The option shown below is selected by default.

An exclusive update is an update that must be installed individually, outside of a batch of other updates. This typically includes updates such as operating system service packs, .NET Framework service packs and redistributables, and updates to the Component-based Servicing Stack. See the table below for option details.
Exclusive update option Description Ignore exclusive updates when matched and install updates Installs all updates and ignores the exclusive update. If an exclusive update is matched, only install the exclusive update Installs only the exclusive update and ignores all other applicable updates. If an exclusive update is matched, fail the installation process Fails the installation process if an older update (based on its KB article number) supersedes the latest update. For example, decline KB4088825 if it is superseded by KB4093432.
-
-
Select the options you want to execute after the updates are installed on the managed computers.
To run a PowerShell script after Patch Manager installs the updates:
-
Select Run remote script or Run local script.
For example, select Run remote script.
-
Click Load remote script, select the targeted PowerShell script, and then click Validate.
Patch Manager checks and validates the script. If the script code is correct, Validate displays in the window. If the script code is not valid, Not Valid displays in the window.
- (Optional) Select Execute if update failed.
-
-
If you selected pre- or post-update reboot options, enter an end user message that displays on the targeted computers. Be sure to include the grace period time setting in the message.
For example:
- Click Finish to complete the wizard and push the scripts and updates to the managed computers.