Discover your network for the SolarWinds Platform with the Discovery Wizard
This SolarWinds Platform topic applies only to the following products:
Hybrid Cloud Observability Essentials — Hybrid Cloud Observability Advanced
IPAM — LA — NAM — NCM — NPM — SAM — SCM — UDT — VMAN — VNQM
 See this video: Creating a Manual Discovery Job.
Before you begin:
- Enable the networking devices you want to monitor for SNMP.
- Enable Windows devices for WMI.
The first time you discover your network, SolarWinds recommends adding a limited number of edge routers or switches, firewalls and load balancers (if you have them), and critical physical or virtual servers and hosts.
Add nodes with high latency one at a time.
-
If the Discovery Wizard does not start automatically after configuration, click Settings > Network Discovery.
-
Click Add New Discovery, and then click Start.
-
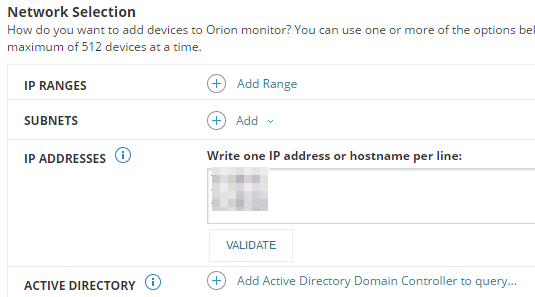
On the Network panel, if this is your first discovery, add a limited number of IP addresses.
As you scale your implementation, you can use the following scanning options.
Option Description IP Ranges Use this option when you want to scan one or more IP ranges.
If you have many IP ranges to scan, consider adding multiple discovery jobs rather than including all ranges in a single job.
Subnets Use this option to scan every IP address in a subnet. SolarWinds recommends scanning at most a /23 subnet (512 addresses max).
Scanning a subnet returns everything that responds to ping, so we recommend only scanning subnets where the majority of devices are objects you want to monitor.
IP Addresses Use this option for a limited number of IP addresses that do not fall in a range.
Since a network discovery job can take a long time to complete, SolarWinds recommends using this option when you are first starting out.
Active Directory Use this option to scan an Active Directory Domain Controller.
Using Active Directory for discovery is particularly useful for adding large subnets because the discovery can use the devices specified in Active Directory instead of scanning every IP address.
-
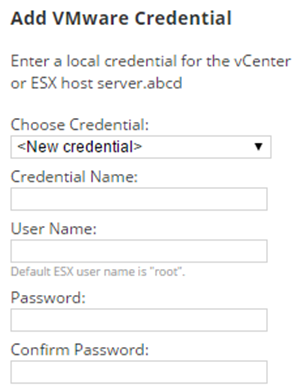
On the Virtualization panel, to discover VMware vCenter or ESX hosts on your network:
-
Check Poll for VMware, and click Add vCenter or ESX Credential.
-
Select <New credential> and provide required information.
If you do not add the host credentials, Orion still discovers the virtual machines (VMs) on the host. However, you will not be able to see the relationships mapped between the VMs and hosts.
-
-
If the Agents panel appears, you enabled the Quality of Experience (QoE) agent during installation. The QoE agent monitors packet-level traffic. If there are any nodes using agents, select the Check all existing nodes check box.
This setting ensures that any agents you deploy, including the one on your SolarWinds Platform server, are up-to-date. If there are no nodes using agents, you can leave this option unchecked.
-
If the Configuration panel appears, add SSH or Telnet credentials. These are necessary for performing configuration backups and restores, monitoring configuration changes or checking compliance. See Protocols NCM uses to transfer configurations.
-
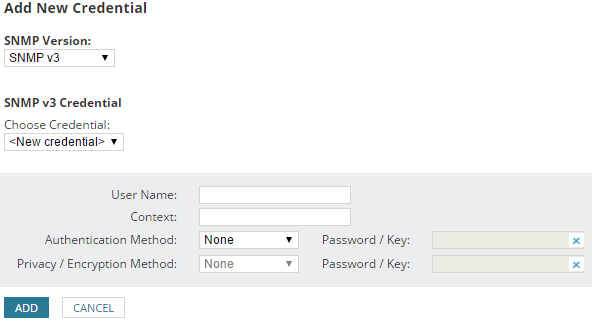
On the SNMP panel:
-
If all devices on your network require only the default SNMPv1 and SNMPv2 public and private community stings, click Next.
-
If any device on your network uses a community string other than public or private, or if you want to use an SNMPv3 credential, click Add Credential and provide the required information.
-
-
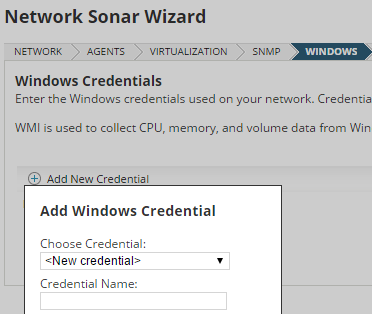
On the Windows panel, to discover WMI or RPC-enabled Windows devices, click Add New Credential and provide the required information.
SolarWinds recommends that you monitor Windows devices with WMI instead of SNMP.
-
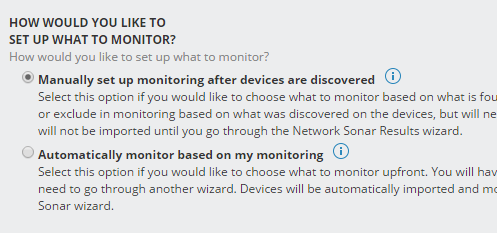
On the Monitoring Settings panel, SolarWinds recommends manually setting up monitoring the first time you run discovery. This allows you to review the list of discovered objects and select the ones you want to monitor.
When you scale monitoring, you can configure discovery to automatically start monitoring objects it finds.
-
On the Discovery Settings panel, click Next.
-
Accept the default frequency and run the discovery immediately.

Discovery can take anywhere from a few minutes to a few hours, depending on the number of network elements the system discovers.