File Property monitor
The File Property monitor detects modifications made to a file and alerts you when these changes exceed a predetermined value.
You can use the File Property monitor to:
- Verify the existence of a file
- Determine whether a file has been modified
- Determine whether the size of a file has changed
- Detect changes in a file's checksum value
The File Property monitor tests the existence and properties of a file at regular intervals to detect any changes outside the boundaries you define. When a change is encountered, the monitor can trigger a Failure Notification alert, an Information alert, or both.
Configuring Information alerts is an optional process. You can configure the monitor to send an Information alert but remain in an Up state even if a change is detected by separating alerting actions from monitoring actions. This gives you maximum flexibility to configure each File Property monitor to meet your specific needs depending on the type of file being tested.
Create a File Property monitor
- Click Devices in the toolbar.
- Locate and click the targeted device you want to monitor.
-
In the toolbar, click Add > Add New Monitor.
- In the Select Monitor menu, File Property.
-
Complete the fields in the Identification section.

-
Under Identification, enter a monitor name using up to 64 characters.
This name will appear in the Monitors List, Monitor Status, Logs pages, and your reports.
You can change this name later, if necessary. ipMonitor does not use this field to internally identify this monitor.
-
Select Enabled to enable the monitor.
When enabled, the monitor tests the specified resource using the settings you enter under Test Parameters. You can disable the monitor later if required.
- (Optional) Select Store Monitor Statistics for Recent Activity and Historical Reports to enable this functionality.
-
-
Complete the fields in the Test Parameters section.
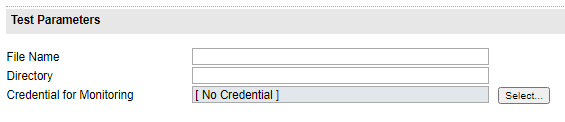
- In the File Name field, enter the name of the file you want to monitor.
-
In the Directory field, enter the Local or UNC path to the file.
An example UNC path would be
\\ServerName\ShareName.An example of a local path would be
C:\\Windows\. -
(Optional) Select a credential for monitoring. When selected, ipMonitor uses the credential account and password information to authenticate to the target machine and test the status of the drive or share.
-
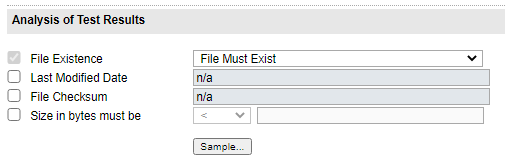
Complete the fields and options in the Analysis of Test Results section.
-
Click the File Existence drop-down menu and select an option.
Select File Must Exist to enable the monitor test to succeed if the file is detected.
Select File Must Not Exist to enable the monitor test to succeed if the file is not detected.
Select File May Exist to enable the monitor test to succeed whether or not the file is detected. This setting is recommended to receive alerts for file changes that may not always be present—for example, a file located on a removable USB drive.
- (Optional) Select the Size in bytes must be checkbox and select the file size requirements.
-
-
Under Timing, configure the fields for the monitor testing states.
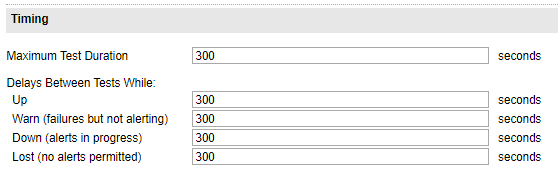
- In the Maximum Test Duration field, enter the maximum test duration rate (in seconds) that the monitor times out before the test is considered a failure.
-
In the remaining fields, enter the number of second between each test while the monitor is in an OK state (Up), a failed state while alerts are processed (Down), and a failed state and the maximum number of alerts have been processed (Lost).
In the Lost state, no additional failure alerts are processed. However, a recovery notification is sent if the monitor recovers.
-
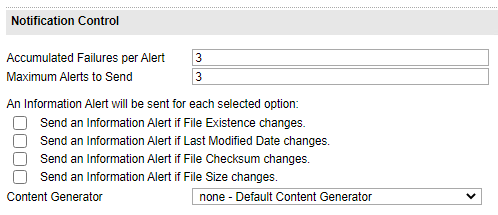
Under Notification Control, complete the fields to determine how many test failures must occur before an alert is sent.
-
Enter the number of test failures that occur for each alert before ipMonitor generates an alert for the monitor.
Each time a monitor test fails during a Warn state, a sequential failure count incremented against this value. A successful test resets the accumulated failure count to zero.
The default option is 3.
-
Enter the maximum number of alerts to send before the monitor enters a Lost state.
A successful test while in the Down or Lost state resets the alert sequence.
-
Assign a notification to the monitor to send an information alert if the:
- File existence changes
- Last modified date changes
- File checksum changes
- File size changes
- Click the Content Generator drop-down menu and select an action to be applied to each SNMP trap and passed along to each processed action.
-
-
Under Recovery Parameters, complete the fields to indicate the corrective action used to automatically restore a resource using the External Process Recovery, Reboot Server Recovery, or Restart Service Recovery action.
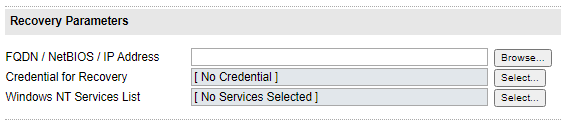
- Enter the Fully Qualified Domain Name (FQDN), NetBIOS, or IP Address of the machine hosting the service that needs a restart or the machine that needs a restart. You can also click Browse to locate and select the machine.
- Select the set of credentials used by the recovery alert. You can select a specific credential to execute recovery alerts that require access to restricted resources, such as Reboot Server, Restart Service, or External Process.
- Select the list of services to restart on the target machine specified in the FQDN/NetBIOS/IP Address field. This field is only required for the Restart Service alert. If a service has dependencies, select all dependent services.
- Click OK.
Test results
Test results include the current available space on the monitored share. Available space is reported in gigabytes (GB) and megabytes (MB).